1. Introduction and Overview
The Stelpro Concerto Programmable Thermostat (Model STF362P) is designed for precise control of electric radiant in-floor heating systems. This thermostat offers advanced scheduling, energy efficiency, and an intuitive interface for optimal comfort. It is compatible with 120V, 208V, and 240V systems and includes a 15-foot floor sensor for accurate temperature readings. An integrated Class A GFCI provides enhanced safety for your heating installation.
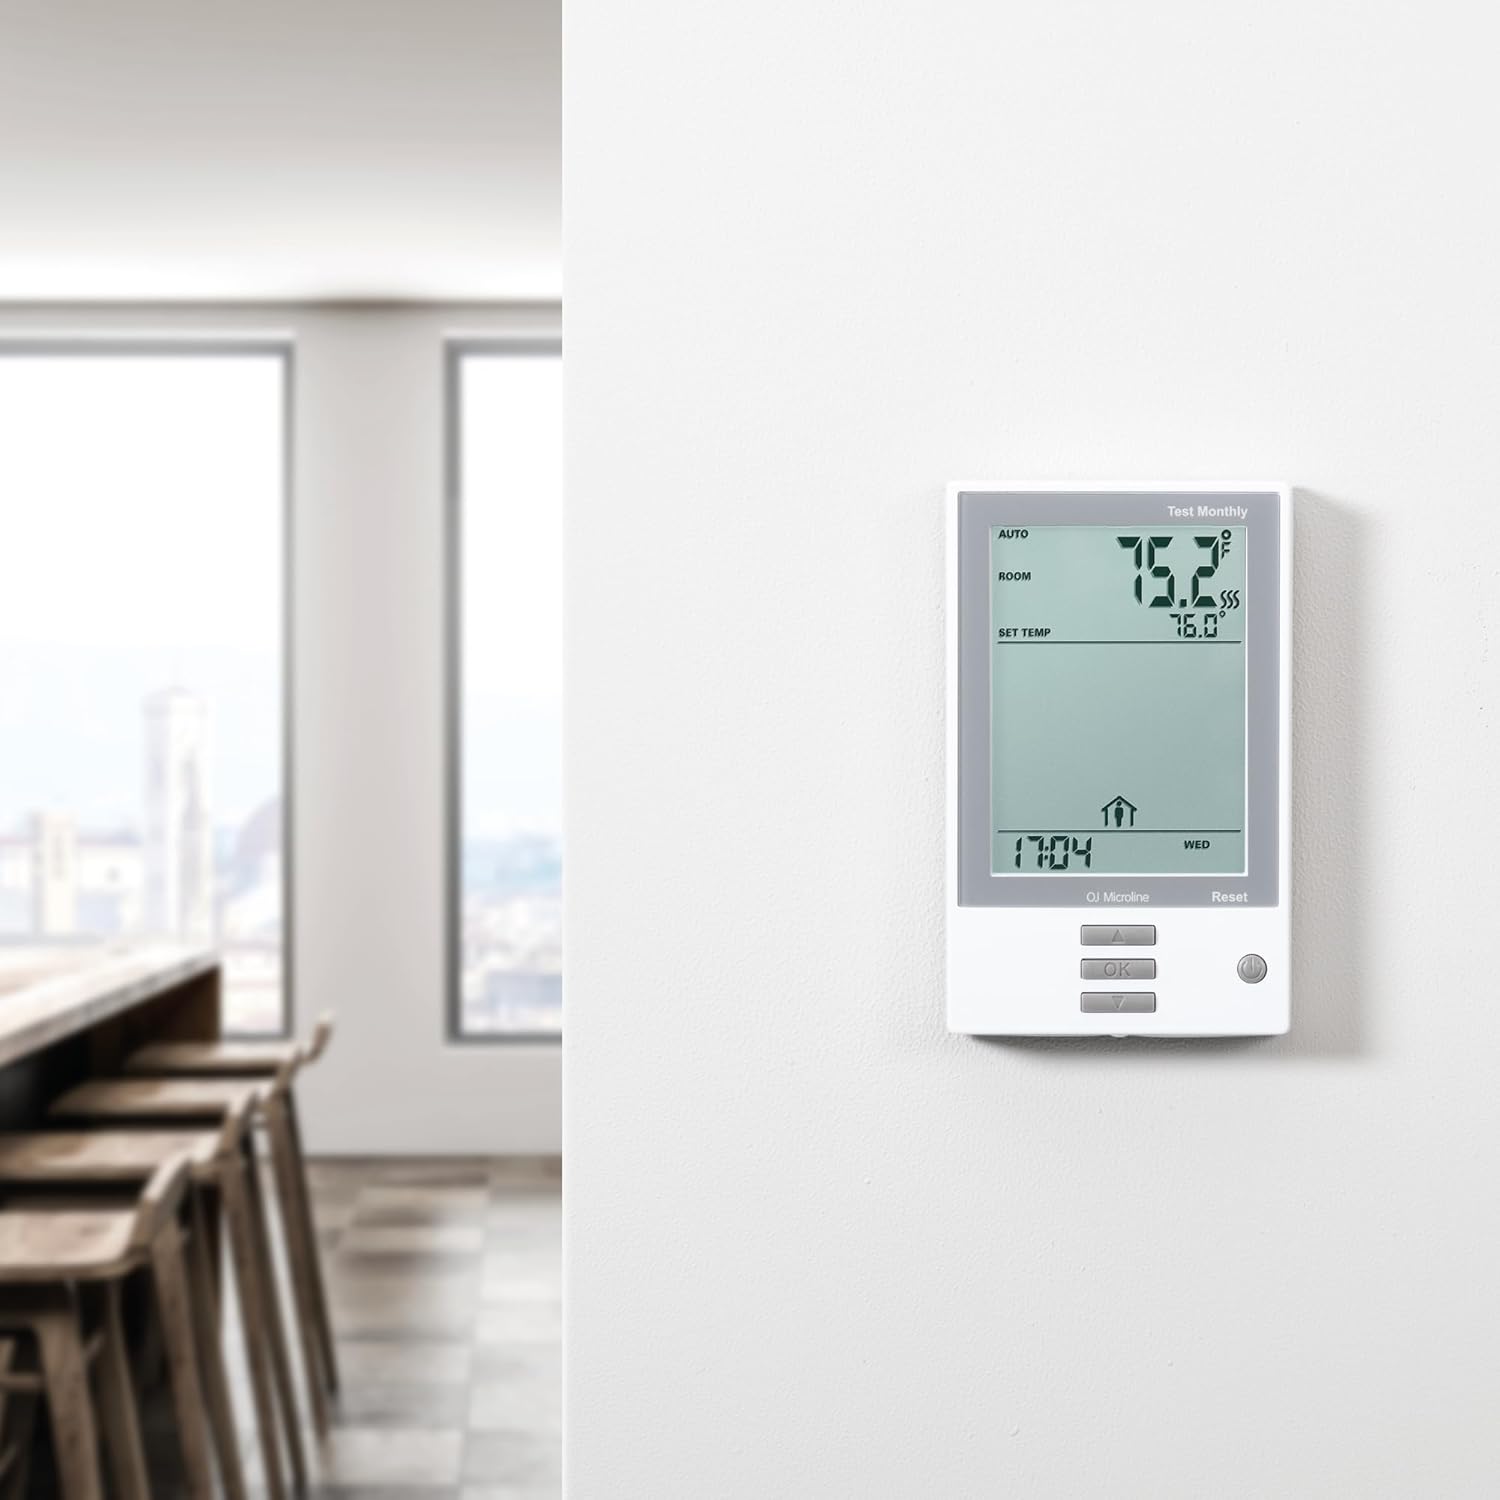
Image 1.1: Stelpro Concerto Thermostat installed on a wall, showcasing its sleek design in a living space.
2. Important Safety Information
IMPORTANT SAFETY INSTRUCTIONS: Read all instructions before installing or operating this thermostat. Failure to follow these instructions may result in electric shock, fire, or property damage.
- Installation must be performed by a qualified electrician in accordance with local and national electrical codes.
- Disconnect power at the main service panel before installation or any maintenance to prevent electric shock.
- This thermostat includes an integrated Class A GFCI (Ground Fault Circuit Interrupter) for protection against electrical hazards, especially in moisture-prone areas like bathrooms. Do not bypass or disable the GFCI function.
- Do not immerse the thermostat or floor sensor in water or any other liquid.
- Ensure all wiring connections are secure and properly insulated.
3. Package Contents
Verify that all items are present in the package:
- Stelpro Concerto Programmable Thermostat (STF362P)
- 15-foot Floor Sensor
- Mounting Screws
- User Manual (this document)
4. Setup and Installation
The installation of the Stelpro Concerto Thermostat requires electrical knowledge. It is strongly recommended that a qualified electrician performs the installation.
- Power Disconnection: Before starting any work, turn off the power to the heating system at the main electrical panel to avoid electric shock.
- Mounting Location: Choose a suitable location for the thermostat, typically in a standard electrical box. Avoid areas exposed to direct sunlight, drafts, or heat sources that could affect temperature readings.
- Wiring: Connect the thermostat wires to the heating system and power supply according to the detailed wiring diagram provided in the complete installation guide (not included in this manual). This thermostat supports 120V, 208V, and 240V systems. Ensure all connections are tight and secure.
- Floor Sensor Installation: Install the 15-foot floor sensor within the heated floor area. Ensure the sensor cable is protected and properly embedded in the floor or conduit as per local codes. The sensor should be placed equidistant between two heating cables.
- Secure Thermostat: Carefully push the thermostat into the electrical box and secure it with the provided mounting screws.
- Power Restoration: Once installation is complete and all connections are verified, restore power at the main electrical panel.

Image 4.1: Side view of the Stelpro Concerto Thermostat, showing its dimensions for installation planning.
Warning: Improper installation can lead to electrical hazards or damage to the heating system. Always consult a qualified electrician.
5. Operating Instructions
The Stelpro Concerto Thermostat features an intuitive interface for daily operation.

Image 5.1: Front view of the Stelpro Concerto Thermostat display, showing current room temperature, set temperature, time, and day.
- Power Button: Press the power button (located on the bottom right) to turn the thermostat ON or OFF.
- Temperature Adjustment: Use the UP (▲) and DOWN (▼) buttons to adjust the desired set temperature. The new setpoint will be displayed temporarily.
- Mode Selection: The thermostat can operate in different modes (e.g., AUTO for programmed schedule, ROOM for ambient air temperature control, FLOOR for floor temperature control). Refer to the full manual for detailed instructions on how to cycle through and select operating modes.
- GFCI Test: The integrated Class A GFCI has a test light. Press the 'Test' button (if available, or follow on-screen prompts) monthly to ensure proper function. If the GFCI trips, the heating will stop. Reset it by pressing the 'Reset' button.
- Display Information: The large backlit LCD displays the current room or floor temperature, the set temperature, the current time, and the day of the week.
6. Programming
The Stelpro Concerto thermostat allows for intuitive programming to optimize your heating schedule and energy consumption.
- Scheduling Events: Program up to four weekday events and two weekend events to automatically adjust the temperature based on your daily routine. This helps maintain comfort while minimizing energy use when heating is not required.
- Adaptive Start: The adaptive start function learns how long it takes to heat your floor to the desired temperature. It will activate the heating system in advance to ensure your desired temperature is reached precisely at the scheduled time, not after.
- Accessing Programming Menu: To set the time, day, and heating schedules, typically press and hold the 'OK' button or a dedicated 'Menu' button to enter the programming settings. Follow the on-screen prompts and use the UP/DOWN buttons to navigate and adjust values. Press 'OK' to confirm selections.
- Temporary Override: You can temporarily override the programmed schedule by manually adjusting the temperature. The thermostat will revert to the schedule at the next programmed event.
7. Maintenance
The Stelpro Concerto Thermostat requires minimal maintenance to ensure optimal performance and longevity.
- Cleaning: Clean the thermostat's exterior regularly with a soft, damp cloth. Do not use abrasive cleaners, solvents, or chemical sprays, as these can damage the display or casing.
- GFCI Testing: Perform a monthly test of the integrated Class A GFCI. Press the 'Test' button on the thermostat. The thermostat should trip, and the heating will stop. A test light may illuminate. Press the 'Reset' button to restore power. If the GFCI does not trip or fails to reset, contact a qualified electrician immediately.
- Firmware Updates: Periodically check the Stelpro official website for any available firmware updates for your thermostat model. Follow the instructions provided by the manufacturer for any update procedures.
8. Troubleshooting
Refer to the table below for common issues and their potential solutions.
| Problem | Possible Cause | Solution |
|---|---|---|
| Thermostat display is blank. | No power supply to the unit. | Check the circuit breaker for the heating system. Ensure power is restored. Verify wiring connections. |
| Floor not heating or heating inconsistently. | GFCI tripped, incorrect operating mode, set temperature too low, or heating element issue. | Check and reset the GFCI. Verify the thermostat is in the correct heating mode (e.g., AUTO, FLOOR) and the set temperature is above the current floor temperature. If the issue persists, consult a qualified electrician. |
| Inaccurate temperature reading. | Faulty floor sensor or improper sensor placement. | Ensure the floor sensor is correctly installed and not damaged. If the sensor is suspected to be faulty, it may need replacement. Contact support. |
| Thermostat not responding to button presses. | Temporary software glitch or unit lock. | Try performing a soft reset (refer to the full manual for specific reset instructions, often a small reset button or power cycle). If the issue continues, contact technical support. |
| GFCI trips frequently. | Ground fault in the heating system or wiring. | This indicates a serious electrical issue. Immediately disconnect power and contact a qualified electrician to diagnose and repair the fault. Do not attempt to bypass the GFCI. |
9. Specifications
Key technical specifications for the Stelpro Concerto Programmable Thermostat (STF362P):
- Brand: Stelpro
- Model Name: Concerto Prog
- Model Number: STF362P
- Voltage Compatibility: 120V / 208V / 240V
- Maximum Power: Up to 3600 Watts
- GFCI: Integrated Class A
- Display Type: LCD (Liquid Crystal Display)
- Control Type: Button Control
- Material: Plastic
- Special Features: Clock Display, Lighted Display, Programmable, Temperature Display
- Dimensions (H x W x D): Approximately 4.72 inches (129 mm) x 2.95 inches (75 mm) x 0.80 inches (20.4 mm)
- Included Sensor: 15-foot Floor Sensor
10. Warranty and Technical Support
This Stelpro Concerto Programmable Thermostat is backed by a 3-year manufacturer's warranty. This warranty covers defects in material and workmanship under normal use.
For warranty claims, technical assistance, or further support regarding your thermostat, please contact Stelpro customer service or visit their official website. Keep your proof of purchase for warranty validation.
Stelpro Official Website: www.stelpro.com