1. Introduction
This manual provides detailed instructions for the assembly, operation, and maintenance of your Korfile 59 Inch L Shaped Computer Desk with Power Outlets, Model CD-026. Please read this manual thoroughly before assembly and use to ensure proper function and safety.
2. Safety Information
Adherence to the following safety guidelines is crucial for preventing injury and damage to the product:
- Always assemble the desk on a stable, level surface.
- Use appropriate tools and follow the included manual for safe assembly.
- Do not overload the desk beyond its maximum weight capacity of 180 pounds (81.6 kg).
- Keep the power outlets and USB ports away from water and other liquids to prevent electrical hazards.
- Always unplug the desk from the power source when not in use or when performing maintenance.
- Ensure the desk is properly anchored to the wall or floor if necessary to prevent tipping, especially in households with children or pets.
3. Package Contents
Before beginning assembly, verify that all components listed below are present and undamaged. If any parts are missing or damaged, contact customer support.
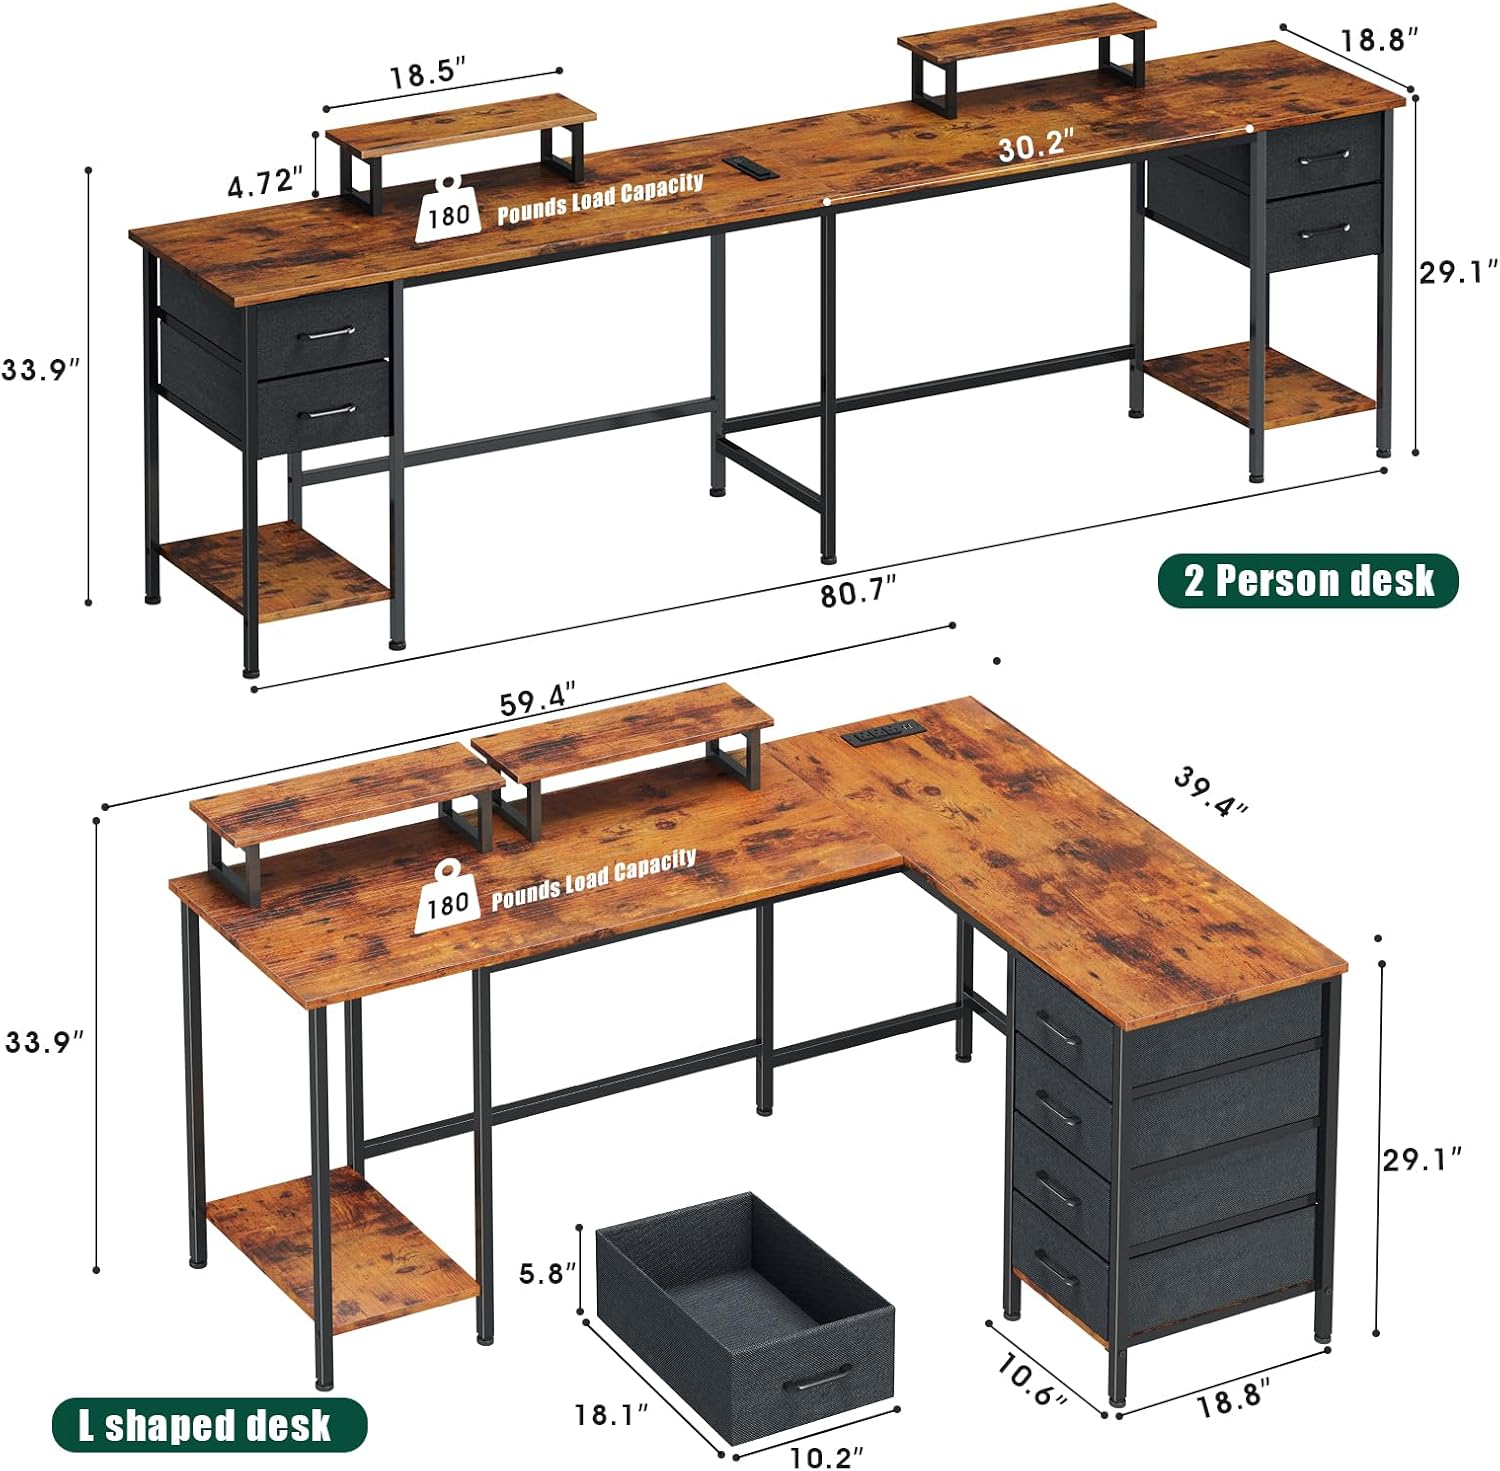
Figure 3.1: All components included in the package.
- Desk Panels (Main, Side, Corner)
- Metal Frame Legs and Support Bars
- 4 Fabric Drawers
- 2 Movable Monitor Stands
- Integrated Power Outlet Strip (3 AC outlets, 2 USB ports) with 6.5 ft power cord
- Assembly Hardware (screws, bolts, nuts, Allen wrench)
- Adjustable Foot Pads
- Instruction Manual
4. Assembly Instructions
Follow these steps carefully for proper assembly. It is recommended to have a helper for certain stages.
4.1. Preparation
- Clear a spacious area for assembly.
- Lay out all components and hardware, verifying against the package contents list.
- Keep the included Allen wrench and any other necessary tools readily available.
4.2. Frame Assembly
- Attach the adjustable foot pads to the bottom of all metal frame legs.
- Assemble the main desk frame sections using the provided screws and support bars. Do not fully tighten screws until all parts are aligned.
4.3. Desk Panel Installation
- Carefully place the desk panels onto the assembled frame. Ensure all pre-drilled holes align.
- Secure the desk panels to the frame using the appropriate screws. Fully tighten all screws on the frame and panels.
4.4. Drawer Unit Assembly and Placement

Figure 4.1: Fabric drawers for storage.
- Assemble the fabric drawers by unfolding them and inserting the bottom panel.
- The desk offers flexible installation options for the drawer unit. You can configure the desk as an L-shape or a long, straight desk. The drawer unit can be placed on either side of the L-shape or at one end of the long desk.
- Slide the assembled drawers into the designated compartments within the desk frame.
4.5. Monitor Stands and Power Outlets
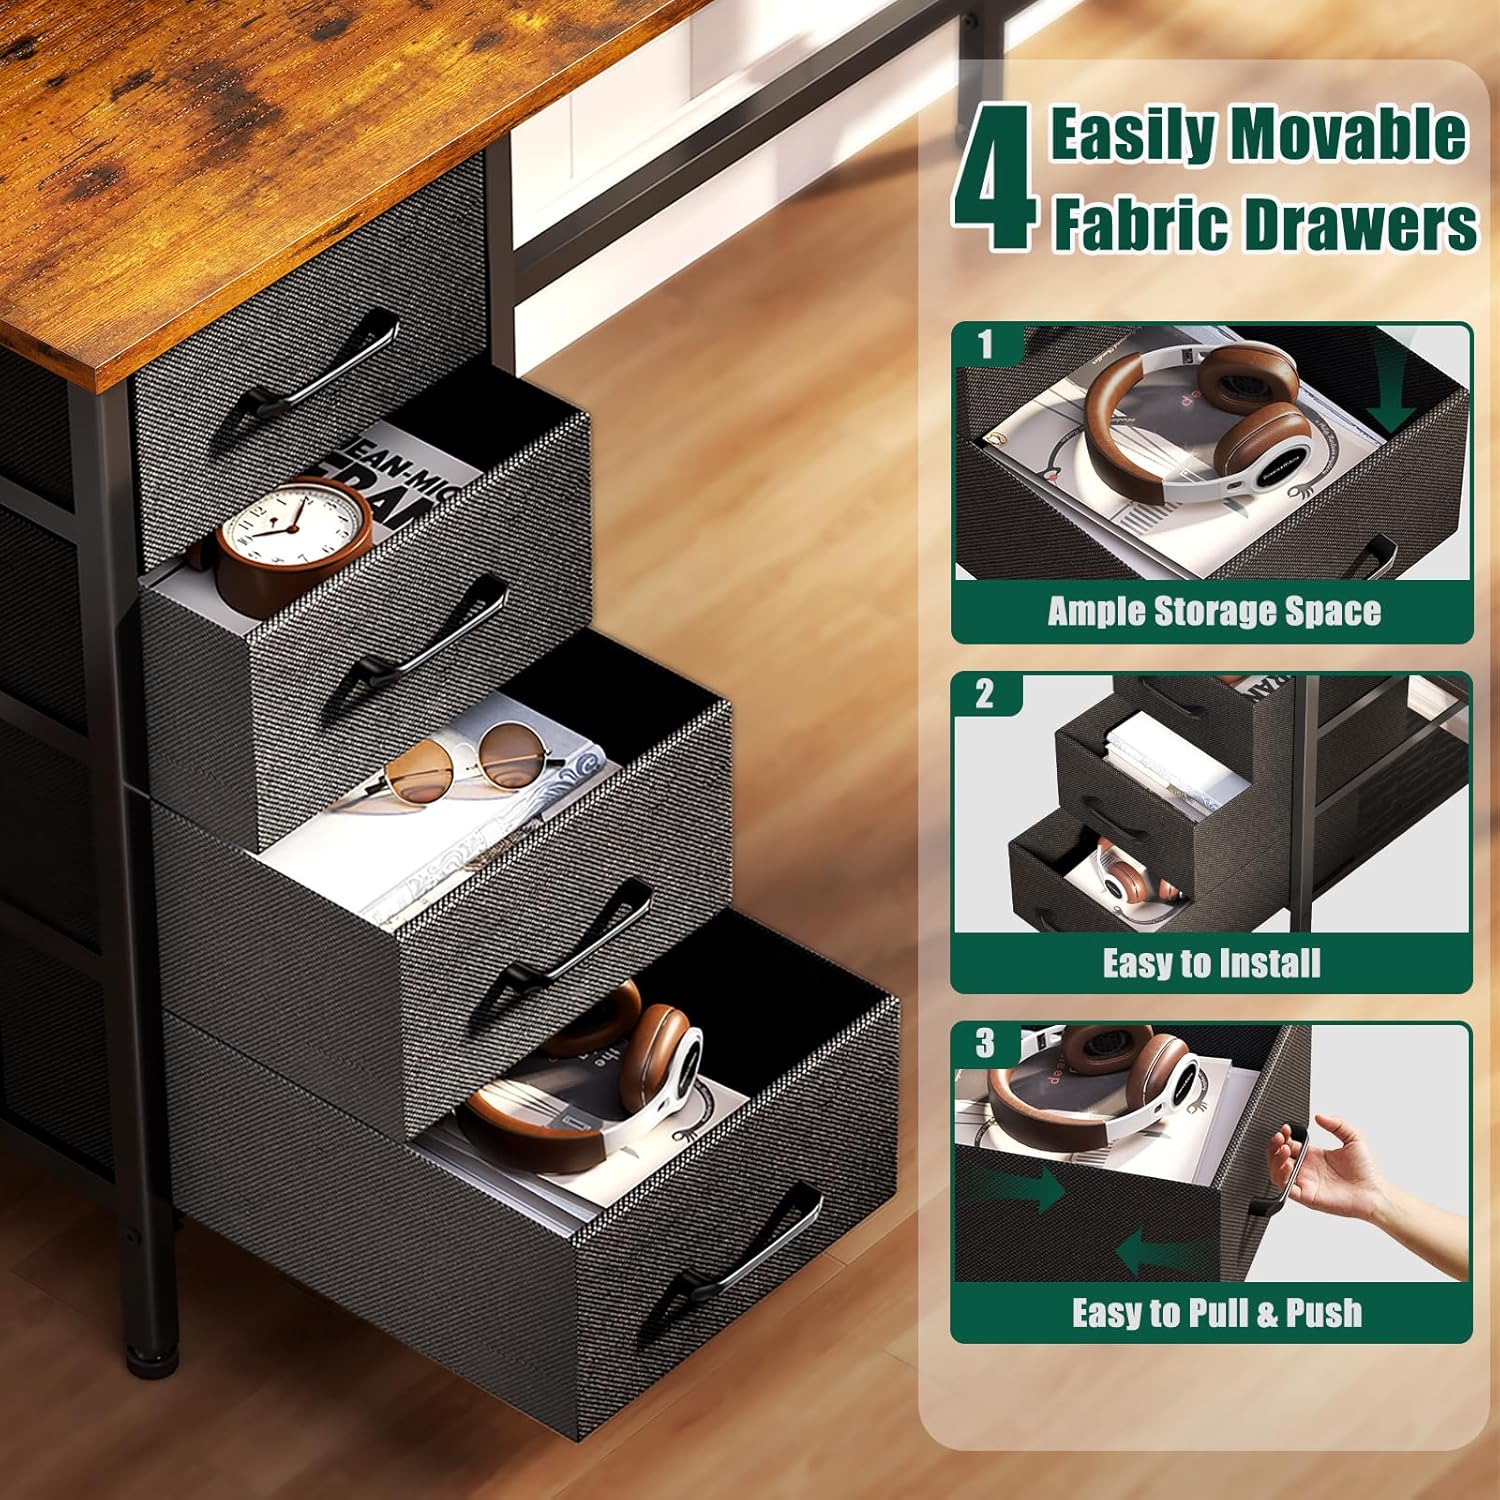
Figure 4.2: Integrated power outlets and USB ports.
- Place the two movable monitor stands on the desk surface in your desired positions. These stands are not fixed, allowing for customization.
- Ensure the integrated power outlet strip is securely seated in its designated slot on the desk surface.
- Plug the desk's power cord into a grounded wall outlet.

Figure 4.3: Flexible L-shaped or 2-person desk configuration.
5. Features Overview
- Flexible Configuration: The desk can be assembled into an L-shape for corner placement or as a long, straight desk suitable for two users. The drawer unit's position is also reversible.
- Integrated Power Outlets: Equipped with 3 standard AC power outlets and 2 USB charging ports, providing convenient access to power for electronic devices directly on the desk surface.
- Movable Monitor Stands: Two independent monitor stands allow for ergonomic placement of displays, helping to reduce neck and back strain.
- Adjustable Storage Drawers: Four durable non-woven fabric drawers offer ample storage space for office supplies, documents, and personal items. These drawers are lightweight and breathable.
- Sturdy Construction: Built with high-quality particleboard and a robust metal frame, ensuring stability and a load capacity of up to 180 pounds. Adjustable feet maintain stability on uneven surfaces.
- Additional Storage Shelves: The desk includes lower shelves for additional storage, such as a computer tower or baskets.

Figure 5.1: Height adjustable storage shelves.
6. Usage Guidelines
6.1. Power Outlets
- Plug electronic devices into the AC outlets or USB ports as needed.
- Do not exceed the maximum electrical load capacity of the integrated power strip.
- Avoid spilling liquids near the power outlets.
6.2. Monitor Stands
- Position the monitor stands to achieve an ergonomic viewing height for your monitors.
- Ensure monitors are centered and stable on the stands to prevent tipping.
6.3. Storage Drawers
- Use the fabric drawers for organizing office supplies, documents, and other items.
- Avoid placing excessively heavy or sharp objects in the fabric drawers to prevent damage.
7. Maintenance
- Cleaning: Wipe desk surfaces with a soft, damp cloth. Avoid harsh chemicals or abrasive cleaners that could damage the finish.
- Dusting: Regularly dust the desk and components to prevent buildup.
- Hardware Check: Periodically check all screws and bolts to ensure they remain tight. Retighten if necessary.
- Drawer Care: The fabric drawers can be spot cleaned with a mild detergent and water. Allow to air dry completely.
8. Troubleshooting
8.1. Desk is Unstable/Wobbly
- Ensure all assembly screws are fully tightened.
- Adjust the foot pads on the bottom of the legs to compensate for uneven flooring.
- Verify that the desk is placed on a flat, level surface.
8.2. Power Outlets Not Working
- Check if the desk's main power cord is securely plugged into a functional wall outlet.
- Ensure the power strip is correctly seated in its slot.
- Test the wall outlet with another device to confirm it has power.
- Avoid overloading the power strip; unplug some devices if too many are connected.
8.3. Difficulty During Assembly
- Refer back to the assembly diagrams and ensure all parts are oriented correctly. Some parts may appear similar but are not interchangeable.
- Do not overtighten screws until all components are loosely fitted, then tighten gradually.
- If holes do not align, slightly loosen adjacent screws to allow for adjustment.
9. Specifications
| Feature | Specification |
|---|---|
| Model Number | CD-026 |
| Product Dimensions (L-Shape) | 59"W x 18.8"D x 33.9"H (149.8 cm W x 47.7 cm D x 86.1 cm H) |
| Material | Engineered Wood (Desk Top), Metal (Frame), Non-woven Fabric (Drawers) |
| Color | Rustic Brown |
| Maximum Weight Capacity | 180 Pounds (81.6 kg) |
| Power Outlets | 3 AC Outlets, 2 USB Ports |
| Power Cord Length | 6.5 feet (1.98 meters) |
| Number of Drawers | 4 |
| Monitor Stands | 2, Movable |
| Assembly Required | Yes (All tools included) |
10. Warranty and Support
Korfile products are designed for quality and durability. For any questions regarding assembly, missing parts, or product functionality, please contact Korfile customer support. While specific warranty details are not provided in this manual, please retain your proof of purchase for any warranty claims.
For assistance, please refer to the contact information provided at the point of purchase or on the official Korfile website.


