Introduction
Thank you for choosing the WOSPORTS Mini Trail Camera and Trail Camera Viewer. This manual provides detailed instructions for setting up, operating, and maintaining your devices. The Mini Trail Camera is designed for capturing high-quality photos and videos of wildlife with its 24MP camera and 1080P HD video capabilities, featuring motion activation and IR night vision. The accompanying Trail Camera Viewer allows for real-time management of your captured media.
Package Contents
Please check the package to ensure all items are present:
- WOSPORTS Mini Trail Camera
- WOSPORTS Trail Camera Viewer
- Mounting Strap (for trail camera)
- USB Cable (for data transfer/power)
- User Manual
- Note: 4x AAA batteries and an SD card are not included and must be purchased separately.
Product Overview
Mini Trail Camera Features
- Compact Design: Significantly smaller and lighter than traditional trail cameras, allowing for discreet placement.
- High-Resolution Imaging: Captures 24 Megapixel still images and Full HD 1080P video.
- Motion Activated: Equipped with a fast trigger speed (0.3-1.1 seconds) to capture movement effectively.
- Infrared Night Vision: Automatic IR filter ensures clear images and videos in low-light conditions or complete darkness.
- Low Power Consumption: Operates efficiently on 4 AAA batteries, extending standby time.
- Weather Resistant: Designed for outdoor use (IP54 rated).

Image: The WOSPORTS Mini Trail Camera, camouflaged and mounted on a tree, demonstrating its discreet design and IP54 weather resistance.

Image: The compact dimensions of the Mini Trail Camera (101mm x 102mm x 63mm) are shown in comparison to a laptop and smartphone, emphasizing its portability.
Trail Camera Viewer Features
- Real-time File Management: Allows instant viewing, saving, sharing, and deleting of photos and videos.
- Multi-Device Compatibility: Effortlessly manage data between iPhone, iPad, Android devices, and computers.
- Plug & Play: No application required for operation, offering direct access to media files.
- Portable Design: Small and lightweight, designed for easy transport.
Setup
1. Battery Installation (Mini Trail Camera)
- Open the camera's casing by unlatching the side clips.
- Locate the battery compartment.
- Insert 4 new AAA batteries (not included) according to the polarity markings (+/-) inside the compartment.
- Close the battery compartment cover securely.

Image: The open trail camera revealing the battery compartment, indicating the placement of 4 AAA batteries for low power consumption.
2. SD Card Insertion (Mini Trail Camera)
- Ensure the camera is powered off.
- Locate the SD card slot, typically on the side or bottom of the camera.
- Insert a formatted SD card (up to 32GB, not included) into the slot until it clicks into place.
- To remove, gently push the card in until it springs out.
3. Mounting the Trail Camera
- Select a suitable location, such as a tree or post, that provides a clear view of the area you wish to monitor.
- Thread the provided mounting strap through the slots on the back of the camera.
- Securely fasten the camera to the desired object using the strap. Adjust the camera's angle as needed.
Operating the Mini Trail Camera
Powering On/Off and Mode Selection
- Locate the power switch inside the camera casing.
- Slide the switch to "ON" to power on the camera. The camera will enter setup mode or monitoring mode.
- Slide the switch to "OFF" to power off the camera.
- The camera typically has modes like "OFF", "SETUP", and "ON" (monitoring). Use "SETUP" to adjust settings and "ON" for active recording.
Basic Settings (in SETUP mode)
While in SETUP mode, use the camera's internal buttons (usually MENU, UP, DOWN, OK) to navigate and adjust settings such as:
- Mode: Select between Photo, Video, or Photo+Video.
- Photo Resolution: Set image quality (e.g., 24MP, 12MP).
- Video Resolution: Set video quality (e.g., 1080P, 720P).
- PIR Interval: Adjust the delay between motion detections.
- Sensitivity: Set the motion sensor's sensitivity (High, Medium, Low).
- Date & Time: Set the current date and time for accurate timestamps on recordings.
- Format SD Card: It is recommended to format the SD card within the camera before first use and periodically thereafter.
Capturing Images and Videos
Once settings are configured, switch the camera to "ON" mode. The camera will then automatically detect motion and capture photos or videos according to your settings. The fast trigger speed ensures minimal delay.

Image: The camera's fast trigger speed (0.3-1.1 seconds) is depicted capturing a moving deer, ensuring no moment is missed.
Night Vision Operation
The camera automatically switches to infrared night vision mode in low-light conditions. The built-in IR illuminators provide illumination for clear black and white images and videos without disturbing wildlife.

Image: An example of the camera's Super Night Vision, showing two zebras clearly captured in complete darkness, with timestamp and temperature.
Using the Trail Camera Viewer
Connecting the Viewer
- Remove the SD card from the Mini Trail Camera.
- Insert the SD card into the appropriate slot on the Trail Camera Viewer.
- Connect the viewer to your smartphone (iPhone, Android) or computer using the appropriate connector (USB-C, Lightning, USB-A). The viewer is designed for "Plug & Play" operation, requiring no additional apps.

Image: Illustration of the two-way transfer capability, showing how to connect the card viewer to a smartphone to transfer media from the trail camera.

Image: The Trail Camera Viewer connected to a smartphone, demonstrating its "Plug & Play" functionality for viewing and managing files without needing an app.
Managing Files
Once connected, your device's file manager or photo application will recognize the SD card. You can then:
- View: Browse through captured photos and videos.
- Save: Transfer selected files to your smartphone or computer's internal storage.
- Share: Easily share media via email, social media, or messaging apps.
- Delete: Remove unwanted files from the SD card to free up space.
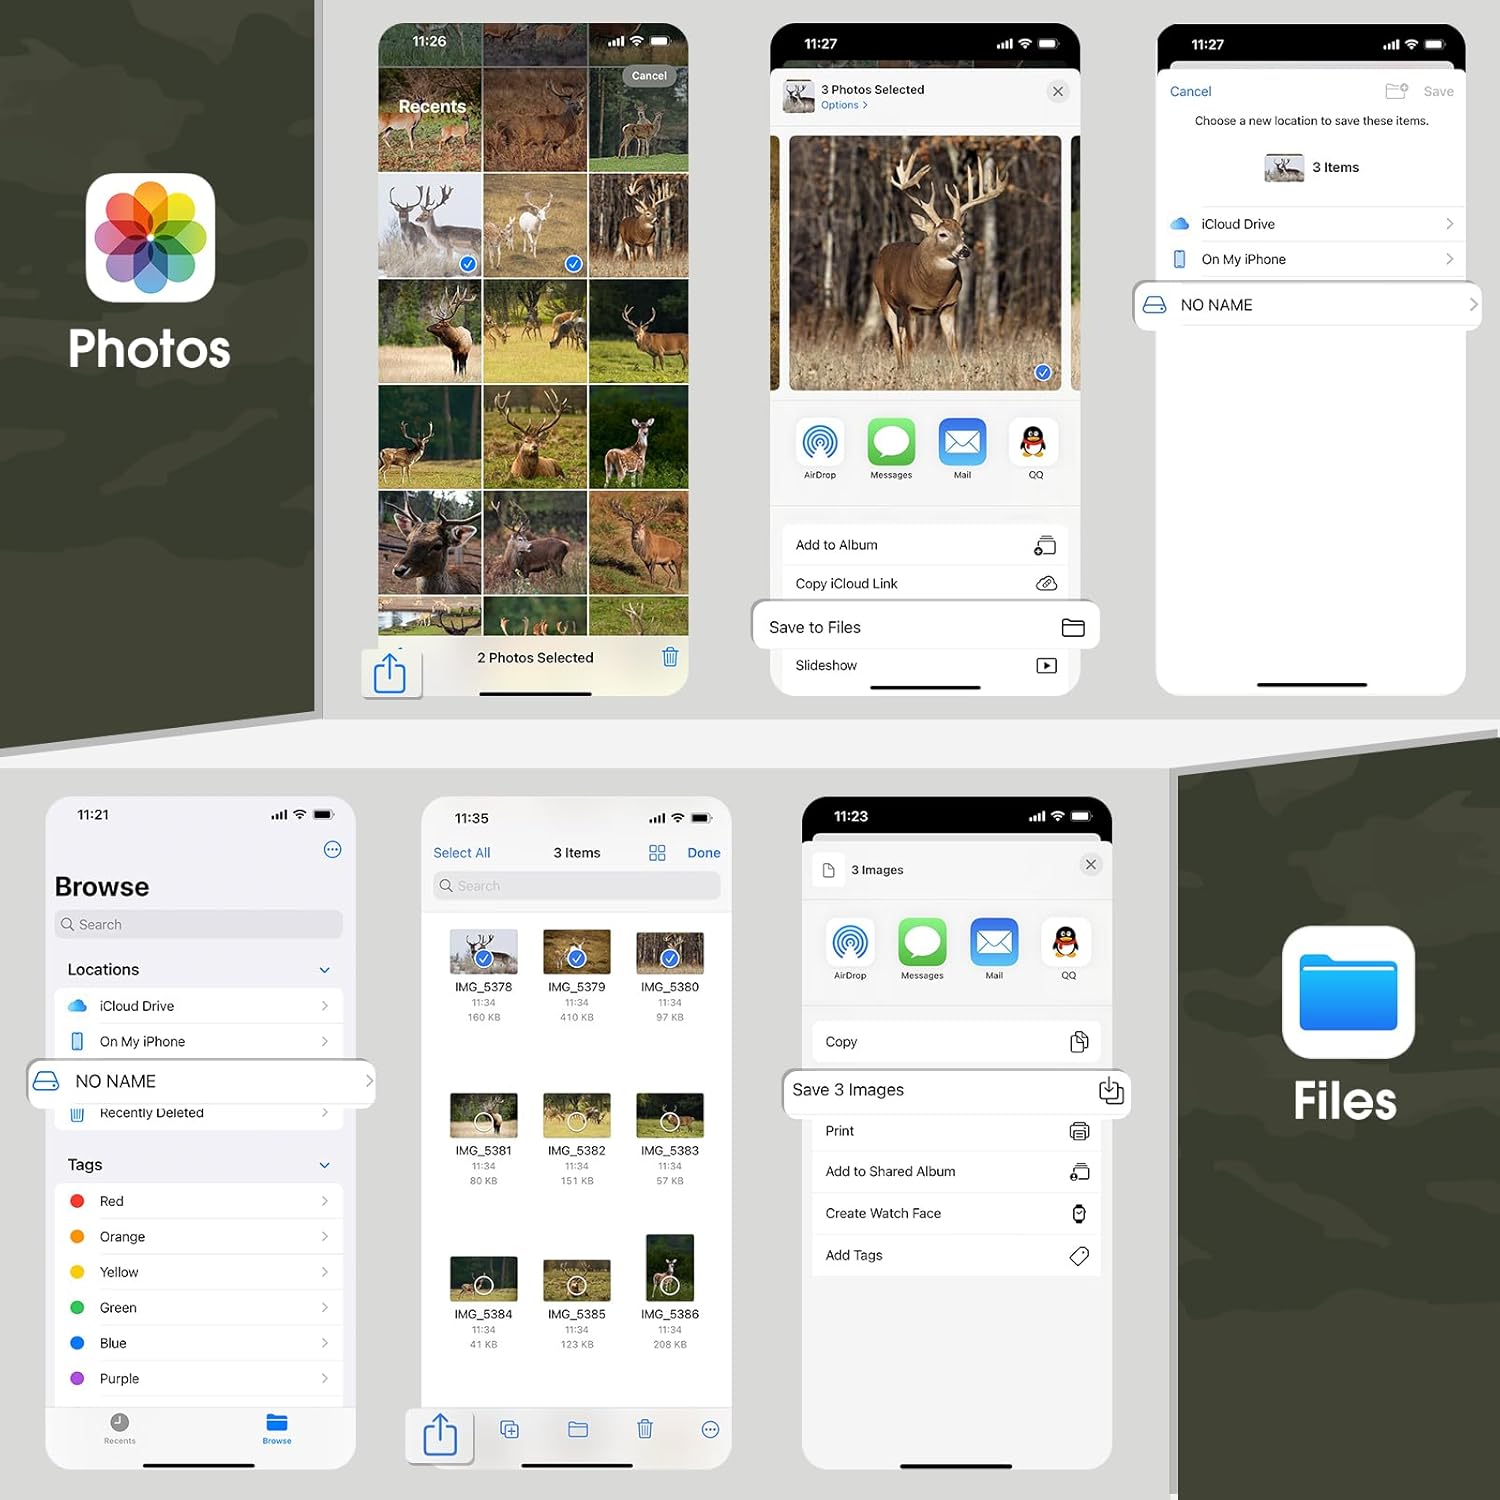
Image: A visual guide demonstrating how to manage files (select, save, share, delete) on a smartphone using the native Photos and Files applications after connecting the viewer.
Maintenance
Cleaning
- Camera Lens: Gently wipe the lens with a soft, lint-free cloth. For stubborn dirt, use a lens cleaning solution designed for optics.
- Camera Body: Wipe the exterior with a damp cloth. Avoid harsh chemicals or abrasive materials.
- Viewer: Keep the connectors free of dust and debris. Use a soft, dry cloth for cleaning.
Storage
- When not in use for extended periods, remove batteries from the trail camera to prevent leakage.
- Store both devices in a cool, dry place, away from direct sunlight and extreme temperatures.
Troubleshooting
| Problem | Possible Cause | Solution |
|---|---|---|
| Camera not powering on | Low or dead batteries; incorrect battery polarity; power switch in OFF position. | Replace batteries; check polarity; ensure switch is in ON or SETUP. |
| Camera not capturing images/videos | SD card full or not inserted correctly; incorrect mode selected; PIR sensor blocked; low battery. | Format/replace SD card; check mode settings; clear sensor path; replace batteries. |
| Poor image/video quality | Dirty lens; low light conditions (for color images); incorrect resolution settings. | Clean lens; ensure adequate lighting or rely on night vision; adjust resolution settings. |
| Viewer not recognized by phone/computer | Incorrect connection; dirty connector; incompatible device; SD card issue. | Ensure secure connection; clean connectors; try another device; reinsert/format SD card. |
Specifications
| Feature | Detail |
|---|---|
| Brand | WOSPORTS |
| Model | Mini Trail Camera, Trail Camera Viewer |
| Photo Resolution | Up to 24 Megapixels |
| Video Resolution | Full HD 1080P |
| Trigger Speed | 0.3 - 1.1 seconds |
| Night Vision | Infrared (IR) |
| Power Supply | 4x AAA Batteries (not included) |
| Storage | SD Card (up to 32GB, not included) |
| Weather Resistance | IP54 |
| Viewer Compatibility | iPhone, iPad, Android, PC (via various connectors) |
Warranty and Support
For warranty information and technical support, please refer to the official WOSPORTS website or contact their customer service directly. Details are typically provided on the product packaging or a separate warranty card.
WOSPORTS Official Website: Visit WOSPORTS Store on Amazon