1. Introduction
This manual provides detailed instructions for the installation, operation, and maintenance of your Driauto 7-inch Single DIN Android Car Stereo. This advanced car multimedia system features a foldable touchscreen, integrated Android 15 operating system, 4GB RAM, 64GB ROM, wireless CarPlay and Android Auto, GPS navigation, WiFi, Bluetooth 5.1, FM/RDS radio, DSP sound processing, USB connectivity, Mirror Link functionality, and support for a backup camera.
Please read this manual thoroughly before using the product to ensure proper operation and to maximize your user experience.

Image 1.1: The Driauto 7-inch Single DIN Android Car Stereo, showing the main unit with its foldable screen extended, along with the included backup camera and microphone.
2. Safety Information
- Driving Safety: Always prioritize safe driving. Do not operate the system in a way that distracts you from the road.
- Volume Control: Keep the volume at a level that allows you to hear outside traffic sounds.
- Professional Installation: For optimal performance and safety, professional installation is recommended. Incorrect wiring can damage the vehicle's electrical system or the stereo unit.
- Power Supply: Ensure the unit is connected to a 12V DC power supply with negative grounding.
- Avoid Moisture: Do not expose the unit to water or excessive moisture.
- Temperature: Avoid extreme temperatures. The operating temperature range is typically -20°C to +70°C.
3. Setup and Installation
3.1 Package Contents
Before beginning installation, verify that all components are present in the package:
- Driauto Single DIN Android Car Stereo Unit
- Power Cable
- RCA Cable
- 6-Pin USB Cable
- Radio Antenna
- GPS Antenna
- Rear Camera Input Cable
- Backup Camera
- Microphone
- Mounting Bracket
- User Manual (this document)

Image 3.1: A visual representation of the complete packaging list, including the main unit, various cables (power, RCA, USB, radio antenna, GPS antenna, rear camera input), backup camera, microphone, mounting bracket, and user manual.
3.2 Wiring Diagram
Refer to the detailed wiring diagram provided with your unit for specific connections. General connections include:
- Power Cable: Connect to vehicle's 12V power supply (constant and accessory), ground, and illumination wires.
- Speaker Wires: Connect to your vehicle's speakers (Front L/R, Rear L/R).
- GPS Antenna: Connect to the dedicated GPS antenna port on the rear of the unit. Position the antenna in a location with a clear view of the sky.
- Radio Antenna: Connect your vehicle's radio antenna to the unit.
- Backup Camera: Connect the camera's video output to the 'CAM IN' RCA port and its power to the reverse light circuit.
- Microphone: Plug the external microphone into the designated 3.5mm MIC input for improved call quality.
- USB Ports: Utilize the dual USB ports for media playback, phone charging, or connecting external devices.
3.3 Mounting the Unit
Install the single DIN unit into your vehicle's dashboard opening using the provided mounting bracket. Ensure the unit is securely fastened to prevent movement during driving.
4. Operating Instructions
4.1 Power On/Off and Screen Operation
- Power On: Turn on your vehicle's ignition. The unit should power on automatically.
- Power Off: Turn off your vehicle's ignition. The unit will power off.
- Screen Extension/Retraction: The 7-inch IPS touchscreen is manually foldable. Gently pull or push the screen to extend or retract it into the single DIN slot.
- Touchscreen Interface: Navigate the Android system by tapping, swiping, and pinching on the capacitive touchscreen.
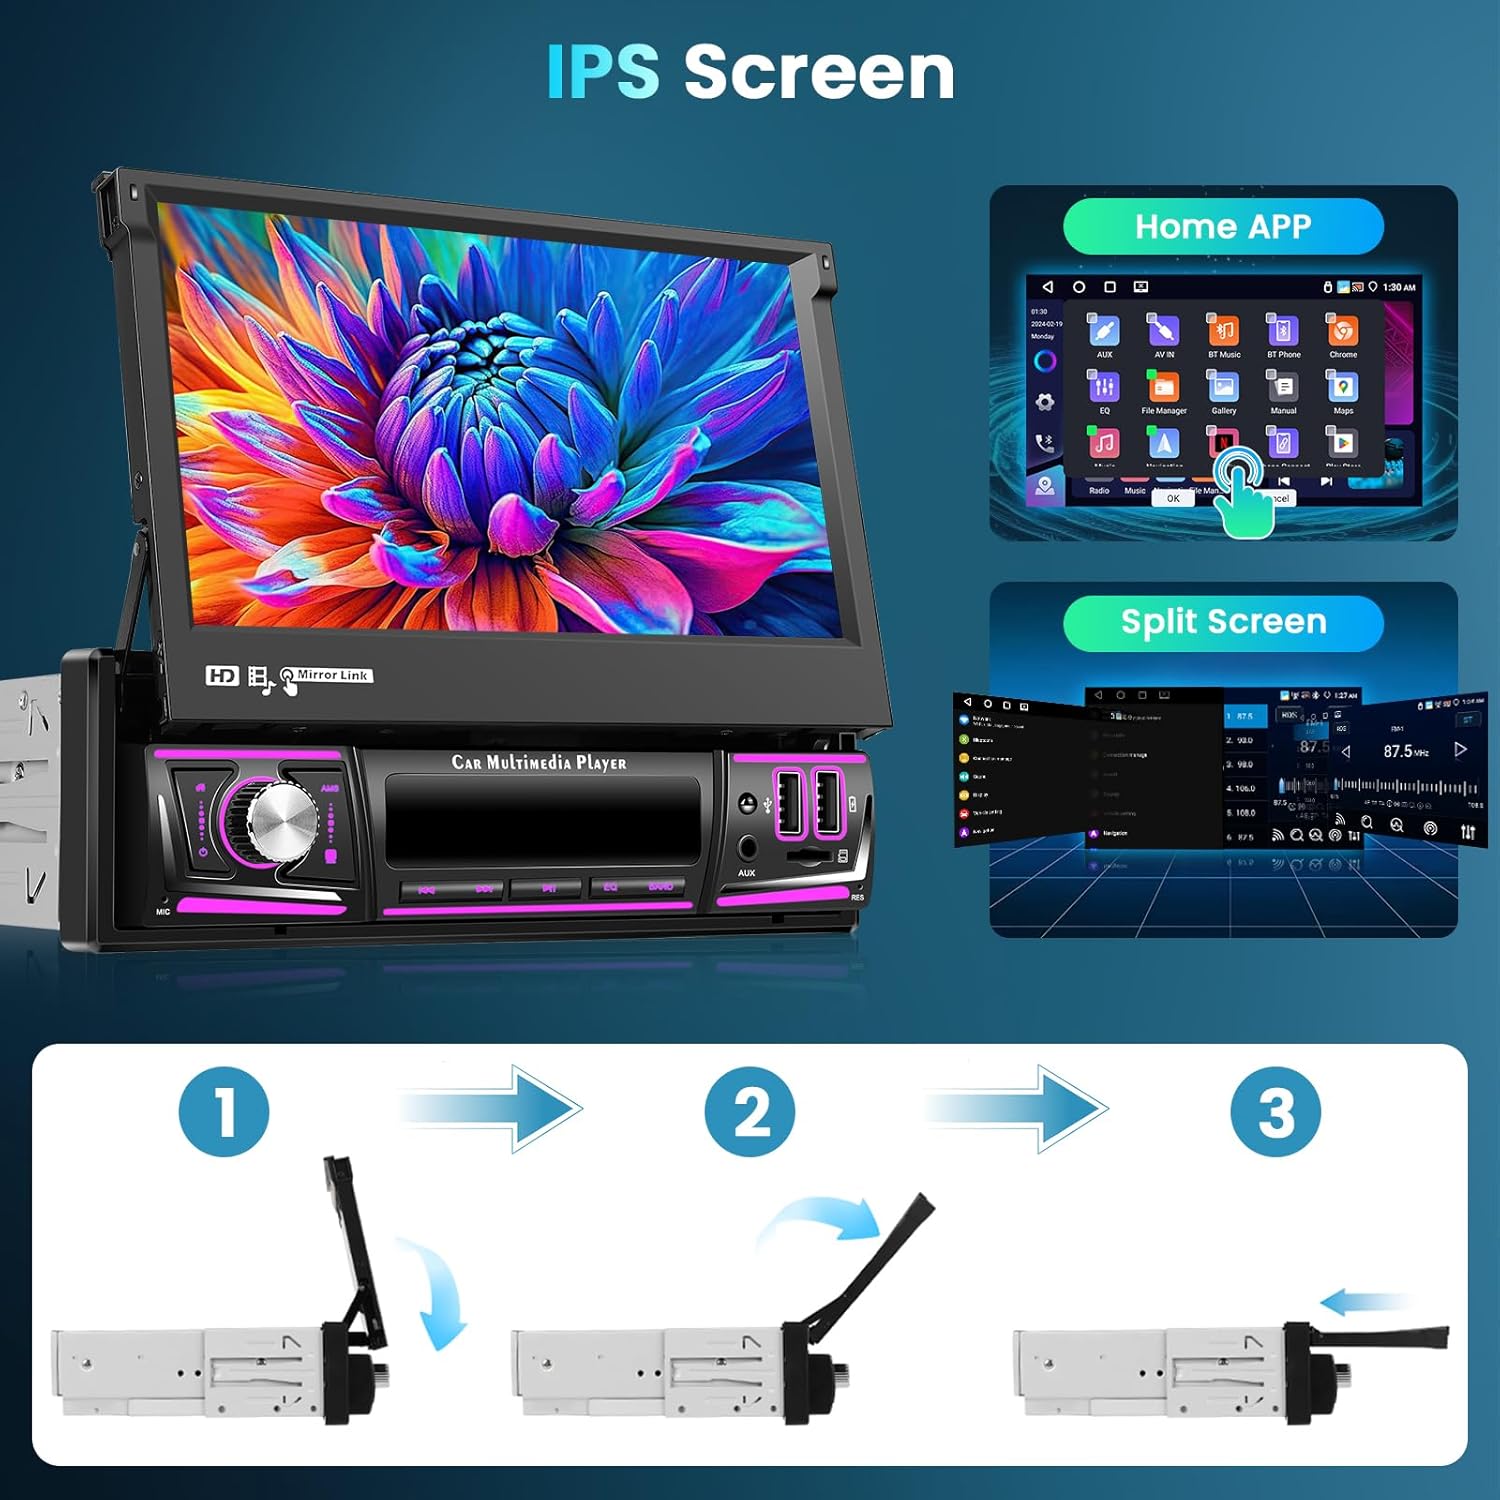
Image 4.1: This image illustrates the IPS screen features, including the home app interface and split-screen functionality. It also shows a three-step diagram demonstrating the manual folding and unfolding mechanism of the screen.
4.2 Android System and Navigation
- Home Screen: Access various applications and settings from the customizable home screen.
- GPS Navigation: The unit comes with pre-installed offline maps. Connect to WiFi for online navigation services and map updates.
- WiFi Connection: Connect to a mobile hotspot or available WiFi network to access online features, download apps, and browse the internet.
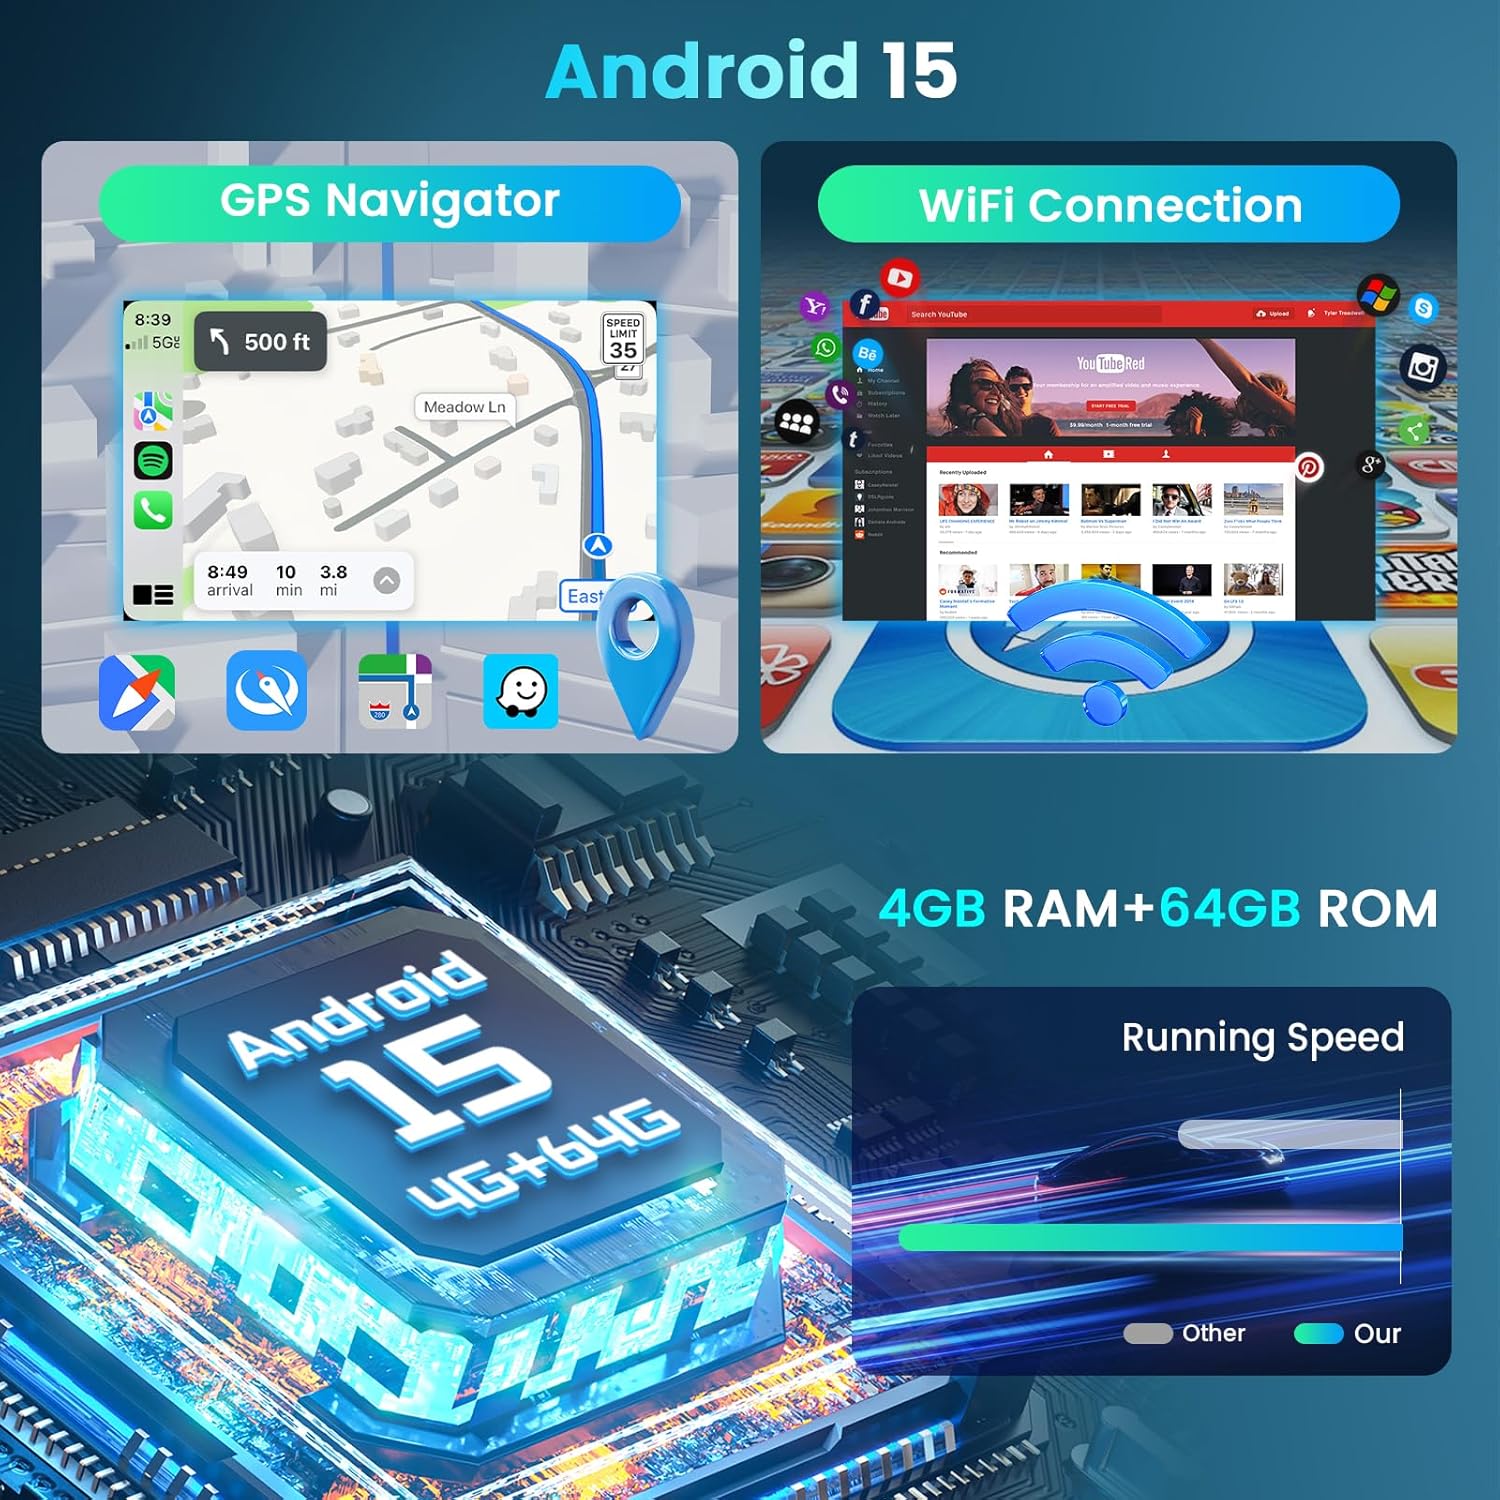
Image 4.2: This image highlights the Android 15 operating system, showcasing the GPS Navigator interface with map display and the WiFi Connection screen with various app icons, along with details on 4GB RAM and 64GB ROM for faster performance.
4.3 Wireless CarPlay & Android Auto
Connect your smartphone wirelessly to access CarPlay (for iOS devices) or Android Auto (for Android devices). This allows for hands-free control of navigation, music, calls, and messages via voice commands or the touchscreen.
- Pairing: Ensure Bluetooth and WiFi are enabled on your smartphone. Follow the on-screen prompts on the car stereo to initiate the connection.
- Voice Control: Use voice commands to interact with your phone's features while driving.

Image 4.3: This image demonstrates the wireless and wired connectivity options for CarPlay, Android Auto, and Mirror Link, showing how smartphones can integrate with the car stereo for navigation, music, and app access.
4.4 Mirror Link
The Mirror Link function allows you to mirror your smartphone's screen directly onto the car stereo's display. This is compatible with both iOS and Android devices.
- Connection: Connect your phone via USB or wirelessly (if supported by your phone and the unit) and follow the instructions on the stereo to activate Mirror Link.
4.5 Bluetooth 5.1
Connect your phone via Bluetooth for hands-free calling and audio streaming.
- Pairing: Go to the Bluetooth settings on the stereo and your phone. Search for available devices and select the car stereo to pair.
- Hands-Free Calling: Make and receive calls directly from the stereo interface.
- Audio Streaming: Play music from your phone through the car's speakers.

Image 4.4: This image displays the Bluetooth interface during a call, the FM radio tuner with RDS information, and the 32-band DSP equalizer settings for audio customization.
4.6 FM/RDS Radio
Tune into your favorite radio stations with the built-in FM tuner. RDS (Radio Data System) provides additional information like station name and song title where available.
- Scanning: Use the auto-scan function to find and save available stations.
- Manual Tuning: Manually adjust the frequency to specific stations.
4.7 DSP 32-Band EQ
Customize your audio experience with the Digital Signal Processor (DSP) and its 32-band equalizer. Adjust frequency bands to match your preferences or select from preset sound modes.
4.8 Multimedia Playback
The unit supports various multimedia formats via its dual USB ports and TF card slot.
- USB/TF Card: Insert a USB drive or TF card containing audio or video files. The system will automatically detect and allow playback.
- Supported Formats: Supports 1080P video playback and various audio formats.
4.9 Steering Wheel Control (SWC)
If your vehicle supports it, connect the steering wheel control wires to the stereo to operate basic functions (volume, track change, answer/end call) directly from your steering wheel.
- Configuration: Access the SWC settings in the stereo's menu to program the buttons according to your vehicle's controls.
4.10 Reverse Image Display
When the backup camera is properly installed and connected, the stereo will automatically display the rear view image on the screen when the vehicle is shifted into reverse gear.

Image 4.5: This image illustrates the automatic reverse image display feature when backing up, along with the interface for configuring steering wheel controls and various input options like USB and TF card.
5. Maintenance
- Screen Cleaning: Use a soft, lint-free cloth to gently wipe the touchscreen. Avoid abrasive cleaners or solvents.
- General Cleaning: Keep the unit free from dust and debris. Use a dry cloth for cleaning the main body.
- Software Updates: Periodically check for software updates from the manufacturer to ensure optimal performance and access to new features.
6. Troubleshooting
If you encounter issues with your Driauto car stereo, refer to the following common problems and solutions:
- No Power:
- Check all power connections (constant 12V, accessory 12V, ground).
- Verify vehicle's fuse for the stereo is intact.
- No Sound:
- Ensure speaker wires are correctly connected and not short-circuited.
- Check volume levels and mute settings.
- Verify audio output settings in the system menu.
- GPS Not Working/Inaccurate:
- Ensure the GPS antenna is securely connected and placed in a location with a clear view of the sky.
- Check GPS settings in the system menu.
- Bluetooth Connection Issues:
- Ensure Bluetooth is enabled on both the stereo and your phone.
- Delete previous pairings and try re-pairing.
- Move your phone closer to the unit.
- Backup Camera Not Displaying:
- Verify the camera's video input cable is correctly connected to the 'CAM IN' port.
- Ensure the camera's power wire is connected to the vehicle's reverse light circuit.
- Check the reverse trigger wire connection from the stereo to the vehicle's reverse signal.
- Touchscreen Unresponsive:
- Perform a system reset (refer to the unit's specific reset procedure, usually a small reset button).
- Ensure the screen is clean and free of debris.
If these steps do not resolve the issue, please contact Driauto customer support for further assistance.
7. Specifications
| Feature | Specification |
|---|---|
| Model Number | Driauto-7AV |
| Operating System | Android 15 |
| Processor | 4-Core |
| RAM | 4GB |
| ROM | 64GB |
| Screen Size | 7 inches |
| Screen Type | IPS Capacitive Foldable Touchscreen |
| Connectivity | Bluetooth 5.1, HDMI, USB, Wi-Fi |
| Special Features | Android Auto, Apple CarPlay, Built-In Bluetooth, Built-In Wi-Fi, GPS Navigation, DSP 32-Band EQ, Mirror Link |
| Audio Output Mode | Surround |
| Surround Sound Channel Configuration | 5.1 |
| Output Power | 180 Watts (4*45W subwoofer audio output) |
| Number of Channels | 6 |
| Video Encoding Support | MKV, RMVB, AVI, MP4, MDV, etc. |
| Item Weight | 4.29 pounds |
| Package Dimensions | 13.3 x 9.61 x 3.58 inches |
8. Warranty and Support
Driauto is committed to providing quality products and customer satisfaction. Your product is covered by the following support:
- Customer Service Response: Replies to inquiries within 18 hours.
- Return Policy: 60-day return window.
- Replacement Policy: 2-year replacement for eligible issues.
- Technical Support: Lifetime support for the product.
For any questions, technical assistance, or warranty claims, please contact Driauto customer support through the platform where you purchased the product or visit the official Driauto website.

Image 8.1: An overview of Driauto's customer support commitments, including response times, return policy, replacement period, and lifetime technical support.