
1. Introduction
Thank you for purchasing the Naicon D.OVER-FRESH Portable Evaporative Air Cooler. This appliance is designed to provide cooling, humidification, and ventilation functions for your home. Please read this instruction manual carefully before use to ensure safe and efficient operation. Keep this manual for future reference.
2. Safety Instructions
- Always place the unit on a stable, level surface.
- Do not immerse the appliance, power cord, or plug in water or other liquids.
- Ensure the power supply matches the voltage specified on the rating label.
- Unplug the unit from the power outlet before cleaning, filling, or performing any maintenance.
- Keep children and pets away from the appliance during operation.
- Do not block the air inlets or outlets.
- Do not use the appliance near flammable materials or gases.
- Only use the provided ice packs or clean water in the tank.
- If the power cord is damaged, it must be replaced by the manufacturer, its service agent, or similarly qualified persons to avoid a hazard.
3. Package Contents
Please check that all items are present:
- Naicon D.OVER-FRESH Evaporative Air Cooler Unit
- Remote Control
- Ice Packs (4 units)
- Instruction Manual
4. Product Diagram
Familiarize yourself with the components of your air cooler.

Figure 1: Front view of the Naicon D.OVER-FRESH Portable Evaporative Air Cooler, showing the control panel, air outlets, and water level indicator.
- Upper Air Outlet: Directs airflow from the upper section.
- Control Panel: Buttons and display for operating the unit.
- Lower Air Outlet: Directs airflow from the lower section.
- Water Level Indicator: Shows the current water level in the tank.
- Water Tank: Located at the base, holds up to 5 liters of water.
- Remote Control Receiver: Sensor for the remote control signals.
5. Setup
- Unpacking: Carefully remove the air cooler from its packaging. Retain packaging for future storage or transport.
- Placement: Place the unit on a firm, level surface in the desired location. Ensure there is adequate space around the unit for proper airflow.
- Filling the Water Tank:
- Pull out the water tank from the bottom rear of the unit.
- Fill the tank with clean, cold water up to the 'MAX' line. Do not overfill.
- For enhanced cooling, place the provided ice packs (after freezing them) into the water tank.
- Slide the water tank back into the unit until it clicks into place.
- Power Connection: Plug the power cord into a suitable electrical outlet (220-240V, 50-60Hz).
6. Operating Instructions
The unit can be operated using the control panel on the device or the included remote control.
6.1 Power On/Off
- Press the POWER button once to turn the unit on. The default mode is usually Fan.
- Press the POWER button again to turn the unit off.
6.2 Fan Speed
- Press the SPEED button repeatedly to cycle through the 3 available fan speeds: Low, Medium, High.
6.3 Operating Modes
The unit offers three ventilation modes: Normal, Natural, and Night.
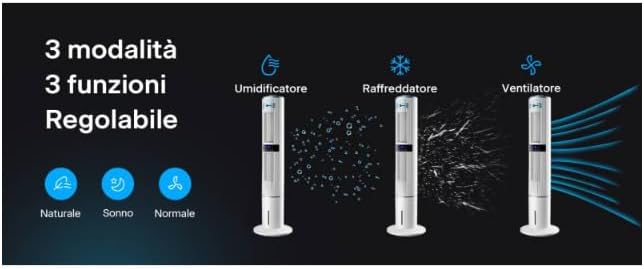
Figure 2: Visual representation of the three main functions (Humidifier, Cooler, Fan) and three adjustable modes (Natural, Sleep, Normal).
- Press the MODE button repeatedly to select your desired mode:
- Normal Mode: Provides a constant airflow at the selected speed.
- Natural Mode: Simulates natural breeze by varying fan speed.
- Night Mode (Sleep): Operates at a lower, quieter speed, gradually decreasing fan speed over time for comfortable sleep.
6.4 Cooling / Humidification Function
This function activates the water pump to circulate water, providing evaporative cooling and humidification.
- Ensure the water tank is filled with water and ice packs for optimal cooling.
- Press the COOL button to activate the cooling/humidification function. The indicator light will illuminate.
- Press the COOL button again to deactivate the function.
6.5 Oscillation Function
The unit features independent oscillation for its upper and lower air outlets.

Figure 3: Illustration of the D.OVER-FRESH's oscillation capabilities, showing how pressing the SWING button cycles through different oscillation patterns for the upper (360°) and lower (60°) air ducts.
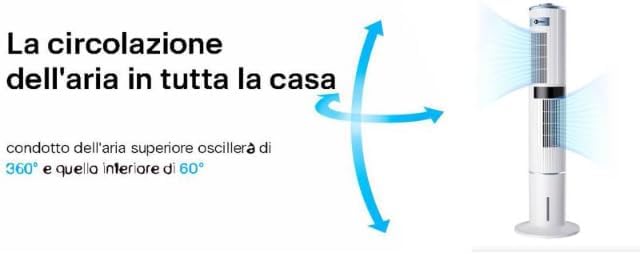
Figure 4: Diagram illustrating the wide air circulation achieved by the 360° upper and 60° lower air duct oscillation.
- Press the SWING button to activate oscillation.
- First press: Both upper and lower air ducts oscillate 60 degrees.
- Second press: The upper air duct oscillates 360 degrees, and the lower air duct oscillates 60 degrees.
- Third press: The upper air duct oscillates 360 degrees, and the lower air duct blows air in a fixed direction.
- Fourth press: Both upper and lower air ducts stop oscillating.
6.6 Timer Function
- Press the TIMER button repeatedly to set the desired operating time, from 1 to 24 hours. The unit will automatically turn off after the set time.
6.7 Remote Control
The remote control allows you to operate all functions from a distance. Ensure the remote control is pointed towards the receiver on the unit.
- Insert 2x AAA batteries (not included) into the remote control.
- The buttons on the remote control correspond to the functions on the main control panel.
7. Maintenance
Regular cleaning and maintenance will ensure optimal performance and extend the lifespan of your air cooler.
7.1 Cleaning the Exterior
- Before cleaning, always unplug the unit from the power outlet.
- Wipe the exterior surfaces with a soft, damp cloth. Do not use abrasive cleaners or solvents.
7.2 Cleaning the Water Tank
- Regularly drain and clean the water tank to prevent mold and mildew growth.
- Pull out the water tank, empty any remaining water, and wipe the interior with a soft cloth and mild detergent. Rinse thoroughly.
- Ensure the tank is completely dry before refilling or storing the unit.
7.3 Air Filter Cleaning
- The air filter should be cleaned every two weeks or more frequently depending on usage and air quality.
- Refer to the product diagram to locate and remove the air filter.
- Wash the filter with clean water and a soft brush. Allow it to air dry completely before reinserting.
7.4 Storage
- If the unit will not be used for an extended period, drain and clean the water tank and air filter.
- Store the unit in a cool, dry place, preferably in its original packaging.
8. Troubleshooting
If you encounter any issues, please refer to the following table before contacting customer support.
| Problem | Possible Cause | Solution |
|---|---|---|
| Unit does not power on. | No power supply. | Check if the power cord is securely plugged into the outlet. Ensure the outlet is functional. |
| Weak or no cooling effect. | Insufficient water in tank; no ice packs; dirty filter. | Fill water tank to MAX level. Add frozen ice packs. Clean the air filter. Ensure COOL function is activated. |
| Unusual noise during operation. | Unit not on a level surface; foreign object in fan; water pump issue. | Place unit on a flat surface. Turn off and unplug, then check for obstructions. If noise persists, contact support. |
| Remote control not working. | Batteries depleted or incorrectly inserted; obstruction. | Replace batteries. Ensure correct polarity. Remove any obstructions between remote and unit. |
9. Specifications
Detailed technical specifications for the Naicon D.OVER-FRESH air cooler.

Figure 5: Original specifications table from the product listing.
| Feature | Specification |
|---|---|
| Model Name | D.OVER-FRESH |
| Brand | Naicon |
| Power Supply | 220-240V 50-60Hz |
| Power Consumption | 65 W |
| Max Sound Level | 65 dB(A) |
| Number of Fan Speeds | 3 |
| Max Air Flow | 7.6 m³/min |
| Number of Ventilation Modes | 3 (Normal, Natural, Night) |
| Upper Grille Oscillation Angle | 360° |
| Lower Grille Oscillation Angle | 60° |
| Timer | 24 hours |
| Water Tank Capacity | 5 Liters |
| Included Ice Packs | 4 |
| Dimensions (H x W x D) | 1080 x 300 x 300 mm (approx. 108 x 30 x 30 cm) |
| Net Weight | 5 Kg |
| Controls | Remote Control (IF) |
10. Warranty and Support
This product comes with a standard manufacturer's warranty. For specific warranty terms and conditions, please refer to the documentation provided at the time of purchase or contact your retailer.
If you require technical assistance, troubleshooting beyond this manual, or have questions about your product, please contact Naicon customer support through their official website or the contact information provided by your retailer.