Introduction
This manual provides detailed instructions for the installation, operation, and maintenance of your MekedeTech Android 13 Car Touch Screen Head Unit. This unit is specifically designed for Toyota RAV4 models from 2020 to 2022, offering advanced features such as wireless CarPlay/Android Auto, 4G LTE connectivity, and a high-resolution 12.3-inch QLED display. Please read this manual thoroughly before use to ensure proper functionality and safety.
Safety Information
- Always ensure the vehicle is parked and the engine is off before attempting any installation or wiring.
- Professional installation is recommended to avoid damage to the unit or vehicle's electrical system.
- Do not operate the device in a way that distracts you from driving. Always prioritize road safety.
- Keep the unit away from water, moisture, and extreme temperatures.
- Use only the provided cables and accessories to prevent damage.
Package Contents
Verify that all items listed below are included in your package:
- Main Head Unit (Machine)
- Power Cable + Canbus Box
- RCA Cable
- Reversing Camera Cable
- Audio Out Cable
- USB Plugs (various types)
- 4G Antenna
- GPS Antenna
- Microphone (MIC)
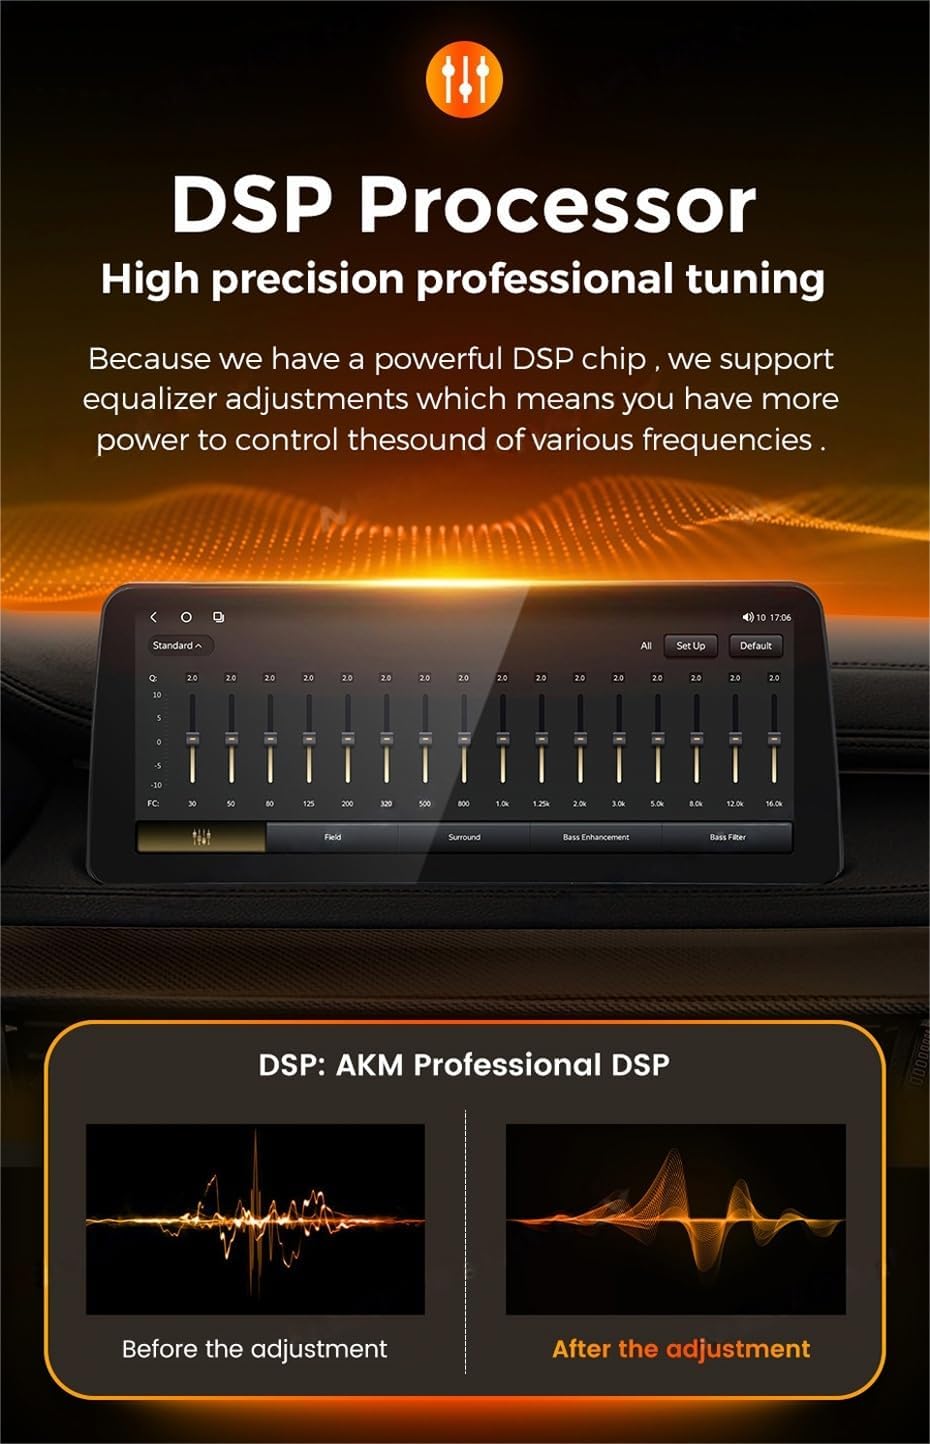
Figure 1: Contents of the product package, including the main unit and all necessary cables and antennas.
Setup
1. Pre-Installation Checks
- Ensure your vehicle is a Toyota RAV4 model from 2020, 2021, or 2022.
- Gather all necessary tools for installation (e.g., screwdrivers, trim removal tools).
- Disconnect the vehicle's battery before starting any electrical work.
2. Installation Steps
The installation process is largely plug-and-play, minimizing the need for splicing wires. However, specific steps may vary slightly depending on your vehicle's trim level. Refer to your vehicle's service manual for detailed dashboard disassembly instructions.
- Carefully remove the original car stereo and dashboard trim.
- Connect the provided power cable and Canbus box to the vehicle's wiring harness.
- Connect the GPS antenna and 4G antenna to their respective ports on the new head unit. Position the antennas in a location with clear signal reception.
- Connect any additional cables such as RCA, reversing camera, USB, and microphone as needed.
- Mount the new head unit securely into the dashboard opening.
- Reconnect the vehicle's battery and test the unit's functionality before reassembling the dashboard trim.

Figure 2: Visual comparison of the car's interior before and after the head unit installation.
Operating Instructions
1. Basic Operation
- Power On/Off: Press and hold the power button (if available) or turn on the vehicle'ignition.
- Volume Control: Adjust volume using the on-screen controls, steering wheel controls, or physical buttons if present.
- Touchscreen: Navigate the interface by tapping, swiping, and pinching on the 12.3-inch QLED display.
2. Wireless CarPlay and Android Auto
The unit supports wireless CarPlay for iOS devices and wireless Android Auto for Android devices.
- Ensure Bluetooth is enabled on your smartphone.
- On the head unit, navigate to the 'Car Link' application.
- Connect your phone via Bluetooth to the head unit.
- Follow the on-screen prompts to establish the wireless CarPlay or Android Auto connection.
- Note: Wired connections are also supported via USB cable.

Figure 3: Steps for connecting Wireless CarPlay and Android Auto.
3. 4G LTE Connectivity
Insert a compatible SIM card into the designated 4G LTE card slot to enable internet access directly from the head unit. This allows for online navigation, app downloads, and streaming services.
4. GPS Navigation
The unit comes with built-in GPS navigation and supports various online map applications. Ensure the GPS antenna is properly installed for optimal signal reception.
5. Radio (AM/FM with RDS)
Access the radio function to listen to AM and FM stations. The unit supports RDS (Radio Data System) for displaying station information. You can perform automatic or manual station searches and customize your channel list.

Figure 4: Radio interface with AM/FM and RDS functionality.
6. Steering Wheel Control (SWC)
The head unit integrates with your vehicle's existing steering wheel controls, allowing you to manage music playback, answer calls, and adjust volume without taking your hands off the wheel. This feature enhances driving safety.

Figure 5: Using steering wheel controls with the head unit.
7. DSP Processor
Equipped with a powerful DSP (Digital Signal Processor) chip, the unit allows for high-precision professional audio tuning. You can adjust a 36-band equalizer to customize the sound output to your preferences, enhancing the audio experience.
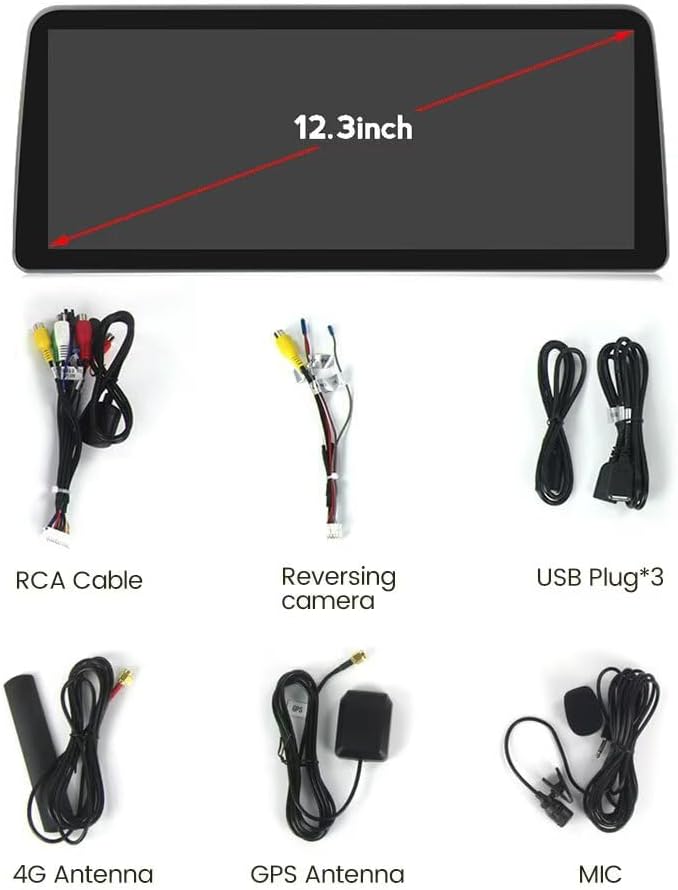
Figure 6: DSP equalizer interface for audio customization.
8. Door and Light Switch Status Display
For vehicles with Canbus support, the head unit can display the status of your car's doors (open/closed) and light switches (on/off) directly on the screen, providing convenient visual feedback.

Figure 7: Display of door and light switch status.
Maintenance
- Cleaning: Use a soft, dry cloth to clean the screen and exterior. Avoid abrasive cleaners or solvents.
- Software Updates: Periodically check for software updates via the unit's settings menu when connected to the internet (WiFi or 4G LTE) to ensure optimal performance and access to new features.
- Temperature: Avoid exposing the unit to extreme temperatures, which can affect its lifespan and performance.
Troubleshooting
- Unit does not power on: Check all power connections and ensure the vehicle's battery is properly connected. Verify the fuse.
- No sound: Check speaker connections, volume levels, and audio settings (e.g., DSP equalizer). Ensure the correct audio source is selected.
- GPS signal lost: Ensure the GPS antenna is securely connected and placed in a location with a clear view of the sky.
- CarPlay/Android Auto not connecting: Ensure Bluetooth is on, the 'Car Link' app is open, and your phone is compatible. Try restarting both the phone and the head unit.
- Touchscreen unresponsive: Try restarting the unit. If the issue persists, contact support.
- Poor radio reception: Check the antenna connection. Ensure you are in an area with good signal coverage.
Specifications
| Feature | Specification |
|---|---|
| Brand | MekedeTech |
| Operating System | Android 13 |
| CPU | 8-Core A53 2.0GHz |
| Memory (RAM + ROM) | 4GB RAM + 32GB ROM (Model: 4+32G) |
| Screen Size | 12.3 Inches |
| Display Type | QLED Touch Screen |
| Screen Resolution | 1920 * 720 |
| Power Output | 4*50W |
| Special Features | Bluetooth, Touchscreen, Wired Android Auto, Wireless CarPlay, Built-in DSP (36 EQ band) |
| Connectivity Technology | Wireless (WiFi, 4G LTE), Bluetooth |
| Supported Navigation | GPS (Worldwide Map Type) |
| Human-Interface Input | Buttons, Microphone, Touchscreen |
| Control Method | Touch, Voice |
| Compatible Vehicle Type | Toyota RAV4 2020-2022 |
Warranty
This MekedeTech product comes with a 1 Year Warranty from the date of purchase. Please retain your proof of purchase for any warranty claims. The warranty covers manufacturing defects and malfunctions under normal use. It does not cover damage caused by improper installation, misuse, accidents, or unauthorized modifications.
Support
For technical assistance, troubleshooting beyond this manual, or warranty inquiries, please contact MekedeTech customer support through the retailer where you purchased the product or visit the official MekedeTech website for contact information. Please have your product model and purchase details ready when contacting support.