1. Introduction
Thank you for choosing the LVWIT GU10 LED Ceiling Spotlight. This product is designed to provide versatile and modern lighting for your indoor spaces. Please read this manual carefully before installation and use to ensure safe operation and optimal performance.

Image: The LVWIT GU10 LED Ceiling Spotlight, featuring three black cylindrical spots mounted on a rectangular base.
2. Safety Information
- Always disconnect power before installation, maintenance, or bulb replacement.
- Installation should be performed by a qualified electrician if you are unsure.
- Ensure the mounting surface can support the weight of the fixture.
- This product is designed for indoor use only (IP20 protection). Do not expose to water or high humidity.
- Use only GU10 bulbs with a maximum wattage of 40W per spot.
- Do not cover the fixture with insulating material.
3. Package Contents
Verify that all components are present before beginning installation:
- 1 x LVWIT GU10 LED Ceiling Spotlight (Rectangular 3-Spot, Black)
- Mounting hardware (screws, wall plugs)
- Instruction Manual
Note: GU10 bulbs are not included and must be purchased separately.
4. Product Features
- Adjustable Spotlight Heads: Each of the 3 GU10 lamp bases can be tilted up to 180° and swiveled up to 350°, allowing for flexible light direction.
- Modern Design: Features a fine powder coating to prevent rust, erosion, and discoloration, ensuring durability and a sleek aesthetic.
- Easy Installation: Designed for straightforward two-part installation.
- Versatile Application: Suitable for various indoor spaces including bedrooms, hallways, living rooms, kitchens, and more.
- GU10 Base: Compatible with standard GU10 LED bulbs (max 40W each).
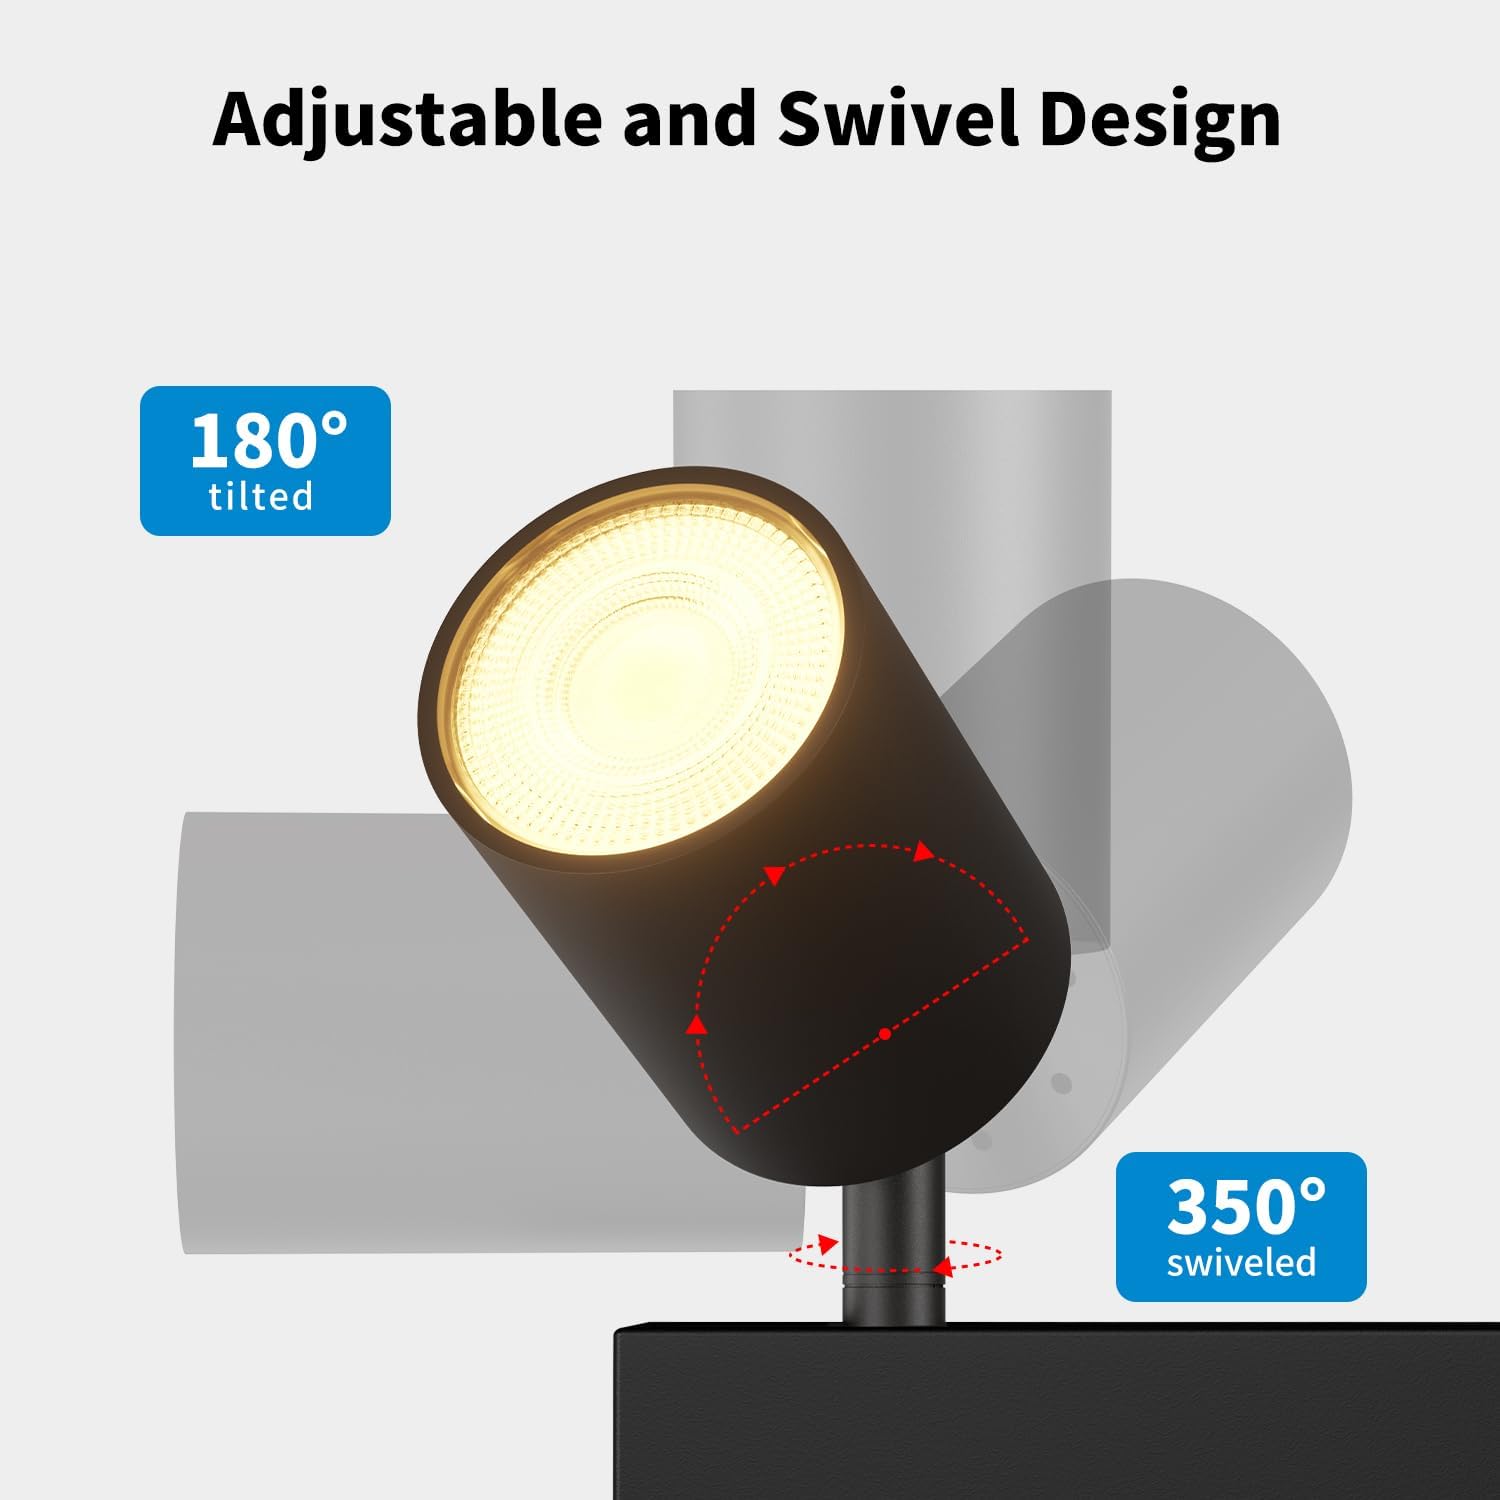
Image: Diagram illustrating the 180° tilt and 350° swivel capabilities of the spotlight heads.
5. Specifications
| Attribute | Value |
|---|---|
| Brand | LVWIT |
| Model Number | EA1910897-03-RB |
| Color | Black |
| Material | Aluminum, Metal |
| Style | Modern |
| Fixture Shape | Ceiling Spotlight |
| Product Dimensions (L x W x H) | 37.8L x 5.3W x 13.5H cm (14.96L x 2.09W x 5.31H inches) |
| Indoor/Outdoor Use | Indoor |
| Power Source | Corded Electric |
| Bulb Type | LED (GU10 base) |
| Number of Bulbs | 3 (not included) |
| Max Wattage per Bulb | 40 Watts |
| Light Output (Max) | 1500 Lumens (total, depending on bulbs used) |
| Ingress Protection (IP) Rating | IP20 (Not waterproof) |
| Mounting Type | Ceiling or Wall Mount |

Image: Diagram showing the dimensions of the LVWIT GU10 LED Ceiling Spotlight.

Image: Illustration of various GU10 bulb types and a size recommendation (D5xH5.5cm / D1.96"xH2.17") for optimal fit.
6. Setup and Installation
Follow these steps for safe and correct installation:
- Turn off Power: Before starting, ensure the main power supply to the installation area is switched off at the circuit breaker.
- Mark Drilling Points: Hold the mounting bracket against the ceiling or wall at the desired installation location. Mark the positions for drilling holes.
- Drill Holes: Drill holes at the marked positions and insert the appropriate wall plugs (if necessary).
- Attach Mounting Bracket: Secure the metal mounting bracket to the ceiling or wall using the provided screws.
- Connect Wiring: Connect the household electrical wires to the terminal block on the fixture. Ensure correct polarity (Live, Neutral, Earth) according to local electrical codes.
- Attach Fixture Body: Align the main fixture body with the mounting bracket and secure it with the provided screws.
- Install GU10 Bulbs: Insert GU10 bulbs into each spotlight socket. Twist to lock them into place.
- Restore Power: Once installation is complete and all connections are secure, restore power at the circuit breaker.

Image: Step-by-step diagram showing the installation process, including mounting the bracket, wiring connections, and bulb insertion.

Image: A comparison illustrating the ease of bulb installation without tools for this model versus other designs that may require tools.
7. Operating Instructions
Once installed and powered, the LVWIT GU10 LED Ceiling Spotlight is ready for use:
- Switching On/Off: Operate the light using your standard wall switch.
- Adjusting Light Direction: Gently hold the base of each spotlight head and tilt it up to 180° or swivel it up to 350° to direct the light as desired. Avoid excessive force to prevent damage.
8. Maintenance
- Cleaning: Ensure the power is off before cleaning. Wipe the fixture with a soft, dry cloth. Do not use abrasive cleaners or solvents.
- Bulb Replacement:
- Turn off the power supply.
- Allow the bulb to cool completely if it has been in use.
- Gently twist and pull the old GU10 bulb from its socket.
- Insert the new GU10 bulb by aligning its pins with the socket holes and twisting to secure. Ensure the new bulb does not exceed 40W.
- Restore power.

Image: Diagram indicating suitability for GU10 bulbs with a maximum of 40W each, along with examples of different color temperatures.
9. Troubleshooting
| Problem | Possible Cause | Solution |
|---|---|---|
| Light does not turn on |
|
|
| Light flickers |
|
|
| Spotlight head is stiff to adjust |
|
|
10. Warranty and Support
This LVWIT product comes with a two-year warranty from the date of purchase, covering manufacturing defects. Please retain your proof of purchase for warranty claims.
For technical support, troubleshooting assistance, or warranty inquiries, please contact LVWIT customer service through the retailer where you purchased the product or visit the official LVWIT website.
Contact Information:
- Online Support: Visit the LVWIT Brand Store