Introduction
This manual provides essential instructions for the safe installation, operation, and maintenance of your Generic 220V 65W Roller Fan Motor. This motor is designed for use in high-temperature applications such as drying ovens, incubators, and baking ovens. Please read this manual thoroughly before installation and use to ensure proper function and longevity of the product.
Important Safety Instructions
- Electrical Safety: Ensure the power supply is disconnected before any installation, maintenance, or repair work. This motor operates on 220V; improper handling can lead to electric shock.
- Qualified Personnel: Installation and electrical connections should only be performed by qualified and experienced personnel.
- Proper Grounding: Ensure the motor and the appliance it is installed in are properly grounded to prevent electrical hazards.
- Ventilation: Ensure adequate ventilation around the motor during operation to prevent overheating.
- Temperature: This motor is designed for high-temperature environments. However, ensure it operates within its specified temperature limits.
- Inspection: Regularly inspect the motor for any signs of wear, damage, or loose connections. Replace damaged parts immediately.
- Compatibility: Verify that this motor is compatible with your appliance's specifications (voltage, power, physical dimensions) before installation.
Product Overview
The Generic Roller Fan Motor is a robust component designed for efficient air circulation in high-temperature industrial and commercial ovens. It features a durable construction suitable for continuous operation.
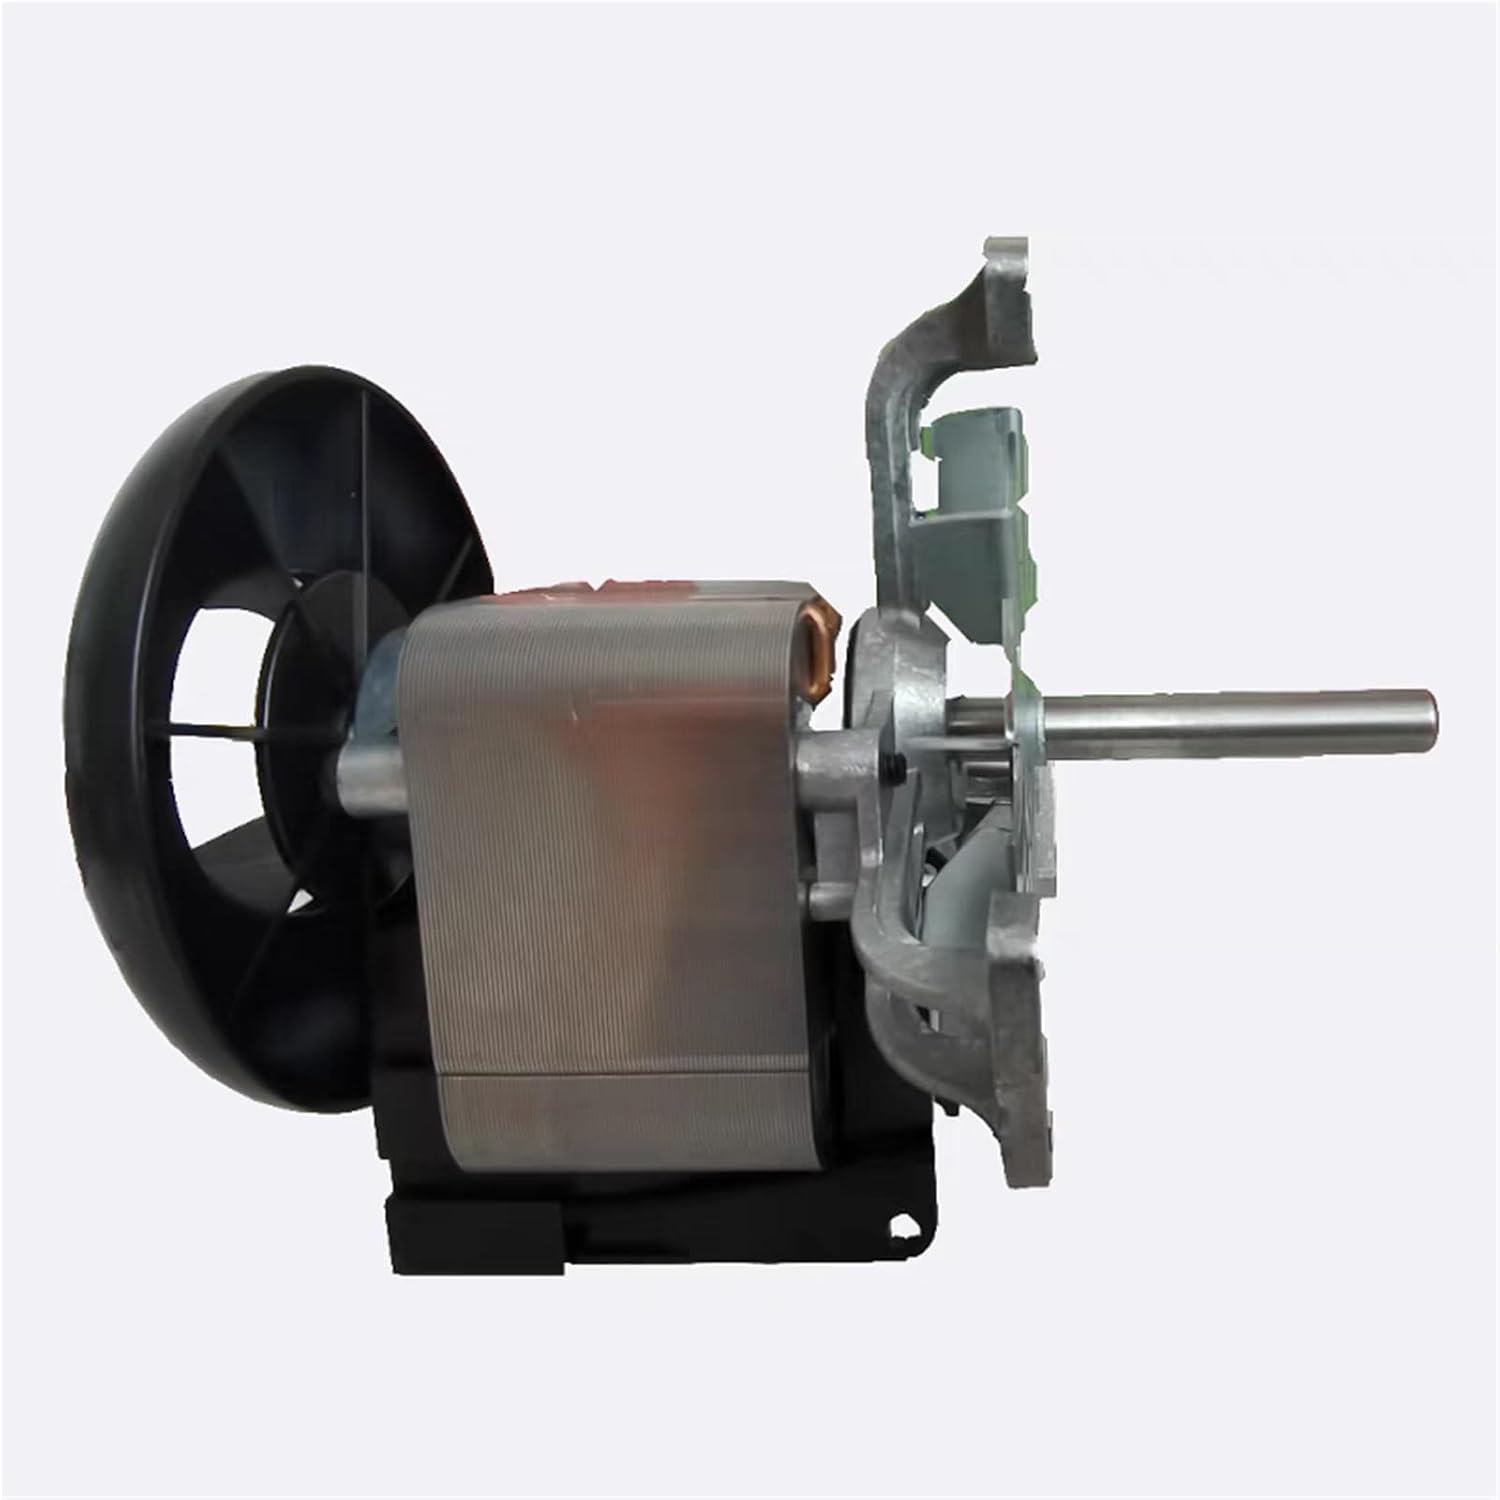
Figure 1: Side view of the motor assembly, showing the main body, shaft, and fan attachment point. This view highlights the compact design and robust housing.

Figure 2: The roller fan motor with its squirrel cage fan impeller. This component is responsible for circulating air within the oven or incubator.

Figure 3: Top-down view of the motor's internal components, including the fan blade and copper coil windings. This illustrates the core mechanism of the motor.

Figure 4: An exploded or cutaway view of the motor, detailing the relationship between the motor body, shaft, and the squirrel cage fan. This image helps visualize the assembly.
Specifications
| Feature | Specification |
|---|---|
| Voltage | 220V |
| Frequency | 50/60Hz |
| Power | 65W |
| Model Numbers | J238-15336, ZS6138-38002, MH6038-38052, GMFM-J238-15336, OCNNZUZMM |
| Application | Drying Ovens, Incubators, Baking Ovens (Household & Commercial) |
| Material | Metal and Plastic |
| Item Weight | 4.41 pounds (2000 Grams) |
| Product Dimensions | 11.81 x 7.87 x 7.87 inches |
Setup and Installation
This motor is intended as a direct replacement for compatible models. Ensure the appliance is disconnected from power before proceeding.
- Power Disconnection: Turn off and unplug the appliance from the main power supply.
- Access Panel: Locate and open the access panel to the motor compartment of your oven or incubator.
- Remove Old Motor: Carefully disconnect the wiring from the old motor. Note the wiring configuration for correct re-connection. Unscrew or unmount the old motor from its housing.
- Inspect Mounting: Clean the mounting area and inspect for any damage.
- Install New Motor: Position the new Generic Roller Fan Motor into the mounting bracket. Secure it using the appropriate screws or fasteners. Ensure it is firmly seated and aligned.
- Wire Connections: Reconnect the electrical wiring to the new motor, ensuring all connections are secure and match the original configuration. Refer to the appliance's wiring diagram if available.
- Grounding: Verify that the motor and appliance are properly grounded.
- Close Access Panel: Replace the access panel and secure it.
- Test: Plug the appliance back into the power supply and perform a test run to ensure the motor operates correctly and quietly.
Note: Always check the consistency of the damaged product with the replacement part before purchasing and installing. This motor is designed to match the original for direct replacement.
Operating Instructions
Once installed, the roller fan motor operates as an integral part of your appliance's heating and air circulation system. Its operation is typically controlled by the appliance's main control board.
- Automatic Operation: The motor will activate automatically when the appliance (drying oven, incubator, baking oven) is turned on and requires air circulation or heat distribution.
- Monitoring: During initial operation after installation, listen for any unusual noises or vibrations. Normal operation should be smooth and relatively quiet.
- Temperature Control: The motor's function is to circulate air to maintain consistent temperatures within the appliance. Ensure the appliance's temperature controls are functioning correctly.
Maintenance
Regular maintenance ensures the longevity and efficient operation of your roller fan motor.
- Power Disconnection: Always disconnect power to the appliance before performing any maintenance.
- Cleaning: Periodically inspect the fan blades and motor housing for dust, debris, or grease buildup. Clean gently with a soft brush or cloth. Avoid using harsh chemicals or excessive moisture.
- Bearing Inspection: Listen for any unusual noises from the motor bearings. If grinding or squealing sounds are present, the bearings may require lubrication or replacement by a qualified technician.
- Wiring Check: Annually inspect all electrical connections for tightness and signs of wear or corrosion.
- Shaft Movement: Ensure the motor shaft rotates freely without obstruction.
Troubleshooting
Before attempting any troubleshooting, ensure the appliance is disconnected from the power supply.
| Problem | Possible Cause | Solution |
|---|---|---|
| Motor does not start | No power supply; Loose wiring; Faulty motor; Appliance control issue | Check power connection; Verify wiring connections; Test motor with multimeter (if qualified); Consult appliance manual or technician |
| Motor makes unusual noise (grinding, squealing) | Worn bearings; Obstruction in fan; Loose mounting | Inspect for obstructions; Check mounting screws; Bearings may need replacement by technician |
| Motor overheats | Poor ventilation; Overload; Internal fault | Ensure adequate airflow; Verify motor is not undersized for application; Consult technician |
| Fan not rotating freely | Obstruction; Bent shaft; Damaged fan blade | Remove obstruction; Inspect shaft and fan for damage; Replace motor if shaft or fan is damaged |
If troubleshooting steps do not resolve the issue, contact a qualified appliance repair technician.
Warranty and Support
This product is a replacement part. For specific warranty information, please refer to the terms provided by the seller at the time of purchase. General support for installation and troubleshooting can often be found through the original appliance manufacturer's documentation or by consulting a professional technician.
For inquiries regarding this specific motor, please contact the seller or manufacturer with your purchase details and model numbers (J238-15336, ZS6138-38002, MH6038-38052, OCNNZUZMM).


