
1. Introduction
Thank you for choosing the RedCap 62mm Cylinder Piston Gasket Rebuild Kit. This comprehensive kit is designed to restore the performance and efficiency of your 200cc GY6B 4-Stroke Engine. Crafted from high-strength aluminum alloy, this kit ensures excellent durability and heat dissipation, extending engine life under demanding conditions.
This manual provides essential information for proper installation, maintenance, and troubleshooting to help you achieve a successful and lasting engine rebuild. Please read all instructions carefully before beginning any work.

Image: Key product features highlighting durability, ease of installation, and quality.
2. Product Overview and Components
The RedCap 62mm Cylinder Piston Gasket Rebuild Kit includes all necessary components for a complete top-end engine rebuild. Each part is manufactured to precise specifications to ensure a perfect fit and optimal performance.
Included Components:
- 1 x Cylinder
- 1 x Piston & Rings (complete set)
- 3 x Gaskets (Head, Cylinder, Timing Adjustment Opening)
- 2 x Circlips
- 1 x Wrist Pin (15mm x 48.5mm)

Image: All components of the RedCap rebuild kit, including cylinder, piston, rings, gaskets, wrist pin, and circlips.

Image: Visual representation of the included package contents, listing each part.

Image: Close-up view of the head and cylinder gaskets, essential for sealing the engine.

Image: Close-up view of the timing gasket, used for the timing adjustment opening.

Image: The piston pin, two circlips, and the complete set of piston rings.
3. Compatibility
This rebuild kit is specifically designed for 200cc GY6B 4-Stroke Engines, identified by the 1P62QML engine block. It features a 62mm piston bore diameter and 57mm stud spacing, ensuring a precise top-end fit.
The kit is compatible with a wide range of Chinese-made vehicles, including:
- Apollo Commander 200 ATVs
- RFZ ATVs
- Batman 200M ATVs
- Various Go-Karts utilizing the 200cc GY6B engine
It also fits select 170cc engines that share the 1P62QML engine block and corresponding specifications. Always verify your engine's specifications, particularly the bore diameter and stud spacing, before purchasing and installing this kit.
4. Installation Guidelines
Installation of this rebuild kit requires mechanical knowledge and appropriate tools. If you are not confident in your abilities, it is highly recommended to seek assistance from a qualified mechanic.
General Steps for Top-End Rebuild:
- Preparation: Ensure the engine is cool. Disconnect the battery. Drain engine oil. Remove all components necessary to access the cylinder and piston, including the carburetor, exhaust, and cylinder head.
- Disassembly: Carefully remove the old cylinder head, cylinder, piston, and associated gaskets. Inspect the crankshaft, connecting rod, and crankcase for any damage or wear. Clean all mating surfaces thoroughly, removing any old gasket material.
- Piston Installation: Install the new piston rings onto the new piston according to the manufacturer's instructions (ring orientation is crucial). Attach the piston to the connecting rod using the new wrist pin and circlips. Ensure circlips are fully seated.
- Cylinder Installation: Lubricate the piston and cylinder bore with clean engine oil. Carefully compress the piston rings and slide the new cylinder over the piston. Ensure the cylinder base gasket is properly placed.
- Cylinder Head Installation: Place the new cylinder head gasket onto the cylinder. Install the cylinder head, ensuring all valves and camshaft components are correctly aligned. Torque cylinder head bolts to the manufacturer's specified values in the correct sequence.
- Reassembly: Reinstall all removed components, including the carburetor, exhaust, and any other engine accessories. Reconnect the battery.
- Fluids: Refill the engine with the correct type and amount of engine oil.
- Initial Start-up: Follow the engine manufacturer's guidelines for initial start-up after a rebuild, including any break-in procedures.
Important: Always refer to your specific engine's service manual for detailed torque specifications, assembly sequences, and critical clearances.
5. Maintenance
Proper maintenance after a rebuild is crucial for the longevity and performance of your engine. Adhere to the following guidelines:
- Break-in Period: Follow the engine manufacturer's recommended break-in procedure. This typically involves varying engine RPMs, avoiding prolonged high RPMs or heavy loads for the first few hours of operation.
- Oil Changes: Perform the first oil change after the break-in period (e.g., 5-10 hours of operation) to remove any assembly lubricants or wear particles. Subsequently, adhere to the regular oil change intervals specified by your engine manufacturer.
- Regular Inspections: Periodically check for oil leaks, unusual noises, or changes in engine performance. Inspect spark plugs, air filter, and fuel system components as part of routine maintenance.
- Cooling System: Ensure the cooling fins on the cylinder are clean and free of debris to allow for efficient heat dissipation.
6. Troubleshooting
If you encounter issues after installing the rebuild kit, consider the following common problems and their potential causes:
| Problem | Possible Cause | Solution |
|---|---|---|
| Low Compression | Incorrect piston ring installation, damaged piston rings, improperly seated valves, head gasket leak. | Recheck piston ring orientation and gaps. Inspect valves and valve seats. Verify head gasket installation and torque. |
| Oil Leaks | Improperly installed gaskets, damaged gaskets, loose bolts. | Ensure all gaskets are correctly seated and undamaged. Re-torque bolts to specifications. |
| Engine Overheating | Insufficient cooling, lean fuel mixture, excessive friction. | Clean cooling fins. Check carburetor tuning. Ensure proper lubrication. |
| Excessive Smoke from Exhaust | Incorrect piston ring installation, worn valve guides/seals (if not replaced), incorrect oil level. | Verify piston ring installation. Check oil level. Consider valve guide/seal inspection. |
If troubleshooting steps do not resolve the issue, it is recommended to consult a professional mechanic.
7. Specifications
Key technical specifications for the RedCap 62mm Cylinder Piston Gasket Rebuild Kit:
- Piston Bore Diameter: 62mm
- Stud Spacing: 57mm
- Wrist Pin Dimensions: 15mm (diameter) x 48.5mm (length)
- Cylinder Height: Approximately 90mm
- Material: High-strength Aluminum Alloy
- Engine Compatibility: 200cc GY6B 4-Stroke Engines (1P62QML engine block)
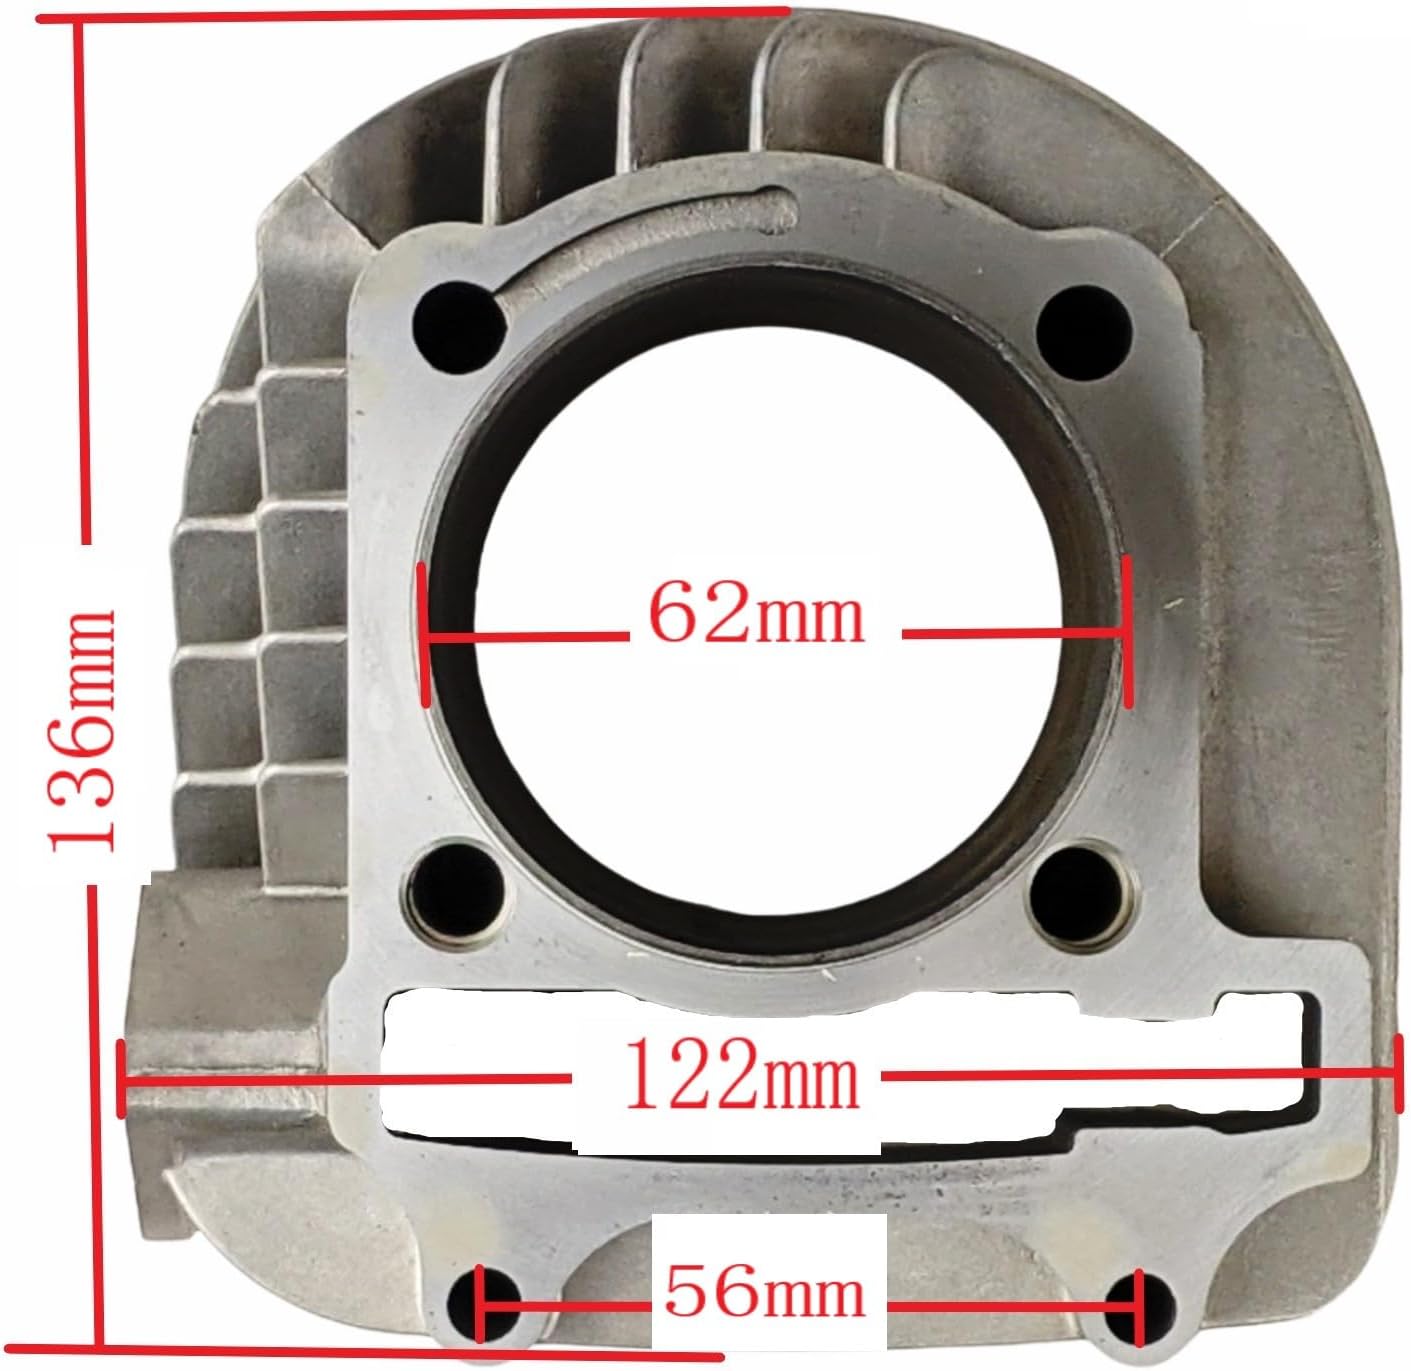
Image: Cylinder showing the 62mm bore diameter.

Image: Cylinder displaying stud spacing measurements (51mm and 45mm between studs).

Image: Side view of the cylinder indicating a height of 90mm.

Image: Piston showing its 62mm diameter and 32mm height.
8. Warranty and Support
For warranty information regarding your RedCap 62mm Cylinder Piston Gasket Rebuild Kit, please refer to the purchase documentation or contact the seller directly. Warranty terms and conditions may vary.
If you require technical assistance or have questions about the installation or compatibility of this product, please reach out to RedCap customer support through the platform where the purchase was made. Provide your order details and a clear description of your inquiry for prompt assistance.