1. Product Overview
The Upperizon Portable Monitor T156UH is a 15.6-inch 4K UHD (3840 x 2160) display designed for enhanced productivity and entertainment on the go. It features an IPS panel with 100% sRGB color gamut, 1400:1 contrast ratio, and 350 Nits brightness, offering vivid and clear visuals. This monitor supports a 60 Hz refresh rate and HDR technology for an immersive viewing experience. Its lightweight and thin design, combined with versatile connectivity options, make it an ideal external display for various devices.
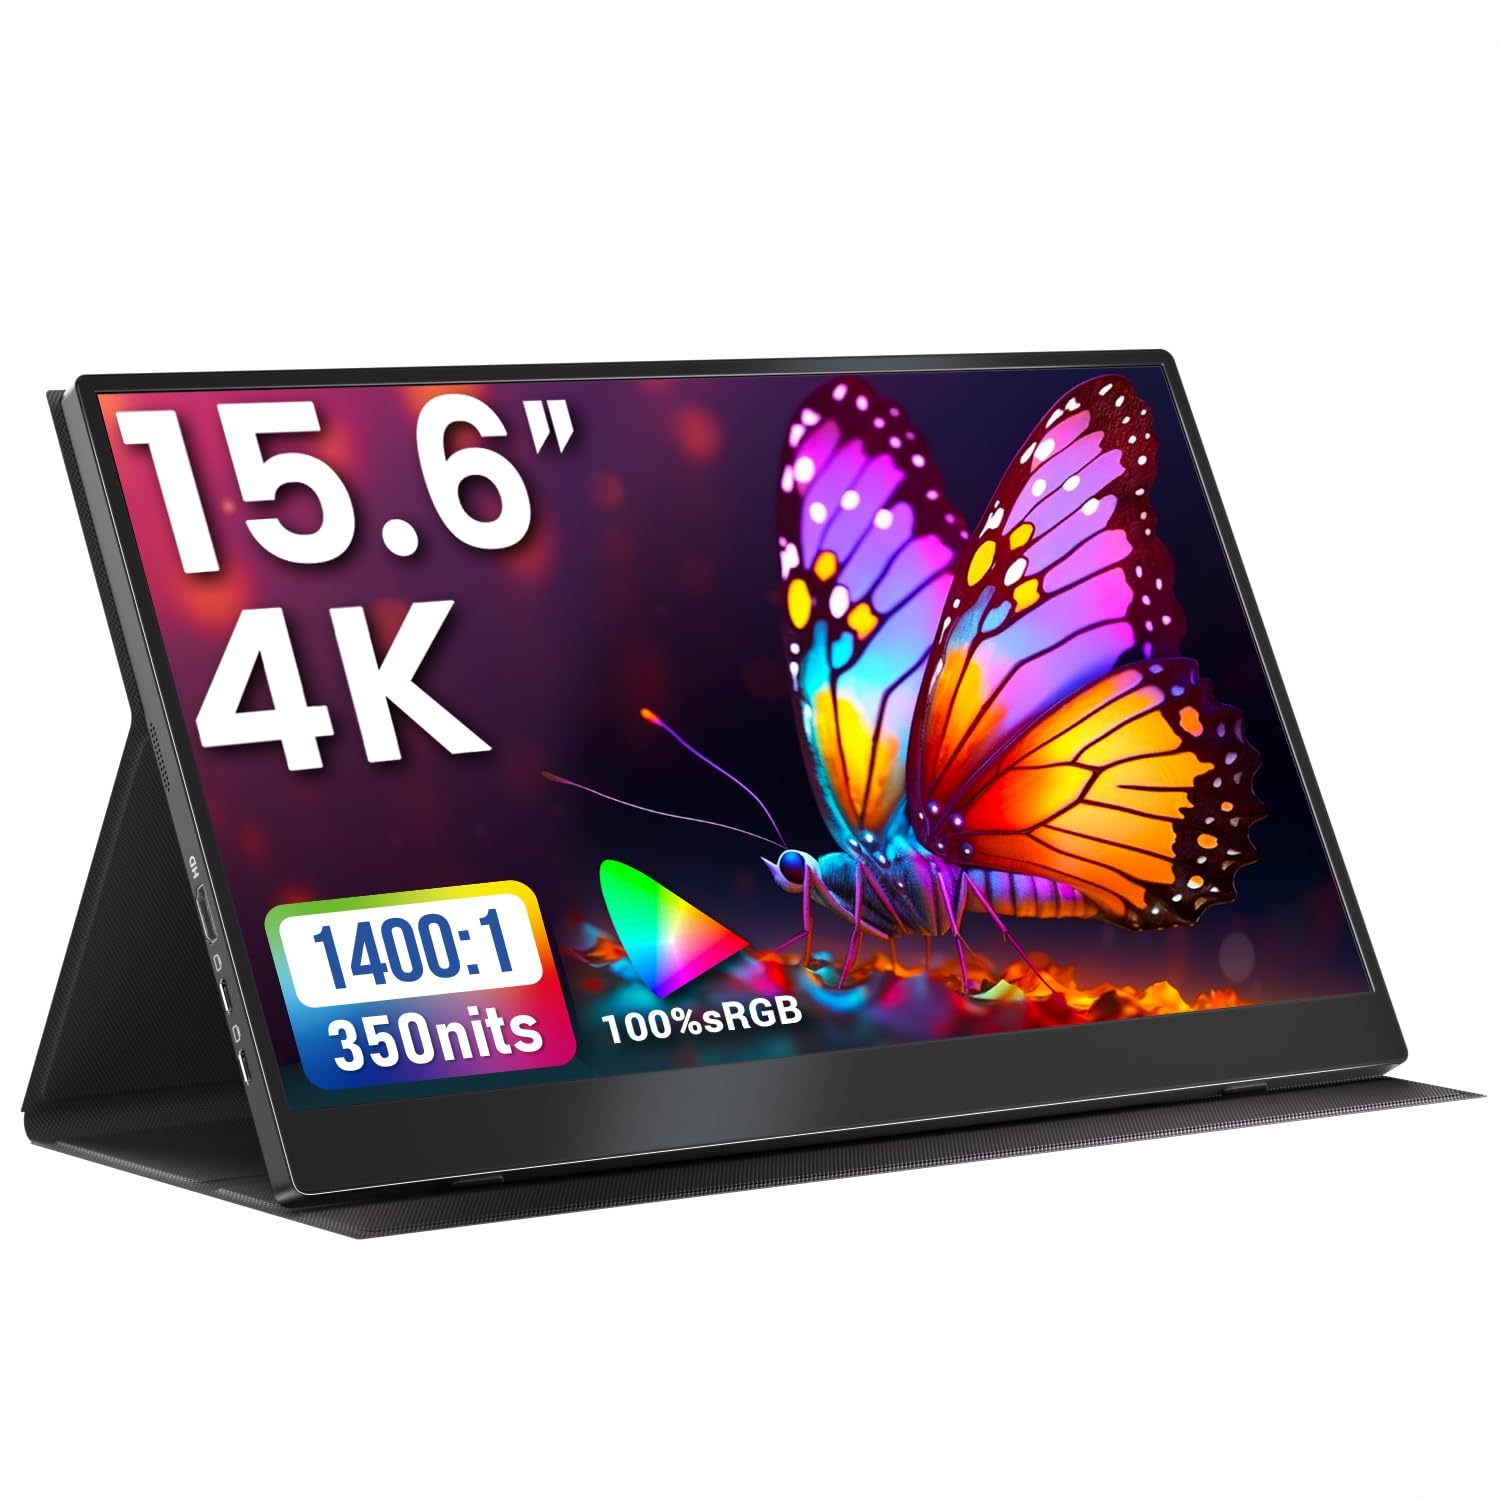
Figure 1: Upperizon Portable Monitor T156UH with its protective cover.
2. What's in the Box
Verify that all items are present in the package:
- 1 × Portable Monitor
- 2 × USB-C to USB-C display Cables
- 1 × HDMI Cable
- 1 × Power Adapter (30W)
- 1 × Cover Case

Figure 2: Included accessories: monitor, two USB-C cables, one HDMI cable, power adapter, and cover case.
3. Setup and Connections
3.1 Connecting via USB-C (Single Cable)
For devices supporting Thunderbolt 3/4/5 or a full-featured USB-C port with DisplayPort Alternate Mode, a single USB-C to USB-C cable can provide both power and video signal.
- Connect one end of the USB-C to USB-C cable to your device's compatible USB-C port.
- Connect the other end of the USB-C to USB-C cable to one of the monitor's USB-C ports.
- If the screen flickers or does not power on, connect the provided 30W power adapter to the other USB-C port on the monitor.

Figure 3: USB-C Plug & Play connection. Ensure your device's USB-C port supports Thunderbolt 3/4/5 or DisplayPort Alt Mode.
3.2 Connecting via HDMI (Dual Cable)
For devices with an HDMI output, two cables are required: one for video and one for power.
- Connect one end of the HDMI cable to your device's HDMI port.
- Connect the other end of the HDMI cable to the monitor's HDMI port.
- Connect the provided 30W power adapter to one of the monitor's USB-C ports to supply power.

Figure 4: HDMI connection requires both an HDMI cable for video and a USB-C power cable.
3.3 VESA Mounting
The monitor features four VESA mounting holes (75x75mm) on its back for mounting on a VESA-compatible stand. M4*6mm screws are recommended for secure attachment.

Figure 5: VESA mounting points for landscape and portrait orientation. VESA stand is not included.
4. Operating the Monitor
4.1 Ports and Controls
The monitor is equipped with multiple ports and control buttons on its sides:
- HDMI Port: For video input from various devices.
- USB-C Ports (x2): For power, video input (DisplayPort Alt Mode), and data transfer.
- Power/Return Button: Powers the monitor on/off, or acts as a 'Return' button in the OSD menu.
- Volume/Down Button: Adjusts volume or navigates down in the OSD menu.
- Brightness/Up Button: Adjusts brightness or navigates up in the OSD menu.
- Menu/Enter Button: Accesses the On-Screen Display (OSD) menu or confirms selections.
- Audio Jack: For connecting external headphones or speakers.
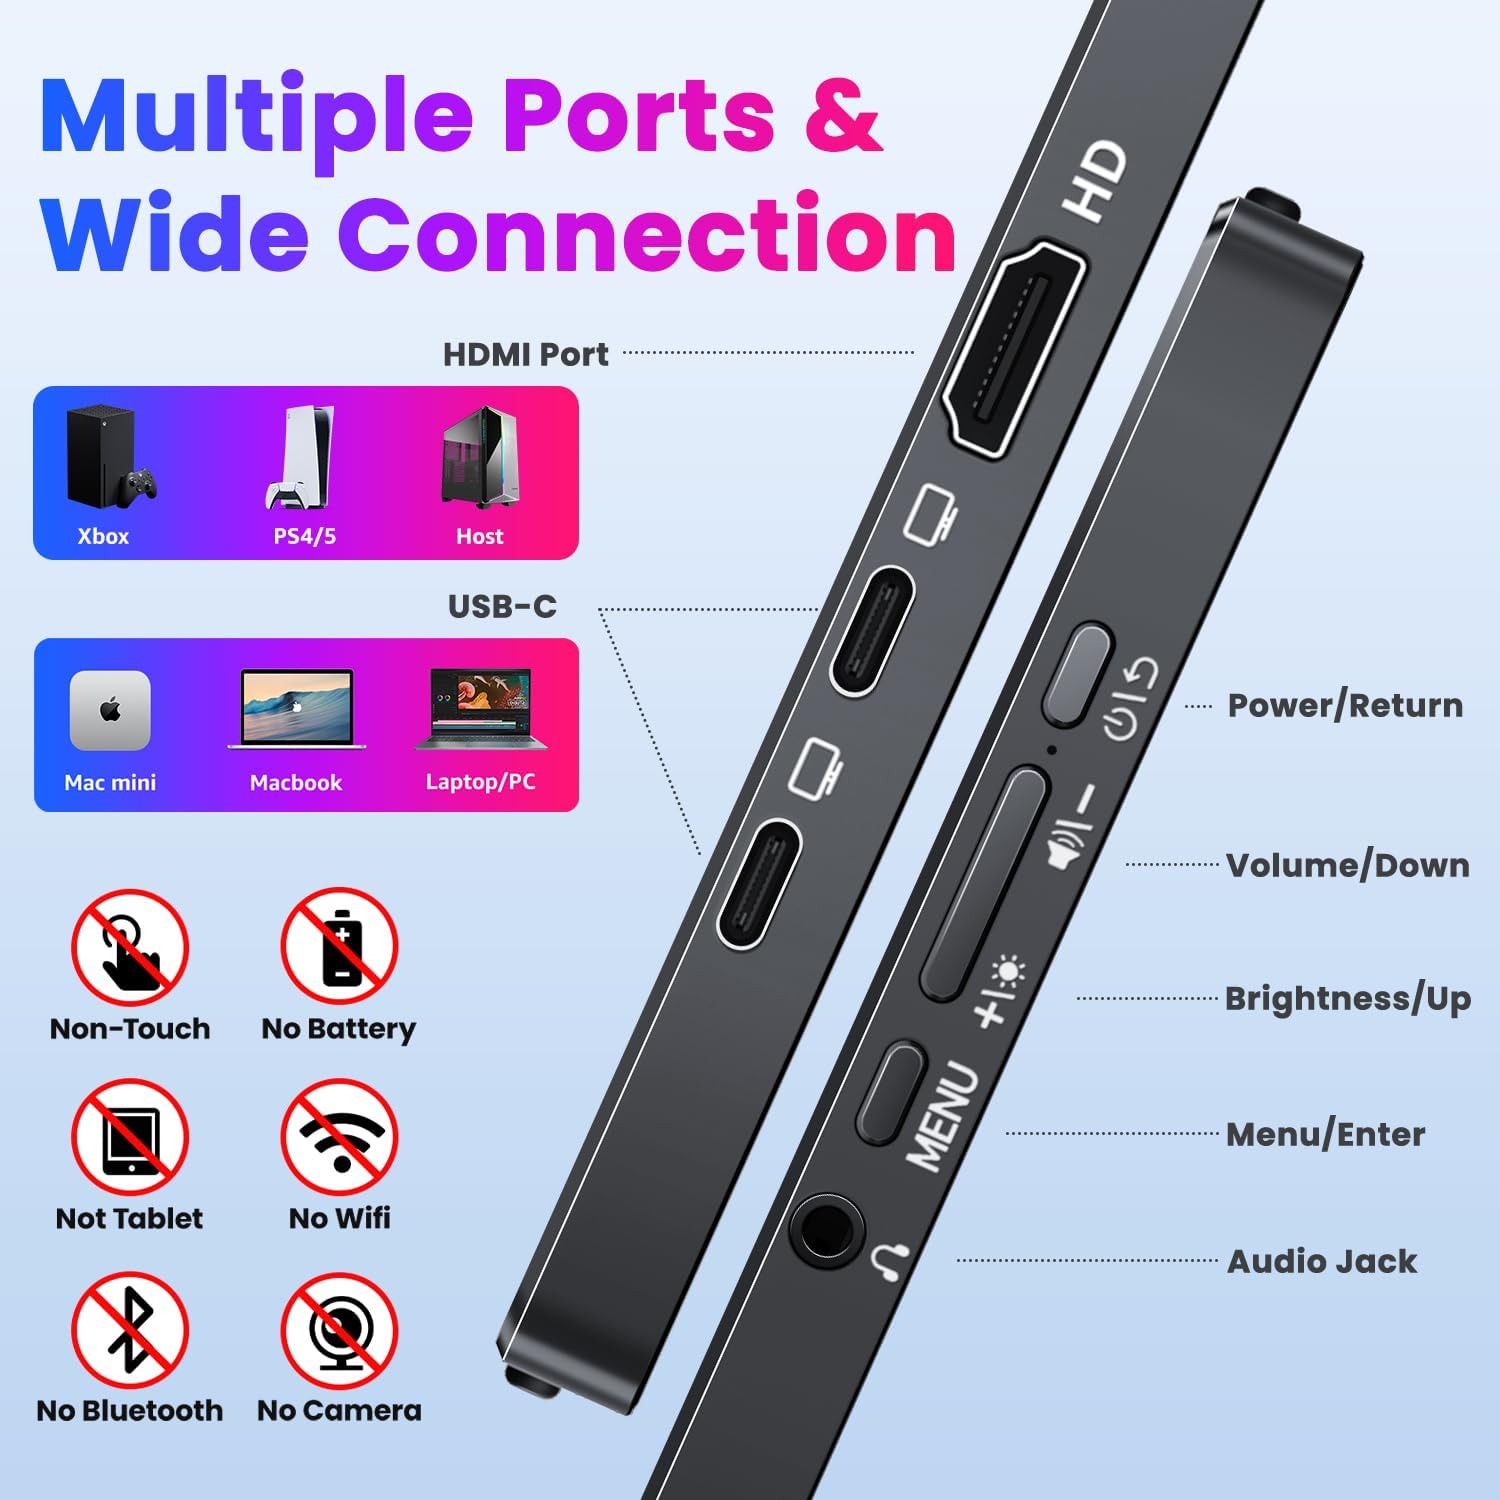
Figure 6: Overview of monitor ports and control buttons.
4.2 On-Screen Display (OSD) Menu
The OSD menu allows you to adjust various display settings such as brightness, contrast, color modes, and HDR settings.
- Press the Menu/Enter button to open the OSD menu.
- Use the Brightness/Up and Volume/Down buttons to navigate through menu options.
- Press the Menu/Enter button to select an option or enter a sub-menu.
- Use the Power/Return button to go back to the previous menu or exit the OSD.

Figure 7: Adjusting HDR settings through the OSD menu.
4.3 Usage Scenarios
- Laptop/PC Extension: Easily set up dual or triple screens for increased productivity.
- Gaming: Connect to consoles like Xbox or PS4/5 via HDMI for an enhanced gaming experience.
- Mac Mini/Studio: Can serve as a main display for mini hosts.

Figure 8: Using the portable monitor as an extended display for work.
5. Maintenance
To ensure the longevity and optimal performance of your Upperizon Portable Monitor, follow these maintenance guidelines:
- Cleaning: Use a soft, lint-free cloth to gently wipe the screen. For stubborn marks, slightly dampen the cloth with water or a screen-safe cleaning solution. Avoid harsh chemicals or abrasive materials.
- Handling: Always handle the monitor with care. Avoid dropping it or subjecting it to strong impacts.
- Storage: When not in use, store the monitor in its protective cover to prevent scratches and dust accumulation.
- Temperature: Avoid exposing the monitor to extreme temperatures or direct sunlight for prolonged periods.

Figure 9: The magnetic protective cover also functions as a stand.
6. Troubleshooting
If you encounter issues with your monitor, refer to the following common solutions:
- Screen Flickering: This is typically caused by insufficient power supply. Ensure you are using the original 30W power adapter, especially when connecting via a single USB-C cable or when the connected device cannot provide enough power.
- No Signal/Display:
- Verify that your device's USB-C port supports Thunderbolt 3/4/5 or DisplayPort Alternate Mode if using a single USB-C cable.
- Ensure all cables are securely connected. Try unplugging and replugging them.
- If using HDMI, ensure the power adapter is connected to the monitor.
- Test with different cables if available.
- Portrait Mode Not Working: Portrait mode is not supported when connecting to an iPad or smartphone.
- Gaming Console Connection: For optimal compatibility with devices like Nintendo Switch, it is recommended to use an HDMI connection. USB-C may not be compatible with all gaming consoles.
7. Specifications
| Feature | Specification |
|---|---|
| Model Number | T156UH |
| Screen Size | 15.6 Inches |
| Resolution | 4K UHD (3840 x 2160 Pixels) |
| Panel Type | IPS |
| Refresh Rate | 60 Hz |
| Color Gamut | 100% sRGB |
| Display Colors | 8-Bit, 16.7 Million Colors |
| Contrast Ratio | 1400:1 |
| Brightness | 350 Nits (Candela) |
| Aspect Ratio | 16:9 |
| Screen Surface | Matte |
| Product Dimensions | 0.39 x 13.93 x 8.62 inches |
| Item Weight | 1.57 pounds |
| Total USB Ports | 2 (USB-C) |
| Voltage | 5 Volts |
| VESA Compatibility | 75x75mm (M4*6mm screws recommended) |

Figure 10: Monitor dimensions and thickness.

Figure 11: The monitor's lightweight design for portability.
8. Warranty and Support
Upperizon products are designed for reliability and performance. For any technical assistance, warranty claims, or product inquiries, please refer to the official Upperizon support channels.
While specific warranty details are not provided in this manual, some users have reported a 2-year warranty. Please check your product packaging or the official Upperizon website for the most accurate and up-to-date warranty information.
For further support, you may visit the Upperizon Store on Amazon.