1. Introduction
This manual provides essential information for the setup, operation, maintenance, and troubleshooting of the EC Buying STM32H743XIH6 STM32 Development Board. Please read these instructions carefully before using the product to ensure proper functionality and to maximize its potential.
2. Product Overview
The STM32H743XIH6 Development Board is a high-performance core board designed for various embedded applications. It features a powerful STM32H743XIH6 microcontroller with a 480MHz main frequency, 2MB Flash memory, and 1M SRAM, complemented by 32MB SDRAM for enhanced data handling. The board offers extensive connectivity and expansion options, making it suitable for complex projects.
Key Features:
- Microcontroller: STM32H743XIH6 (480MHz, 2MB Flash, 1M SRAM)
- External Memory: 32MB SDRAM (16-bit wide), W25Q64 Flash
- Power Supply: 5V via USB Type-C interface
- I/O Ports: 83 general-purpose input/output (GPIO) ports
- Onboard Components: 3.3V voltage regulator, Reset button, BOOT button, User LED
- Display Interfaces: SPI LCD (0.96 to 2.0 inches), RGB LCD (larger than 4.3 inches)
- Camera Interface: 8-bit DCMI driver compatible
- Operating Temperature: -40°C to 85°C
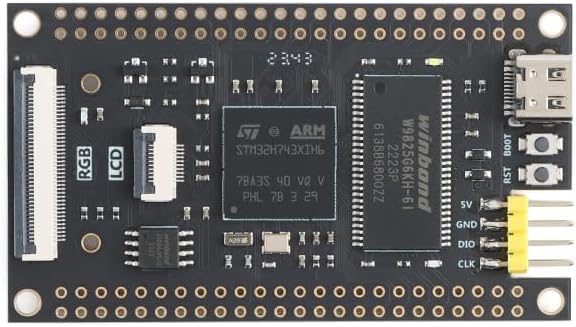
Figure 2.1: Top view of the STM32H743XIH6 Development Board, highlighting key components.

Figure 2.2: Bottom view of the STM32H743XIH6 Development Board, featuring expansion interfaces.
3. Setup Instructions
Follow these steps to set up your STM32H743XIH6 Development Board:
- Power Connection: Connect the board to a 5V power source using a USB Type-C cable. The Type-C port is located on the board's edge. Ensure the power supply is stable.
- Driver Installation: Depending on your operating system and development environment, you may need to install specific USB drivers for the STM32 microcontroller. Refer to the STMicroelectronics official website or your chosen Integrated Development Environment (IDE) documentation for driver details.
- Development Environment Setup: Install a suitable IDE such as STM32CubeIDE, Keil MDK, or IAR Embedded Workbench. These environments provide tools for compiling code, flashing firmware, and debugging.
- Peripheral Connections: For connecting external components like SPI LCDs, RGB LCDs, or cameras, refer to the board's pinout diagram (if available from the seller) to identify the correct GPIO pins and interfaces. Ensure all connections are secure before powering on.
- Initial Programming: Use the BOOT button and Reset button in conjunction with your IDE to enter programming mode and upload your first firmware. Typically, holding BOOT while pressing and releasing Reset, then releasing BOOT, will put the board into DFU (Device Firmware Upgrade) mode.

Figure 3.1: STM32H743XIH6 Development Board with pin headers for expansion.
4. Operating Instructions
Once the board is set up and programmed, its operation will depend on the specific application firmware loaded onto the microcontroller. General operational guidelines include:
- Power On: Connect the USB Type-C cable to a 5V power source. The onboard user LED may illuminate, indicating power.
- Reset Function: Press the Reset button to restart the microcontroller and execute the loaded program from the beginning.
- Debugging: Utilize the debugging features of your IDE, typically via a SWD (Serial Wire Debug) interface, to monitor program execution, set breakpoints, and inspect variables.
- Peripheral Interaction: Interact with connected peripherals (LCDs, sensors, etc.) as defined by your firmware.
5. Maintenance
To ensure the longevity and reliable operation of your development board, observe the following maintenance practices:
- Handling: Handle the board by its edges to avoid touching sensitive components, which can be damaged by static electricity or contaminants.
- Storage: Store the board in a dry, anti-static environment when not in use.
- Cleaning: If necessary, gently clean the board with a soft, dry brush or compressed air to remove dust. Avoid using liquids or abrasive materials.
- Environmental Conditions: Operate the board within its specified temperature range of -40°C to 85°C. Avoid extreme humidity or direct exposure to moisture.
6. Troubleshooting
If you encounter issues with your STM32H743XIH6 Development Board, consider the following troubleshooting steps:
- No Power/LED Off:
- Verify the USB Type-C cable is securely connected to both the board and a functional 5V power source.
- Test the power source with another device to confirm it is supplying power.
- Board Not Recognized by PC:
- Ensure all necessary USB drivers are installed correctly on your computer.
- Try a different USB port or cable.
- Confirm the board is in the correct mode (e.g., DFU mode for programming) if applicable.
- Program Not Running:
- Check your code for errors and ensure it has been successfully compiled and flashed to the board.
- Press the Reset button to restart the program.
- Use debugging tools to step through your code and identify execution issues.
- Peripheral Not Functioning:
- Double-check all wiring connections to the peripheral.
- Verify that the peripheral is correctly initialized and configured in your firmware.
- Consult the peripheral's datasheet and any available pinout diagrams for the STM32H743XIH6 board.
For more detailed technical support or specific documentation, it is recommended to contact the seller or manufacturer directly.
7. Specifications
| Feature | Detail |
|---|---|
| Brand | EC Buying |
| Model Name | STM32H743XIH6 |
| Processor | STMicroelectronics ARMv7 (STM32H743XIH6) |
| Processor Speed | 480 MHz |
| Flash Memory | 2 MB |
| SRAM | 1 MB |
| SDRAM | 32 MB (16-bit wide) |
| External Flash | W25Q64 |
| I/O Ports | 83 |
| Power Supply | 5V (via USB Type-C) |
| Connectivity | USB Type-C, SPI |
| Compatible Devices | SPI LCDs, Camera, RGB LCDs |
| Operating Temperature | -40°C to 85°C |
| Dimensions | Refer to Figure 7.1 |

Figure 7.1: STM32H743XIH6 Development Board dimensions.
8. Warranty and Support
For warranty information, technical support, or to obtain additional documentation such as detailed pinout diagrams or example code, please contact EC Buying directly through their official channels or the platform where the product was purchased. Providing your product model number (STM32H743XIH6) and purchase details will assist in a quicker resolution.