
SAVSEC MST50
SAVSEC MST50 Laser Distance Meter User Manual
Model: MST50
1. Introduction
This manual provides detailed instructions for the safe and effective operation of your SAVSEC MST50 Laser Distance Meter. Please read this manual thoroughly before using the device to ensure proper functionality and to prevent potential hazards.
The MST50 is a digital laser measuring tool designed for precise distance, area, volume, and Pythagorean measurements. It features 4 unit switching options (ft/in/m/ft+in), a 165ft measurement range, and 1/16in accuracy.

Image: An illustration highlighting the SAVSEC MST50's high accuracy of ±2mm (1/13 inch) and fast reading speed of less than 0.25 seconds, enabled by a large optical lens with 50% higher light transmittance.
2. Safety Information
2.1 Laser Safety Warning
WARNING: This device emits a Class 2 laser. Do not stare directly into the laser beam. Do not aim the laser beam at people or animals.
- Laser Class: Class 2 (IEC/EN60825-1/2014)
- Power Output: <1mW
- Wavelength: 635nm
2.2 General Safety Precautions
- Keep the device out of reach of children.
- Do not attempt to modify or disassemble the device.
- Avoid using the device in explosive environments or near flammable materials.
- Ensure the measurement surface is clear of obstructions.
3. Package Contents
Verify that all items are present in the package:
- 1x SAVSEC MST50 Laser Distance Meter
- 3x AAA Batteries
- 1x User Manual

Image: The SAVSEC MST50 Laser Distance Meter shown with three AAA batteries, indicating the complete package contents.
4. Device Overview
Familiarize yourself with the components of your MST50 Laser Distance Meter.
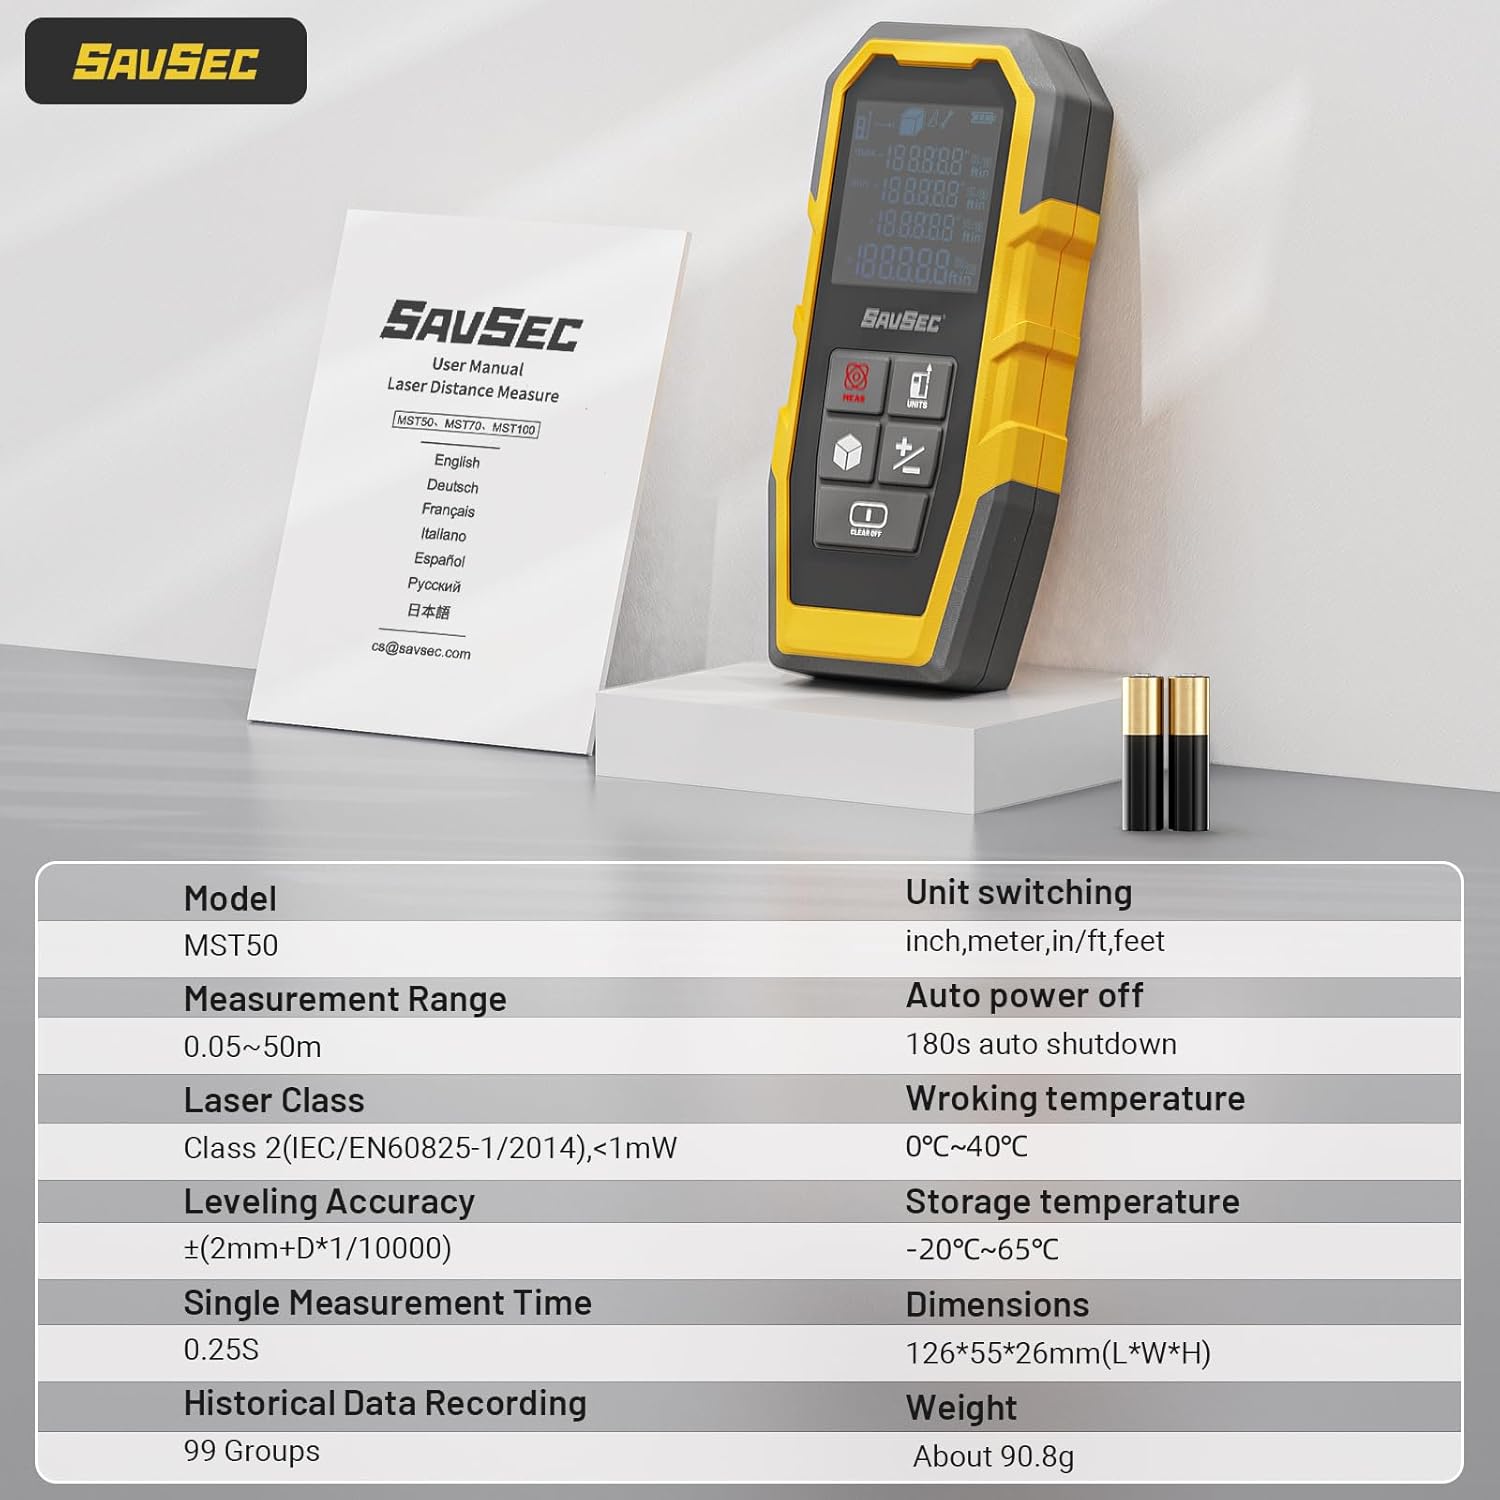
Image: Front view of the SAVSEC MST50 Laser Distance Meter, highlighting the display screen and control buttons for measurement, unit switching, and clear/off functions.
4.1 Buttons and Display
- MEAS Button: Initiates measurement, confirms selection.
- UNITS Button: Switches measurement units (m/in/ft/ft+in), changes reference point.
- Function Button (Cube Icon): Selects measurement modes (Area, Volume, Pythagorean).
- Add/Subtract Button (+/-): Performs addition or subtraction of measurements.
- CLEAR OFF Button: Clears current measurement, exits mode, or powers off the device.
- Display Screen: Shows measurement values, units, battery status, and mode indicators.
5. Setup
5.1 Battery Installation
- Locate the battery compartment cover on the back of the device.
- Slide or unclip the cover to open it.
- Insert three AAA batteries, ensuring correct polarity (+/-).
- Close the battery compartment cover securely.
The device is powered by 3x AAA batteries, which are included.
6. Operation
6.1 Power On/Off
- Power On: Press the MEAS button.
- Power Off: Press and hold the CLEAR OFF button for 2 seconds. The device also features a 180-second auto shut-off to conserve battery.

Image: The SAVSEC MST50 Laser Distance Meter on a wooden surface, illustrating the 180-second auto shut-off feature with a circular arrow icon.
6.2 Unit Switching
Press the UNITS button repeatedly to cycle through the available measurement units: meters (m), inches (in), feet (ft), and feet+inches (ft+in).

Image: A visual representation of the SAVSEC MST50's ability to convert between inches, meters, feet, and feet+inches, along with indicators for reference points and 99 data storage groups.
6.3 Reference Point Adjustment
The device can measure from either its front or rear edge. Press and hold the UNITS button to switch between front and rear reference points. An icon on the display will indicate the active reference point.
6.4 Basic Measurement (Single Distance)
- Ensure the device is powered on.
- Point the laser at the target surface.
- Press the MEAS button once. The measured distance will appear on the display.
6.5 Continuous Measurement
This mode allows for dynamic measurement, displaying real-time distance as the device is moved. It also records maximum and minimum values.
- Press and hold the MEAS button. The device will enter continuous measurement mode.
- Move the device to measure different distances. The display will update continuously, showing current, maximum, and minimum values.
- Press the MEAS button again to exit continuous measurement and freeze the last reading.

Image: The SAVSEC MST50 Laser Distance Meter positioned in a room, demonstrating continuous measurement with the laser beam extending across the space, and the display showing real-time, maximum, and minimum values.
6.6 Area Measurement
- Press the Function button (cube icon) once. The area icon will appear on the display.
- Measure the first side (length) by pressing MEAS.
- Measure the second side (width) by pressing MEAS.
- The device will automatically calculate and display the area.
6.7 Volume Measurement
- Press the Function button (cube icon) twice. The volume icon will appear on the display.
- Measure the length by pressing MEAS.
- Measure the width by pressing MEAS.
- Measure the height by pressing MEAS.
- The device will automatically calculate and display the volume.
6.8 Pythagorean Measurement
The MST50 supports three types of Pythagorean measurements for indirect height or distance calculations.

Image: A grid of nine images illustrating different measurement modes: Single Measurement, Continuous Measurement, Area, Wall Area, Volume, Pythagorean-1, Pythagorean-2, and Pythagorean-3, demonstrating the versatility of the SAVSEC MST50.
6.8.1 Pythagorean-1 (Indirect Height)
- Press the Function button (cube icon) three times. The Pythagorean-1 icon will appear.
- Measure the hypotenuse (distance from device to top of object) by pressing MEAS.
- Measure the base (horizontal distance from device to bottom of object) by pressing MEAS.
- The device will calculate and display the indirect height.
6.8.2 Pythagorean-2 (Indirect Height with two hypotenuses)
- Press the Function button (cube icon) four times. The Pythagorean-2 icon will appear.
- Measure the first hypotenuse (distance from device to top of object) by pressing MEAS.
- Measure the second hypotenuse (distance from device to bottom of object) by pressing MEAS.
- Measure the horizontal distance between the two points on the ground by pressing MEAS.
- The device will calculate and display the indirect height.
6.8.3 Pythagorean-3 (Indirect Distance)
- Press the Function button (cube icon) five times. The Pythagorean-3 icon will appear.
- Measure the first hypotenuse (distance from device to top of object) by pressing MEAS.
- Measure the second hypotenuse (distance from device to bottom of object) by pressing MEAS.
- Measure the vertical distance from the device to the bottom of the object by pressing MEAS.
- The device will calculate and display the indirect distance.
6.9 Addition and Subtraction of Measurements
The MST50 can add or subtract measurements for distance, area, and volume.
- Perform the first measurement (e.g., distance, area, or volume).
- Press the +/- button. A "+" or "-" icon will appear.
- Perform the second measurement.
- The result of the addition or subtraction will be displayed. Repeat for multiple calculations.

Image: Two panels demonstrating the addition and subtraction functions of the SAVSEC MST50. The top panel shows two areas being added, and the bottom panel shows one volume being subtracted from another, with the results displayed on the meter's screen.
6.10 Data Storage
The device can store up to 99 groups of historical measurement data. To recall stored data, refer to the device's display interface. Specific instructions for recalling data are typically found by cycling through modes or pressing a dedicated history button (if available, not explicitly mentioned for MST50 but implied by "99-group storage").
7. Specifications
Technical specifications for the SAVSEC MST50 Laser Distance Meter:
Image: A detailed table of specifications for the SAVSEC MST50 Laser Distance Meter, including measurement range, laser class, accuracy, and operating conditions.
| Feature | Detail |
|---|---|
| Model | MST50 |
| Measurement Range | 0.05 - 50m (165ft) |
| Laser Class | Class 2 (IEC/EN60825-1/2014), <1mW |
| Leveling Accuracy | ±2mm + D*1/10000 (1/16in) |
| Single Measurement Time | 0.25s |
| Historical Data Recording | 99 Groups |
| Unit Switching | inch, meter, in/ft, feet |
| Auto Power Off | 180s auto shutdown |
| Working Temperature | 0°C ~ 40°C |
| Storage Temperature | -20°C ~ 65°C |
| Dimensions (L*W*H) | 126*55*26mm |
| Weight | About 90.8g |
| Material | Acrylonitrile Butadiene Styrene, Rubber |
| Included Components | 1x laser distance meter, 3x AAA battery |
8. Troubleshooting
If you encounter issues with your MST50, refer to the following common problems and solutions:
| Problem | Possible Cause | Solution |
|---|---|---|
| Device does not power on. | Low or dead batteries; incorrect battery installation. | Replace batteries with new ones; ensure correct polarity. |
| Inaccurate measurements. | Unstable measurement surface; laser beam obstructed; incorrect reference point. | Ensure stable positioning; clear obstructions; verify reference point setting. |
| Display is blank or flickering. | Low battery; device malfunction. | Replace batteries. If problem persists, contact customer support. |
| Laser beam is not visible. | Device off; environmental conditions (bright light). | Ensure device is on. In bright conditions, the laser may be harder to see, but measurement should still function. |
9. Maintenance
9.1 Cleaning
- Wipe the device with a soft, damp cloth. Do not use abrasive cleaners or solvents.
- Clean the laser lens carefully with a soft cloth, similar to cleaning camera lenses.
9.2 Storage
- Store the device in a cool, dry place away from direct sunlight.
- Remove batteries if the device will not be used for an extended period to prevent leakage.
9.3 Durability Features
The MST50 features a double-layer rubber armor and an IP54 rating, providing protection against drops, dust, and spills.

Image: The SAVSEC MST50 Laser Distance Meter on a table, with an inset showing the thick rubber wrap around its edges, emphasizing its fall protection and rugged design.
10. Warranty and Customer Support
10.1 Warranty Information
The SAVSEC MST50 Laser Distance Meter is backed by a 2-year manufacturer's warranty from the date of purchase. This warranty covers defects in materials and workmanship under normal use.
The warranty does not cover damage caused by misuse, unauthorized modification, accident, or neglect.
10.2 Customer Support
For technical assistance, warranty claims, or any questions regarding your SAVSEC MST50, please contact our customer support team.
Email: service@savsec.com
Our customer support is available 24/7 to assist you.
Ask a question about this manual
Ask about setup, troubleshooting, compatibility, parts, safety, or missing instructions. Manuals+ will review the question and use this page’s manual context to help answer it.