1. Introduction
This manual provides essential information for the safe operation, assembly, maintenance, and troubleshooting of your CURECURE Electric Pressure Washer, Model YLQ3500H-130. Please read this manual thoroughly before using the product and retain it for future reference.
2. Important Safety Instructions
WARNING: Read all safety warnings and instructions. Failure to follow the warnings and instructions may result in electric shock, fire, and/or serious injury.
- Always wear appropriate personal protective equipment, including safety glasses, hearing protection, and protective footwear.
- Never point the spray gun at people, pets, or electrical devices. The high-pressure spray can cause serious injury.
- Ensure the power cord and plug are in good condition. Do not use if damaged.
- Connect the pressure washer only to a grounded outlet protected by a Ground Fault Circuit Interrupter (GFCI).
- Do not operate the pressure washer in the rain or near standing water.
- Always turn off the power and disconnect the water supply before performing any maintenance or cleaning.
- Keep children and pets away from the operating area.
- Do not use flammable liquids or toxic chemicals with this pressure washer.
3. Product Overview and Package Contents
Familiarize yourself with the components of your CURECURE Electric Pressure Washer.

This image displays the complete CURECURE Electric Pressure Washer system, including the main unit, high-pressure spray gun, high-pressure hose, foam cannon, and two quick-connect nozzles (15-degree and 40-degree spray patterns).

This diagram provides a clear, numbered identification of the main components of the pressure washer, including the trigger gun assembly, on/off switch, water inlet, and various hoses and holders.
Package Contents:
- Pressure Washer Main Unit
- High-Pressure Spray Gun (Trigger Gun Assembly)
- High-Pressure Hose (20 ft)
- Foam Cannon (400ml)
- Quick-Connect Nozzles (15-degree, 40-degree)
- Water Inlet Connector
- Power Cord with Anti-leakage Plug (35 ft)
- User Manual
4. Assembly and Setup
Follow these steps to assemble your pressure washer before first use.

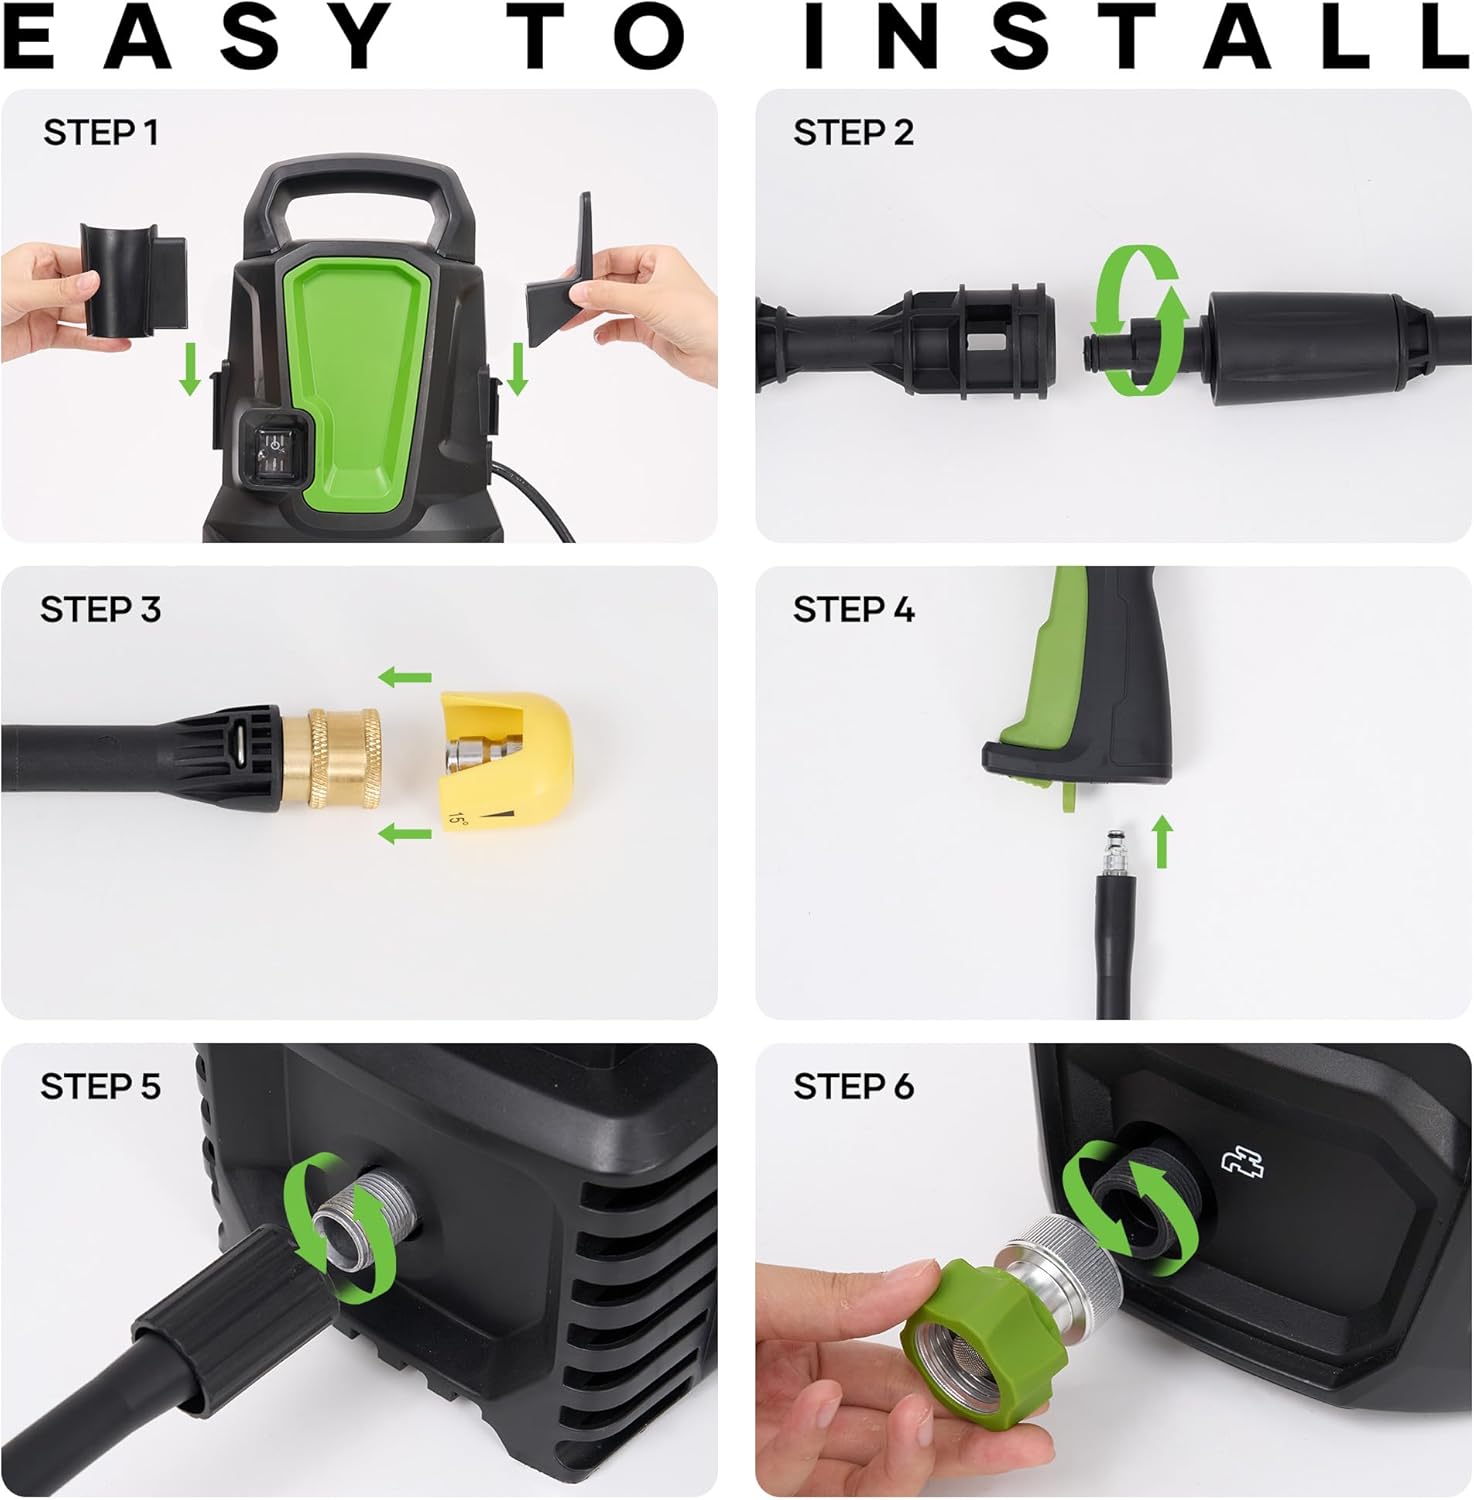
A six-step visual guide illustrating the straightforward assembly process of the pressure washer, from attaching the gun holder to connecting the water inlet and high-pressure hose.
- Attach Gun Holder: Slide the gun holder pieces onto the main unit as shown in Step 1 of the image.
- Connect Spray Gun: Securely attach the spray gun assembly to the lance, twisting until it locks into place (Step 2).
- Attach Nozzle: Insert the desired quick-connect nozzle (e.g., 15° or 40°) into the end of the spray gun lance until it clicks (Step 3).
- Connect High-Pressure Hose to Gun: Connect one end of the high-pressure hose to the spray gun handle (Step 4).
- Connect High-Pressure Hose to Unit: Connect the other end of the high-pressure hose to the outlet on the pressure washer main unit, twisting clockwise to tighten (Step 5).
- Connect Water Supply: Attach a standard garden hose (not included) to the water inlet connector on the pressure washer. Ensure the connection is tight to prevent leaks (Step 6).
Water and Power Connection:
- Ensure your water source provides a steady flow.
- Plug the power cord into a grounded 120V AC outlet with GFCI protection.
- Before turning on the unit, squeeze the trigger on the spray gun to purge air from the system until a steady stream of water flows out. This prevents damage to the pump.
5. Operating Instructions
Starting the Unit:
- Ensure all connections are secure and the water supply is turned on.
- Press the ON/OFF switch to the 'ON' position. The motor will start.
- Squeeze the trigger on the spray gun to begin spraying. Release the trigger to stop the flow.
Nozzle Selection and Usage:
The pressure washer comes with quick-connect nozzles for various cleaning tasks.

This image demonstrates the three versatile cleaning modes available: the 15-degree nozzle for tough surfaces like concrete and brick, the 40-degree nozzle for general cleaning of cars and windows, and the 400ml foam spray for applying detergent.
- 15-Degree Nozzle (Yellow): Provides a concentrated, powerful spray for stubborn stains on durable surfaces like concrete, brick, and driveways. Use with caution on softer materials.
- 40-Degree Nozzle (White): Offers a wider, gentler spray suitable for general cleaning of cars, windows, patio furniture, and other delicate surfaces.
Using the Foam Cannon:
The included 400ml foam cannon allows for easy application of detergent.
- Fill the foam cannon with an appropriate pressure washer detergent.
- Attach the foam cannon to the spray gun lance.
- Activate the pressure washer and spray to apply foam to the desired surface.
- Allow the foam to dwell for the recommended time, then rinse with a suitable nozzle.

An individual is shown effectively cleaning a car using the electric pressure washer. The image emphasizes the unit's key performance metrics: 2000 PSI pressure, a 13 Amp power motor, and a 1.7 GPM water output.

A user is depicted cleaning a patio, showcasing the pressure washer's capability to powerfully disintegrate stubborn stains from outdoor surfaces.
Safety Features:
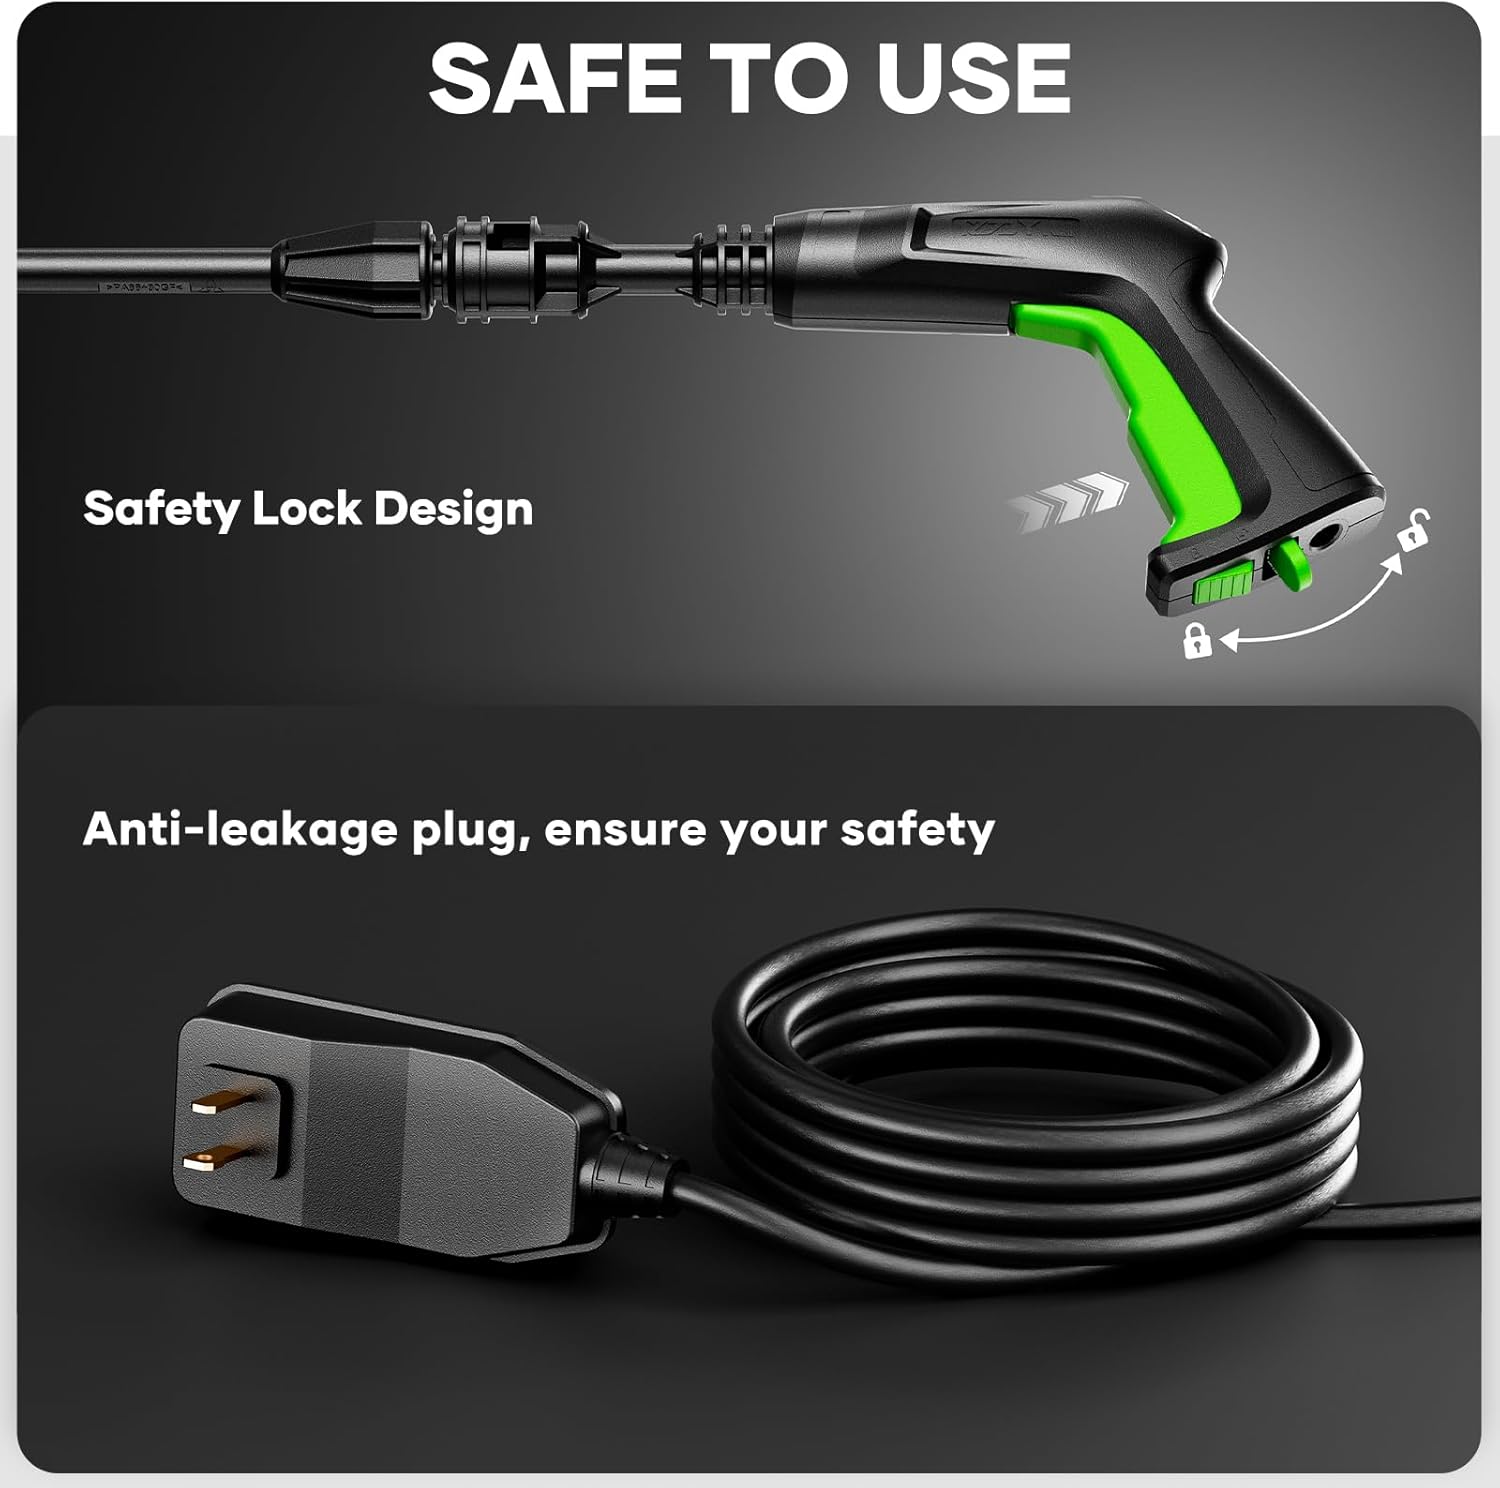
This image highlights two crucial safety features: the safety lock design on the trigger gun to prevent accidental operation, and the anti-leakage plug on the power cord for electrical safety.
- Safety Lock Design: The spray gun features a safety lock to prevent accidental activation. Always engage the safety lock when not spraying.
- Anti-leakage Plug: The power cord is equipped with an anti-leakage plug for enhanced electrical safety.
An overhead view illustrates the extensive reach provided by the 20-foot high-pressure hose and the 35-foot power cord, allowing for cleaning a wide area without repositioning the main unit.
6. Maintenance and Storage
After Each Use:
- Turn off the pressure washer and disconnect the power supply.
- Turn off the water supply.
- Squeeze the trigger on the spray gun to release any remaining pressure in the system.
- Disconnect the garden hose and high-pressure hose.
- Drain any remaining water from the pump by tilting the unit.
- Clean the nozzles and filter screen at the water inlet.
Storage:
- Store the pressure washer in a dry, frost-free area. Freezing temperatures can damage the pump.
- If storing for an extended period or in cold conditions, consider using a pump protector/antifreeze solution.
- Coil the high-pressure hose and power cord neatly.
7. Troubleshooting
| Problem | Possible Cause | Solution |
|---|---|---|
| Motor does not start | No power supply; GFCI tripped; ON/OFF switch off | Check power connection; Reset GFCI; Turn ON switch |
| No water pressure or low pressure | Water supply off; Kinked hose; Clogged nozzle; Air in pump | Turn on water; Straighten hose; Clean nozzle; Purge air from system |
| Water leaks from connections | Loose connections; Damaged O-rings | Tighten connections; Replace O-rings |
| Motor stops during operation | Overheating; Electrical overload | Allow unit to cool; Check power supply and circuit breaker |
8. Specifications

This diagram illustrates the internal copper wire motor, highlighting its design for increased power, energy efficiency, enhanced safety, and extended service life.
| Feature | Specification |
|---|---|
| Model Number | YLQ3500H-130 |
| Maximum Pressure | 2000 PSI |
| Power Source | AC (Electric) |
| Motor Amperage | 13 A |
| Water Output | 1.7 GPM |
| High Pressure Hose Length | 20 ft (6 m) |
| Power Cord Length | 35 ft (10.7 m) |
| Product Dimensions | 10 x 8 x 12 inches (approximate) |
| Item Weight | 13.67 pounds |
| Manufacturer | CURECURE |
9. Warranty and Customer Support
CURECURE products are designed for reliability and performance. For warranty information, technical support, or to order replacement parts, please refer to the contact information provided with your purchase documentation or visit the official CURECURE website.
Please have your model number (YLQ3500H-130) and purchase date available when contacting customer support.


