1. Introduction
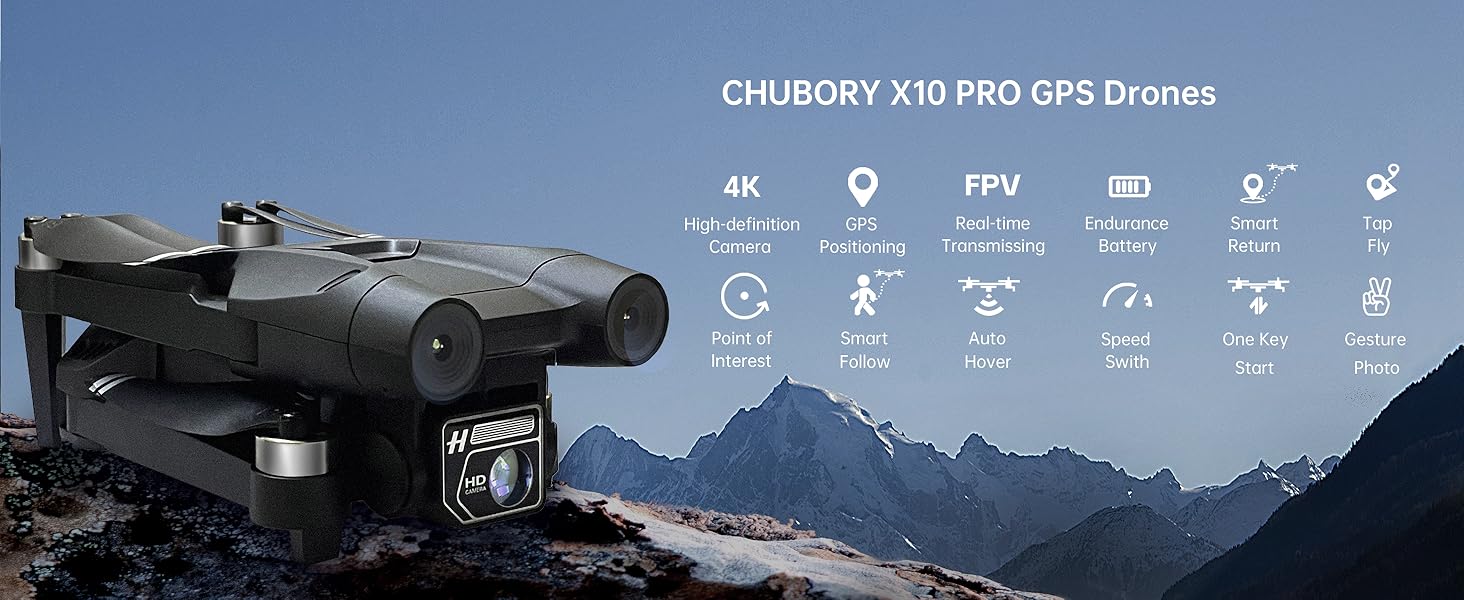
Thank you for choosing the CHUBORY X10 PRO GPS Drone. This manual provides essential information for the safe operation, setup, and maintenance of your drone. The X10 PRO is a high-performance quadcopter equipped with a 4K UHD camera, GPS positioning, and brushless motors, designed for both beginners and experienced pilots. Please read this manual thoroughly before operating the drone to ensure a safe and enjoyable flight experience.
2. Safety Guidelines
Operating a drone requires responsibility. Adhere to the following safety guidelines to prevent injury or damage:
- Pre-Flight Check: Always inspect the drone, remote controller, and batteries for any damage before each flight.
- Environmental Conditions: Fly in open areas, away from people, animals, buildings, and trees. Avoid flying in strong winds (above 24mph), rain, or fog.
- Battery Safety: Use only original CHUBORY batteries. Do not overcharge or puncture batteries. Discontinue use if batteries are swollen or damaged.
- Line of Sight: Maintain visual line of sight with the drone at all times.
- Respect Privacy: Do not use the drone to photograph or record individuals without their consent.
- Regulatory Compliance: The CHUBORY X10 PRO weighs under 0.55 lbs (235 grams), making it regulation-friendly in many regions. However, always check local drone regulations and restrictions before flying.
3. Package Contents
Verify that all items are present in your package:
- CHUBORY X10 PRO GPS Drone
- Remote Controller
- Lithium Ion Batteries (3 included)
- Spare Propellers
- USB Charging Cable
- Screwdriver
- Carrying Case
- User Manual (this document)

4. Drone Overview
The CHUBORY X10 PRO features a foldable design for portability and is equipped with advanced components for stable flight and high-quality imaging.
4.1 Drone Components
- Brushless Motors: Provide strong power and wind resistance (up to 24mph) for reliable performance.
- 4K UHD Camera: Features a 120° wide-angle lens with adjustable angle, electronic zoom, and real-time FPV transmission.
- GPS Module: Enables precise outdoor positioning and advanced flight functions.
- Optical Flow Sensor: Assists with stable indoor positioning.
- LED Indicators: Provide status information during flight and calibration.


5. Remote Controller Overview
The remote controller provides intuitive control over the drone's flight and camera functions. It includes a retractable phone holder for FPV viewing.
5.1 Controller Layout
Refer to the diagram in the quick start guide for specific button functions. Key controls include:
- Left Stick: Controls altitude (throttle) and yaw (rotation).
- Right Stick: Controls forward/backward (pitch) and left/right (roll).
- One-Key Take-off/Landing Button: Initiates automatic take-off or landing.
- Return to Home (RTH) Button: Commands the drone to return to its take-off point.
- Photo/Video Button: Captures images or starts/stops video recording.
- Speed Switch Button: Toggles between different flight speeds (3 speed regulation).
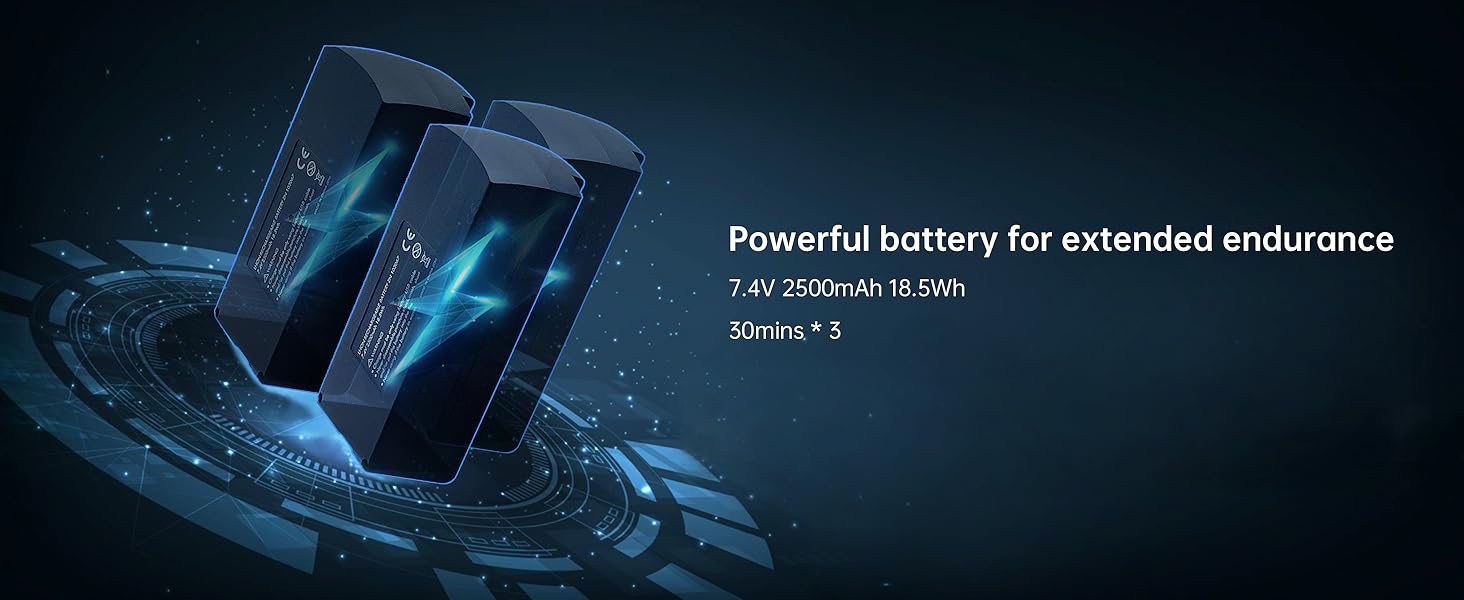
6. Battery Installation and Charging
The CHUBORY X10 PRO uses Lithium Ion batteries. Proper handling and charging are crucial for safety and battery longevity.
6.1 Charging the Drone Batteries
- Connect the USB charging cable to the drone battery.
- Plug the other end of the USB cable into a 5V/2A USB power adapter (not included).
- The battery indicator lights will show charging status. Charging typically takes 1-2 hours per battery.
- Once fully charged, disconnect the battery from the charger.
The package includes three batteries, providing a total flight time of up to 90 minutes (approximately 30 minutes per battery).
6.2 Installing Drone Batteries
- Ensure the drone is powered off.
- Insert the charged battery into the battery compartment on the drone until it clicks securely into place.
6.3 Charging the Remote Controller
The remote controller is typically charged via a micro USB port. Connect it to a 5V/1A USB power source. Refer to the controller's specific instructions for charging indicators.
7. Setup and Calibration
Before your first flight, proper setup and calibration are essential for stable and safe operation.
7.1 App Installation
Download the official CHUBORY drone application from your smartphone's app store. This app is required for FPV viewing, advanced flight modes, and camera control.
7.2 Connecting to the Drone
- Power on the drone, then power on the remote controller.
- On your smartphone, connect to the drone's Wi-Fi network (usually named 'CHUBORY-X10PRO-XXXX').
- Open the CHUBORY app. The app should automatically connect to the drone.
7.3 Compass Calibration
Compass calibration is critical for accurate GPS positioning. Perform this outdoors in an open area, away from magnetic interference.
- After connecting, the app or drone LEDs may prompt for calibration.
- Hold the drone horizontally and rotate it 360 degrees until the LEDs change.
- Hold the drone vertically with the camera facing down and rotate it 360 degrees until the LEDs change again, indicating successful calibration.
7.4 GPS Signal Acquisition
After calibration, place the drone on a flat, open surface. Wait for the drone to acquire sufficient GPS satellites. The drone's LEDs will indicate when GPS lock is achieved (e.g., solid green lights).
The drone seamlessly switches between GPS (outdoor) and Optical Flow (indoor) for optimal stability.
8. Operating Instructions
Once the drone is calibrated and has a GPS lock, you are ready to fly.
8.1 Basic Flight Controls
- One-Key Take-off: Press the one-key take-off button on the remote controller or in the app. The drone will automatically ascend to a safe height and hover.
- Manual Take-off: Push both control sticks down and outwards to start the motors, then slowly push the left stick up to ascend.
- Ascend/Descend: Use the left stick (throttle) to control altitude.
- Forward/Backward/Left/Right: Use the right stick to control horizontal movement.
- Yaw (Rotation): Use the left stick to rotate the drone left or right.
- One-Key Landing: Press the one-key landing button. The drone will descend and land automatically.
- Emergency Stop: In an emergency, press and hold the one-key landing button for a few seconds to stop the motors.

8.2 Speed Modes
The X10 PRO offers 3 speed regulation modes. Press the speed switch button on the remote controller to cycle through low, medium, and high speeds, suitable for different flying environments and pilot skill levels.
8.3 Camera Operation
- Taking Photos: Press the photo button on the remote controller or tap the photo icon in the app.
- Recording Video: Press the video button to start recording; press again to stop.
- Adjusting Camera Angle: Use the dedicated button/dial on the remote controller or the app to adjust the camera's vertical angle.
- FPV Viewing: The live video feed from the drone's camera will be displayed on your smartphone screen via the app.

9. Advanced Features
The CHUBORY X10 PRO offers several intelligent flight modes to enhance your flying and photography experience.
9.1 Auto Return (Return to Home - RTH)
When activated, the drone will automatically return to its recorded take-off point. This feature is crucial in situations of low battery or signal loss. Ensure a strong GPS signal before using RTH.
9.2 Follow Me
In Follow Me mode, the drone will autonomously track and follow a designated target, typically the person holding the remote controller or smartphone. This is ideal for capturing dynamic footage of your activities.

9.3 Tap Fly (Waypoint Flight)
With Tap Fly, you can define a flight path by tapping points on the map within the app. The drone will then automatically navigate along these waypoints, allowing you to focus on camera control.

9.4 Point of Interest (Orbit Flight)
In Point of Interest mode, the X10 PRO will automatically circle around a designated location or object, maintaining focus on it. This creates cinematic orbiting shots.

9.5 Gesture Photography
Capture photos and videos effortlessly using intuitive hand gestures recognized by the drone's camera. Refer to the app for specific gesture commands.

10. Maintenance
Regular maintenance ensures the longevity and optimal performance of your CHUBORY X10 PRO drone.
- Cleaning: Use a soft, dry cloth to clean the drone and remote controller after each use. Avoid water or harsh chemicals.
- Propeller Inspection: Regularly check propellers for cracks, bends, or damage. Replace damaged propellers immediately using the provided screwdriver and spare parts.
- Motor Care: Keep motors free from dust and debris. Do not attempt to lubricate the motors.
- Battery Storage: Store batteries in a cool, dry place, partially charged (around 50-60%) if not used for extended periods.
- Firmware Updates: Check the official CHUBORY website or app for any available firmware updates and follow instructions for installation.
11. Troubleshooting
If you encounter issues with your CHUBORY X10 PRO, refer to the following common problems and solutions:
| Problem | Possible Cause | Solution |
|---|---|---|
| Drone does not power on | Low battery; Battery not installed correctly | Charge battery fully; Reinstall battery securely |
| Drone cannot connect to remote controller/app | Incorrect pairing; Wi-Fi interference; App not updated | Ensure correct pairing sequence; Move to an area with less interference; Update app to latest version |
| Unstable flight/Drifting | Compass not calibrated; Strong winds; Damaged propellers | Perform compass calibration; Fly in calm conditions; Replace damaged propellers |
| GPS signal weak or lost | Flying indoors; Obstructions; Magnetic interference | Fly outdoors in open areas; Avoid tall buildings/trees; Recalibrate compass |
| Camera not recording/taking photos | SD card full/missing; App connection issue | Insert/replace SD card; Reconnect app; Check app settings |
| Follow Me/Auto Return not working | Weak GPS signal; Feature not activated correctly | Ensure strong GPS lock; Follow app instructions for feature activation |
12. Specifications
| Feature | Detail |
|---|---|
| Brand | CHUBORY |
| Model Name | X10 PRO |
| Item Weight | 235 Grams (0.52 lbs) |
| Product Dimensions | 4.72"L x 2.95"W x 1.96"H (Folded) |
| Video Capture Resolution | 4K UHD |
| Camera Features | 120° Wide-angle, Adjustable Lens, Electronic Zoom, Real-time FPV |
| Connectivity Technology | Wi-Fi (5G FPV) |
| Maximum Control Range | Up to 3280 FT (1000 meters) |
| Flight Time | Up to 90 minutes (with 3 batteries, approx. 30 min/battery) |
| Motor Type | Brushless Motors |
| Positioning System | GPS (Outdoor), Optical Flow (Indoor) |
| Battery Type | Lithium Ion |
| Control Type | Remote Control, Gesture Control |
| UPC | 718027774087 |
13. Warranty and Support
For warranty information, technical support, or service inquiries, please contact CHUBORY customer service directly. Details can typically be found on the official CHUBORY website or through your purchase platform.
Please retain your proof of purchase for warranty claims.