Introduction
Thank you for purchasing the Generic 30.7-inch Ceiling Fan with Lights. This manual provides essential information for the safe installation, operation, and maintenance of your new ceiling fan. Please read all instructions carefully before installation and retain this manual for future reference.
Safety Instructions
- Always disconnect power at the circuit breaker before installation or servicing.
- All electrical connections must be in accordance with local codes, ordinances, and the National Electric Code. If you are unfamiliar with electrical wiring, consult a qualified electrician.
- Ensure the installation site can support the weight of the fan (approximately 10-15 kg).
- Do not bend the fan blades during installation or cleaning.
- Avoid placing objects in the path of the fan blades.
- This appliance is not intended for use by persons (including children) with reduced physical, sensory or mental capabilities, or lack of experience and knowledge, unless they have been given supervision or instruction concerning use of the appliance by a person responsible for their safety.
- Children should be supervised to ensure that they do not play with the appliance.
Package Contents
Verify that all components listed below are included in your package. If any parts are missing or damaged, please contact customer support.
- Ceiling Fan Unit with Integrated Lights
- Remote Control
- Mounting Bracket
- Hardware Pack (screws, wire nuts, etc.)
- User Manual
Product Specifications
| Feature | Specification |
|---|---|
| Brand | Generic |
| Model | B0F283NZKM |
| Dimensions (D x W x H) | 30.7" x 30.7" x 5.9" |
| Color | Black |
| Material | Acrylic (Blades: 7*ABS) |
| Power Source | AC/DC |
| Fan Speeds | 6 Gear Wind Speed |
| Light Color Temperatures | 3000K (Warm White), 4000K (Neutral White), 6000K (Cool White) |
| Light Brightness | Stepless Dimmable (10%-100%) |
| Timer Function | 2-hour Smart Timing |
| Motor Type | DC Reversible Motor |
| Control Method | Remote Control, APP Control |
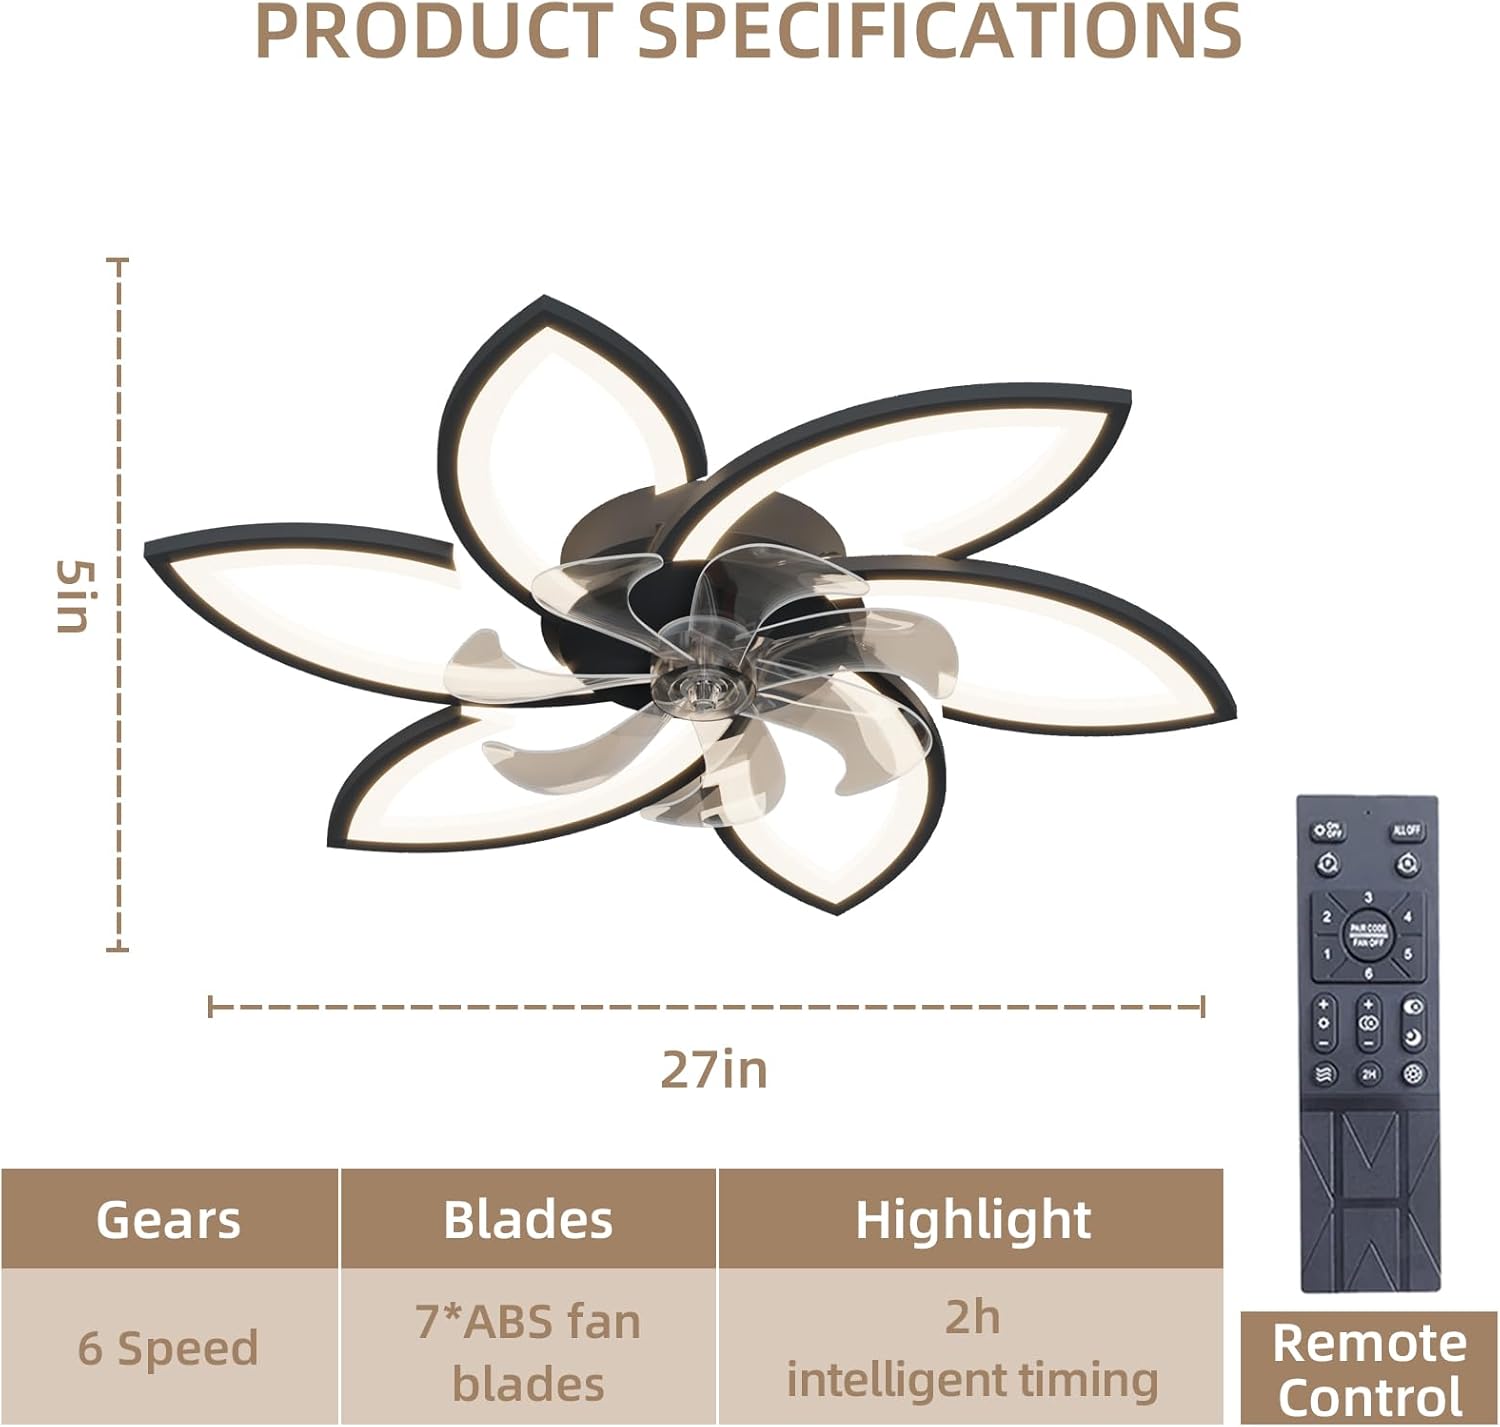
A detailed diagram outlining the product specifications, including its dimensions (approximately 5 inches height, 27 inches width as depicted), fan blade count (7 ABS blades), 6-speed settings, and 2-hour intelligent timing feature. The remote control is also pictured.
Installation Guide
The fan is designed for easy installation, with most functional parts pre-assembled. Installation can typically be completed in about twenty minutes by following these steps:
- Prepare for Installation: Turn off power at the main circuit breaker. Ensure the mounting surface is structurally sound and can support the fan's weight.
- Install Mounting Bracket: Secure the mounting bracket to the ceiling junction box using the screws provided. Ensure it is firmly attached.
- Wire Connections: Connect the fan's electrical wires to the household wiring according to local electrical codes. Typically, this involves connecting live, neutral, and ground wires. Use the provided wire nuts to secure connections.
- Mount the Fan: Carefully lift the fan unit and attach it to the mounting bracket. Ensure all connections are secure and the fan is properly seated.
- Secure the Fan: Fasten the fan to the mounting bracket using the appropriate screws, ensuring it is stable and does not wobble.
- Restore Power: Once installation is complete and all connections are checked, restore power at the circuit breaker.
Operation Guide
Your ceiling fan can be operated using the included remote control or a compatible mobile application.
Remote Control Functions

The ceiling fan is shown installed in a living room, highlighting its aesthetic integration and the convenience of remote control operation.
- Power On/Off: Press the ON/OFF button to turn the fan and light on or off.
- Fan Speed Control: Use the FAN SPEED buttons (usually marked 1-6 or +/-) to adjust between 6 wind speeds.
- Light Control (Color Temperature): Press the COLOR TEMP button (or similar) to cycle through 3000K (Warm White), 4000K (Neutral White), and 6000K (Cool White).
- Light Control (Brightness): Use the DIMMER buttons (usually marked with sun icons or +/-) to adjust the light brightness from 10% to 100%.
- Reverse Function: Press the REVERSE button to change the direction of the fan blades. This allows for downward airflow (cooling) in summer and upward airflow (air circulation) in winter.
- Timer Function: Press the TIMER button (e.g., 2H) to set the fan to automatically turn off after 2 hours.

This visual guide demonstrates the adjustable lighting features. The top section shows the three color temperature options (warm white 3000K, neutral white 4000K, cool white 6000K), and the bottom section illustrates the dimmable brightness levels from 10% to 100%.

This image illustrates the reversible airflow feature of the fan. The top panel shows downward airflow for cooling, while the bottom panel shows upward airflow for air circulation.
App Control (If Applicable)
For models with APP control, download the specified mobile application from your device's app store. Follow the in-app instructions to pair your fan and control its functions remotely. The APP typically mirrors the remote control's capabilities, including fan speed, light settings, and timer.

This image emphasizes the quiet operation and smart features of the fan. It shows a child sleeping undisturbed, with indicators for 2-hour smart timing, 6-speed adjustment, and low noise levels (e.g., 30dB for the unit).
Maintenance
Regular maintenance ensures optimal performance and extends the lifespan of your ceiling fan.
- Cleaning: Before cleaning, ensure the power is turned off at the circuit breaker. Use a soft, damp cloth to wipe down the fan blades and motor housing. Do not use abrasive cleaners or solvents that could damage the finish.
- Blade Inspection: Periodically check the fan blades for any signs of damage or looseness. Ensure all screws are tight.
- Light Source: The integrated LED light source is designed for long life and typically does not require replacement. If issues arise, contact customer support.
Troubleshooting
If you encounter any issues with your ceiling fan, refer to the following common problems and solutions:
| Problem | Possible Cause | Solution |
|---|---|---|
| Fan does not start | No power supply; Loose wiring; Remote control battery low. | Check circuit breaker; Verify wire connections; Replace remote control batteries. |
| Light does not work | No power supply; Loose wiring; LED driver issue. | Check circuit breaker; Verify wire connections; Contact customer support if LED driver is suspected. |
| Fan wobbles | Loose mounting screws; Unbalanced blades. | Ensure mounting bracket and fan screws are tight; Check for any bent blades. |
| Remote control not working | Low battery; Remote not paired. | Replace batteries; Refer to remote pairing instructions (if applicable, usually involves pressing a button combination). |
| Fan is noisy | Loose screws; Obstruction; Motor issue. | Tighten all screws; Remove any obstructions; If noise persists, contact customer support. |
Warranty and Support
This product comes with a standard manufacturer's warranty. For specific warranty details, please refer to the documentation included with your purchase or contact the retailer. If you require technical assistance or have questions not covered in this manual, please contact customer support through your purchase platform or the manufacturer's website.