Introduction
Thank you for choosing the Generic UAV Ultra Power UP600+ Dual Channel Drone Battery Charger. This high-performance charger is designed for LiPo/LiHV batteries with 2-6S cell counts, offering a total charge power of 1200W (2x600W). It features dual independent charging channels, a clear LCD display, and various charging modes to ensure efficient and safe battery management for your drones.
Please read this manual thoroughly before operating the charger to ensure proper use and to maximize the lifespan of your batteries and charger.
Package Contents
Verify that all items listed below are included in your package. If any items are missing or damaged, please contact your retailer.
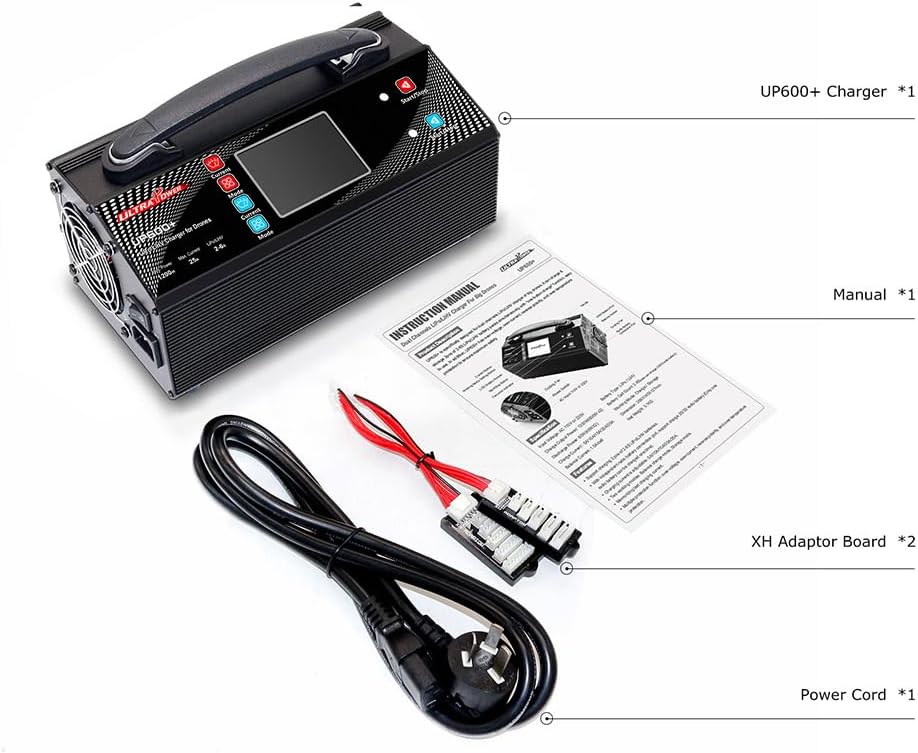
Figure 1: Package Contents. This image displays the contents typically found in the UP600+ charger package, including the main charger unit, the instruction manual, two XH adaptor boards, and a power cord.
- UP600+ Charger Unit (x1)
- Instruction Manual (x1)
- XH Adaptor Board (x2)
- Power Cord (x1)
Product Overview and Features
The UP600+ charger is equipped with advanced features for efficient and safe battery charging.
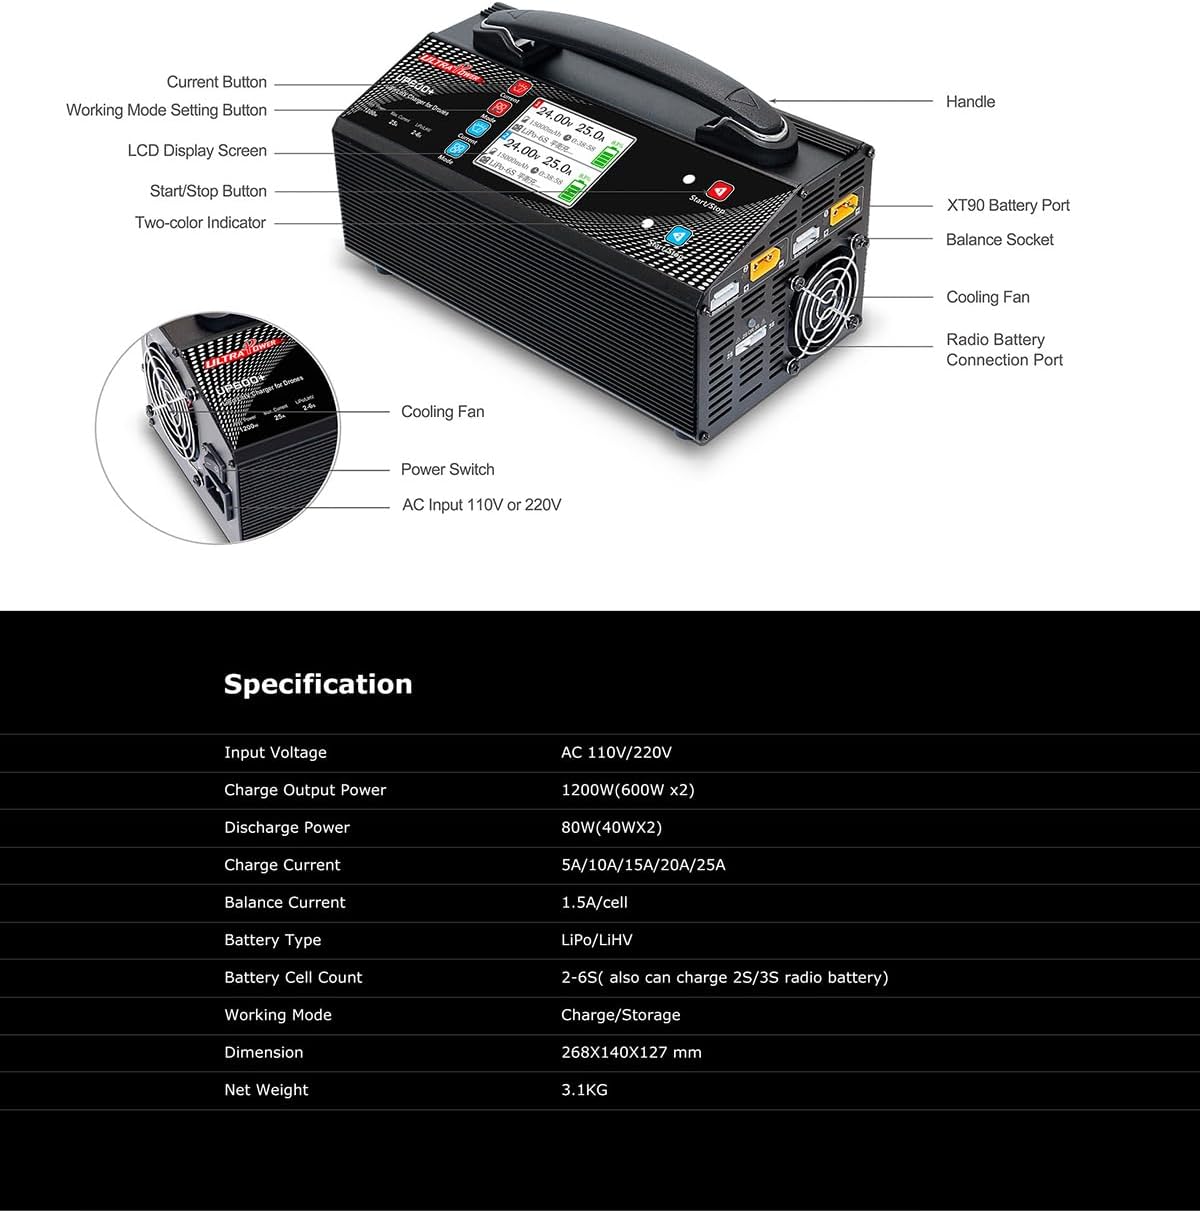
Figure 2: Charger Components. This diagram labels the key parts of the UP600+ charger, including the handle, LCD display screen, current button, working mode setting button, start/stop button, two-color indicator, XT90 battery port, balance socket, cooling fan, power switch, and AC input.
- Dual Channel Charging: Two independent channels allow simultaneous charging of two batteries.
- High Power Output: 1200W total (2x600W) for fast charging.
- Wide Voltage Compatibility: Supports AC 110V or 220V input.
- Versatile Battery Support: Compatible with LiPo/LiHV batteries from 2S to 6S.
- Multiple Charging Modes: Includes Charge mode and Storage mode.
- Clear LCD Display: A 3.2-inch high-definition LCD displays real-time charging data such as voltage, current, battery capacity, working time, and battery type. The display automatically switches interface every 5 seconds to show detailed cell voltages.
- One-Key Charging: Simplified operation for quick start.
- Independent Port for 2/3S Radio Batteries: A dedicated port for charging smaller radio batteries.

Figure 3: LCD Display. This image highlights the 3.2-inch high-definition LCD display, clearly showing battery data during charging or discharging, including voltage, current, and battery percentage.

Figure 4: Dynamic Display and One-Key Charging. This image illustrates how the charger's interface intelligently switches every 5 seconds to show real-time voltage, charging current, battery capacity, working time, battery type, and individual cell voltages. It also depicts the 'One-key charging' feature for user convenience.
Setup Instructions
- Unpack the Charger: Carefully remove all components from the packaging.
- Connect Power:
- Ensure the charger's power switch is in the OFF position.
- Connect the provided AC power cord to the AC input port on the back of the charger.
- Plug the other end of the power cord into a suitable AC outlet (110V or 220V, depending on your region).
- Power On: Flip the power switch to the ON position. The LCD display should illuminate, indicating the charger is ready.
Operating Instructions
Connecting Batteries for Charging
- Connect Main Power Lead: Connect the main power lead of your LiPo/LiHV battery to the XT90 battery port on one of the charging channels (Channel 1 or Channel 2).
- Connect Balance Lead: Connect the balance lead of your battery to the corresponding balance socket using the provided XH adaptor board if necessary. Ensure the balance lead is inserted correctly to prevent damage.
- Repeat for Second Channel (Optional): If charging two batteries simultaneously, repeat steps 1 and 2 for the second channel.

Figure 5: Charging Setup. This image demonstrates the charger connected to two 6S 16000mAh LiPo batteries, illustrating its capability to charge multiple large batteries simultaneously. It also shows the independent charging port for 2/3S radio batteries.
Selecting Charging Mode and Current
- Select Channel: Use the "Current Button" or "Mode Button" to navigate and select the desired charging channel (1 or 2) if not already selected.
- Choose Mode: Press the "Working Mode Setting Button" to cycle through available modes: Charge Mode and Storage Mode.
- Charge Mode: Charges the battery to its full voltage (e.g., 4.2V per cell for LiPo, 4.35V per cell for LiHV).
- Storage Mode: Charges or discharges the battery to a safe storage voltage (typically 3.80V per cell for LiPo/LiHV) to extend battery lifespan.
- Set Charge Current: Use the "Current Button" to adjust the charge current. Available options are 5A, 10A, 15A, 20A, and 25A. Select a current appropriate for your battery's capacity (e.g., 1C rate).
Starting and Stopping Charging
- Start Charging: Once the mode and current are set, press the "Start/Stop Button" to begin the charging process. The LCD will display real-time charging data.
- Monitor Progress: The display will show voltage, current, capacity charged, and individual cell voltages (switching every 5 seconds).
- Stop Charging: To stop charging at any time, press the "Start/Stop Button" again. The charger will cease operation.
- Completion: The charger will automatically stop when the battery reaches its full charge or storage voltage. Disconnect the battery once charging is complete.
Using the Independent 2/3S Radio Battery Port
The charger includes a dedicated port for 2S or 3S radio batteries. Only one 2S or 3S radio battery can be charged at a time using this port.
- Connect your 2S or 3S radio battery to the designated "Radio Battery Connection Port".
- The charger will automatically detect the battery type and begin charging. Monitor the process on the main display or a dedicated indicator if available.
Maintenance
- Cleaning: Keep the charger clean and free from dust. Use a soft, dry cloth to wipe the exterior. Do not use solvents or abrasive cleaners.
- Storage: Store the charger in a cool, dry place away from direct sunlight and moisture when not in use.
- Ventilation: Ensure the cooling fans are not obstructed during operation to prevent overheating.
- Cable Inspection: Regularly inspect all cables and connectors for signs of wear or damage. Replace any damaged components immediately.
Troubleshooting
| Problem | Possible Cause | Solution |
|---|---|---|
| Charger does not power on. | No power supply; power cord loose; power switch off. | Check AC power connection; ensure power cord is securely plugged in; turn power switch ON. |
| Battery not charging. | Battery not connected correctly; incorrect mode selected; battery damaged. | Verify main and balance lead connections; ensure correct charging mode is selected; inspect battery for damage. |
| Display shows error message. | Battery voltage mismatch; connection error; internal fault. | Check battery cell count setting; re-connect battery; if error persists, contact support. |
| Charger gets hot during operation. | Normal operation for high power; obstructed ventilation. | Ensure adequate airflow around the charger; clear any obstructions from cooling fans. If overheating persists, reduce charge current. |
Specifications
| Feature | Detail |
|---|---|
| Input Voltage | AC 110V or 220V (100V-240V) |
| Charge Power | 1200W (2x600W) |
| Discharge Power | 80W (40W x 2) |
| Charge Current Range | 5A / 10A / 15A / 20A / 25A |
| Battery Type | LiPo / LiHV |
| Battery Cell Count | 2-6S (also charges 2S/3S radio batteries) |
| Working Modes | Storage Mode / Charge Mode |
| Balance Current | 1.5A/cell |
| Dimensions | 268 x 140 x 127 mm (12 x 5 x 6 inches approx.) |
| Net Weight | 3.1 KG |
Warranty and Support
This product comes with a standard manufacturer's warranty. Please refer to the warranty card included in your package or contact your retailer for specific warranty terms and conditions.
For technical support, troubleshooting assistance, or inquiries regarding parts and service, please contact the retailer or manufacturer directly. Keep your purchase receipt as proof of purchase for warranty claims.


