Allparts Equipment & Accessories 530003
AAA Horizontal Triplex Plunger Replacement Pressure Washer Pump Kit
Model: 530003
Product Overview
The AAA 530003 Horizontal Triplex Plunger Replacement Pressure Washer Pump Kit is designed for high-pressure cleaning applications. This pump features a 1-inch hollow shaft and a multi-fit flange, making it compatible with most 1-inch / 24mm gas engines. It is engineered for durability and efficient operation, capable of handling burst pressures up to 4000 PSI.

Image: Front view of the AAA 530003 Horizontal Triplex Plunger Replacement Pressure Washer Pump Kit, showcasing its robust design and brass components.
Key features include an EZ Start Unloader system for adjustable pressure control, enhanced oil seal technology, and a sight glass for easy oil level checks. The pump is constructed with dual oversized ball bearings and a corrosion-resistant brass pump head with replaceable coated-ceramic pistons for extended life and performance.
Safety Information
Always read and understand all instructions before operating the pressure washer pump. Failure to follow safety guidelines can result in serious injury or property damage.
- Wear appropriate personal protective equipment (PPE), including eye protection and gloves.
- Ensure the pressure washer is turned off and depressurized before performing any maintenance or installation.
- Do not operate the pump with damaged or missing parts.
- Keep children and pets away from the operating area.
- This product contains chemicals known to the State of California to cause cancer and birth defects or other reproductive harm. Wash hands after handling.
Package Contents
Verify that all components are present before beginning installation:
- AAA 530003 Horizontal Triplex Plunger Pump
- Siphon Tube
- Hardware Mounting Kit (bolts, drive key)
- Instruction Manual (this document)

Image: The AAA 530003 pump shown with the included siphon tube and mounting hardware, illustrating the complete kit contents.
Setup and Installation
This section provides instructions for installing the 530003 replacement pump onto your pressure washer engine. Ensure your engine has a 1-inch / 24mm hollow shaft and an SAE bolt pattern for compatibility.
Compatibility Check:
- Verify your pressure washer engine's shaft size is 1 inch (24mm).
- Confirm the engine's bolt pattern matches the SAE bolt pattern of the 530003 pump. Refer to your engine's manual for specifications.

Image: Diagram illustrating the SAE J-609A/B bolt pattern and shaft dimensions (1-inch shaft, 3.5" x 3.5" bolt spacing) for the C Series pump, crucial for verifying compatibility with your engine.
Installation Steps:
- Preparation: Ensure the pressure washer engine is off and cooled down. Disconnect the spark plug wire to prevent accidental starting.
- Remove Old Pump: If replacing an existing pump, carefully unbolt it from the engine. Note the orientation of the old pump and any connections.
- Clean Shaft: Clean the engine's drive shaft thoroughly to remove any rust or debris.
- Install Key: Insert the drive key (included in hardware kit) into the keyway on the engine's drive shaft.
- Mount New Pump: Align the 530003 pump's hollow shaft with the engine's drive shaft and carefully slide the pump onto the shaft. Ensure the bolt holes align with the engine's mounting points.
- Secure Pump: Use the provided mounting bolts to secure the pump to the engine. Tighten bolts evenly and securely.
- Connect Hoses: Connect your garden hose to the pump's garden hose inlet and your high-pressure hose to the quick connect outlet fitting. Ensure all connections are tight to prevent leaks.
- Add Oil: Before first use, check the pump oil level using the sight glass. If needed, add appropriate pump oil (refer to specifications for oil type) until the level is correct. Do not overfill.

Image: Side view of the AAA 530003 pump, highlighting the garden hose inlet, quick connect outlet fitting, and the adjustable unloader with built-in EZ Start system.
Operating Instructions
Follow these steps for safe and effective operation of your pressure washer with the new pump.
- Water Supply: Connect a garden hose to the pump's inlet and ensure a steady water supply is turned on. Allow water to flow through the pump and out the high-pressure hose to purge air before starting the engine.
- Engine Start: Reconnect the spark plug wire. Start the pressure washer engine according to its manufacturer's instructions.
- Adjust Pressure: The EZ Start Unloader system allows for pressure adjustment. Turn the black knob on top of the unloader to increase or decrease output pressure as needed for your cleaning task.
- Chemical Injection (Optional): If using the chemical injector, ensure the siphon tube is placed into your pressure washer safe detergent. The chemical injector typically operates at low pressure.
- Operation: Begin cleaning, maintaining a safe distance from the surface.
- Shut Down: When finished, turn off the pressure washer engine. Turn off the water supply. Squeeze the spray gun trigger to release any remaining pressure in the system.

Image: Detailed view of the AAA 530003 pump with key components labeled, including the adjustable unloader, garden hose inlet, quick connect outlet fitting, chemical injector, and thermal relief valve.
Maintenance
Regular maintenance ensures the longevity and optimal performance of your AAA 530003 pump.
Oil Changes:
- Check the pump oil level before each use using the sight glass.
- Change the pump oil after the first 50 hours of operation, then every 100 hours or annually, whichever comes first.
- Use a high-quality non-detergent pump oil, typically SAE 30 or 10W-30, specifically designed for pressure washer pumps. Refer to the specifications section for recommended oil type.
- To change oil: Place a drain pan under the pump's oil drain plug. Remove the drain plug and the oil fill cap to allow oil to drain completely. Reinstall the drain plug. Fill with new oil to the correct level as indicated by the sight glass. Reinstall the oil fill cap.
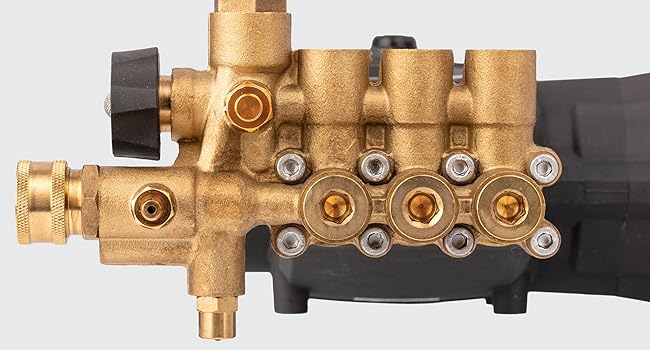
Image: Close-up view of the pump's oil sight glass and oil fill cap, demonstrating how to check and maintain oil levels without a dipstick.
General Care:
- Winterization: If storing the pressure washer in freezing temperatures, winterize the pump to prevent damage. Use a pump saver solution or antifreeze.
- Clean Inlet Filter: Periodically check and clean the water inlet filter screen to prevent debris from entering the pump.
- Inspect Hoses and Fittings: Regularly inspect all hoses and fittings for wear, cracks, or leaks. Replace damaged components immediately.
- Piston and Seal Inspection: While the pump features replaceable coated-ceramic pistons and enhanced oil seals, periodic inspection by a qualified technician is recommended for long-term performance.
Troubleshooting
This section provides solutions to common issues you might encounter with your pressure washer pump.
| Problem | Possible Cause | Solution |
|---|---|---|
| No or Low Pressure |
|
|
| Water Leaking from Pump |
|
|
| Pump Overheating |
|
|
If you are unable to resolve an issue using this guide, please contact Allparts Equipment & Accessories technical support.
Specifications
| Feature | Specification |
|---|---|
| Model Number | 530003 |
| Pump Type | Horizontal Triplex Plunger Pump |
| Maximum Pressure (Burst) | Up to 4000 PSI |
| Maximum Flow Rate | 3.5 Gallons Per Minute (GPM) |
| Shaft Type | 1" Hollow Shaft |
| Bolt Pattern | SAE J-609A/B |
| Material | Brass Pump Head, Metal Housing |
| Item Weight | 18 Pounds |
| Product Dimensions | 12"L x 9"W x 6"H |
| Recommended Oil | SAE 30 or 10W-30 Non-Detergent Pump Oil |
Warranty and Support
Allparts Equipment & Accessories is committed to delivering superior products and support.
Warranty Information:
Specific warranty details for the 530003 pump are typically provided with the product packaging or can be found on the official Allparts Equipment & Accessories website. Please retain your proof of purchase for warranty claims.
Technical Support:
Allparts Equipment & Accessories offers USA-based technical support to assist with any questions or issues regarding your pump. For assistance, please visit the official Allparts Equipment & Accessories store or contact their customer service directly.
Allparts Equipment & Accessories Store: Visit Store on Amazon
When contacting support, please have your model number (530003) and purchase information readily available.