1. Important Safety Information
Please read all instructions carefully before installation and operation. Failure to follow these instructions may result in damage to the product, vehicle, or personal injury. Keep this manual for future reference.
- Professional installation is recommended for optimal performance and safety.
- Disconnect the vehicle's battery before beginning any electrical work to prevent short circuits.
- Ensure all wiring connections are secure and properly insulated.
- Do not operate the device in a manner that distracts from driving.
- Avoid exposing the unit to extreme temperatures, direct sunlight for prolonged periods, or moisture.
2. Package Contents
Verify that all items listed below are included in your package:
- 1 x Car MP5 Player (Main Unit)
- 1 x Power Cable
- 1 x GPS Antenna
- 1 x AHD Backup Camera
- 1 x RCA Input and Output Cable Set
- 1 x External Microphone
- 2 x USB Cables
- 1 x Instruction Manual

Image: All components included in the moseiny car stereo package.
3. Product Overview
The moseiny 9.7-inch Car Stereo is designed for Hyundai Grand i10 models from 2014-2019. It features a high-definition capacitive touchscreen and runs on the Android 14 operating system. Key functionalities include Wireless CarPlay, Android Auto, Bluetooth for hands-free calls and audio streaming, GPS navigation, FM radio, and support for a backup camera.

Image: Front view of the moseiny 9.7-inch car stereo with its user interface.
4. Setup & Installation
Note: This unit is not plug-and-play. Installation requires cutting and connecting wires. Professional installation is strongly recommended to ensure proper functionality and avoid damage to your vehicle's electrical system.
4.1 Wiring Connections
Refer to the wiring diagram provided with your unit for specific connections. General connections include:
- Power Cable: Connect to the vehicle's power supply (constant 12V, accessory 12V, and ground).
- RCA Input/Output: For external audio/video devices, amplifiers, etc.
- USB Cables: For connecting USB devices, charging, and wired CarPlay/Android Auto.
- GPS Antenna: Mount in a location with a clear view of the sky for optimal signal reception.
- AHD Backup Camera: Connect for automatic rear view display when reversing.
- External Microphone: For improved call quality during hands-free operation.
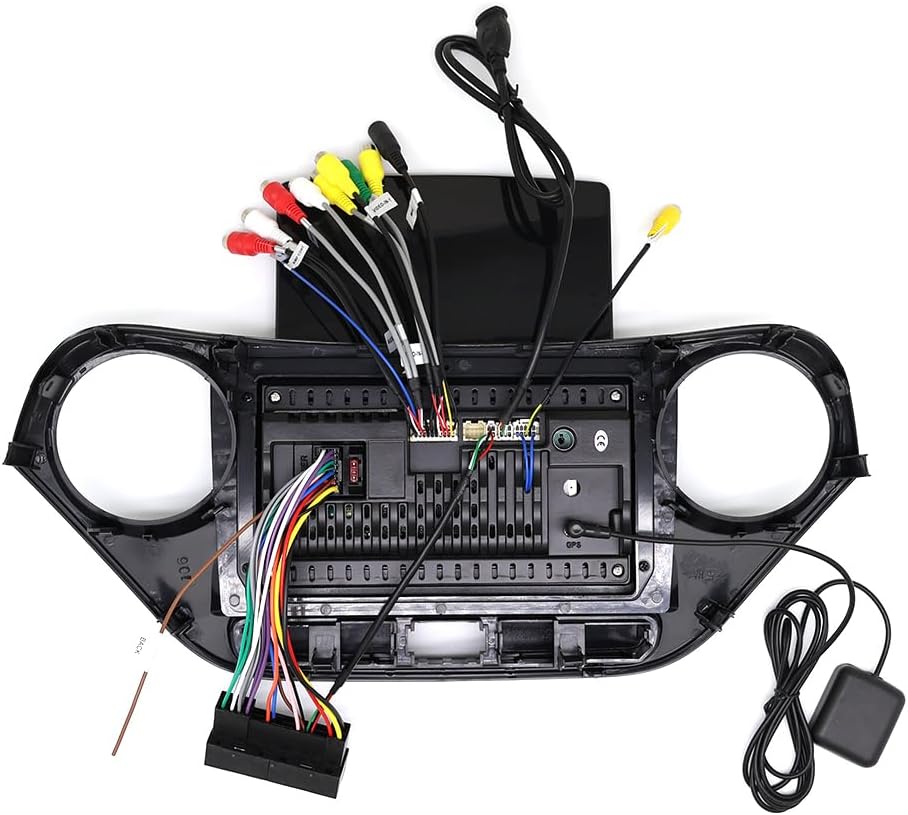
Image: Rear view of the car stereo with wiring connections.
5. Operating Instructions
5.1 Power On/Off
The unit will power on automatically when the vehicle's ignition is turned on. To manually power off or restart, use the designated power button on the unit or within the software interface.
5.2 Initial Setup
Upon first use, follow the on-screen prompts to set up basic preferences such as language, time zone, and initial network connections.
5.3 Wireless CarPlay & Android Auto
The unit supports both Wireless CarPlay for iOS devices and Android Auto for Android devices, offering seamless integration for navigation, music, calls, and more.
- Bluetooth Connection: First, pair your smartphone with the car stereo via Bluetooth. Go to the stereo's Bluetooth settings, make it discoverable, and pair with your phone. The default PIN is usually '0000'.
- ZLINK Connection: After successful Bluetooth pairing, open the 'ZLINK' application on the car stereo. Your phone should automatically connect to CarPlay or Android Auto.
- Manual WiFi Connection (if ZLINK fails): If the ZLINK connection is not successful, you may need to manually connect your phone to the car stereo's WiFi hotspot. Go to the car stereo's settings, find 'Network & Internet' > 'Hotspot & tethering' > 'Wi-Fi hotspot' to enable it and view the network name and password. Then, connect your phone to this WiFi network. After connecting, delete the history record of the WiFi connection on the vehicle, then reopen the ZLINK app.
Video: Demonstrates the connection process for Wireless CarPlay and Android Auto, including Bluetooth and WiFi setup.

Image: Wireless CarPlay and Android Auto interface with key functions.

Image: Overview of Wireless CarPlay and Android Auto support.
5.4 Bluetooth Connectivity
Connect your smartphone via Bluetooth for hands-free calling and audio streaming.
- Enable Bluetooth on your phone and the car stereo.
- Search for 'CarBT' on your phone and pair. Enter '0000' if prompted for a PIN.
- Once connected, you can make/receive calls and play music through the car's speakers.

Image: Built-in Bluetooth for calls and music.
5.5 GPS Navigation & WiFi
The unit features built-in GPS and WiFi connectivity. Connect to a WiFi hotspot (e.g., from your smartphone) to access online maps, stream media, and download apps.
- Go to 'Settings' > 'Network & Internet' > 'Wi-Fi' to connect to an available network.
- Use pre-installed navigation apps or download your preferred ones from the Play Store.

Image: GPS Navigation and WiFi connection features.

Image: 5G WiFi connectivity for online services.
5.6 FM Radio
Access FM radio stations with RDS support for station information.
- Open the 'Radio' app.
- Use the scan function to find available stations or manually tune to a frequency.
- Save your favorite stations for quick access.

Image: Bluetooth and FM/RDS Radio features.
5.7 Steering Wheel Control (SWC)
The unit supports steering wheel controls, allowing you to manage audio, calls, and navigation without taking your hands off the wheel. Configuration may be required in the settings menu.

Image: Steering Wheel Control interface and buttons.
5.8 Mirror Link
Mirror Link allows you to display your smartphone's screen directly onto the car stereo's display, supporting both wireless and wired connections.

Image: Phone Mirror Link functionality, wireless and wired.
5.9 Split Screen Function
Utilize the split-screen feature to run two applications simultaneously, such as navigation on one side and music playback on the other.

Image: Split Screen Technology with multiple UI options.
5.10 Backup Camera
When the vehicle is shifted into reverse, the display will automatically switch to the backup camera feed, providing a clear view of the area behind your vehicle for safer parking.
6. Maintenance
- Screen Cleaning: Use a soft, lint-free cloth to gently wipe the touchscreen. For stubborn smudges, slightly dampen the cloth with water or a screen-safe cleaner. Avoid harsh chemicals or abrasive materials.
- Software Updates: Periodically check for software updates through the unit's settings menu to ensure optimal performance and access to new features.
- General Care: Keep the unit free from dust and debris. Ensure proper ventilation around the unit to prevent overheating.
7. Troubleshooting
If you encounter issues with your car stereo, refer to the following common problems and solutions:
| Problem | Possible Solution |
|---|---|
| No Power | Check all power connections (constant 12V, accessory 12V, ground). Verify vehicle fuses. Ensure the unit is properly seated in its harness. |
| Bluetooth Not Connecting | Ensure Bluetooth is enabled on both the stereo and your phone. Delete previous pairings and try re-pairing. Restart both devices. Check the PIN (default '0000'). |
| CarPlay/Android Auto Not Starting | Ensure Bluetooth is connected first. Open the 'ZLINK' app. If issues persist, try the manual WiFi hotspot connection method described in Section 5.3. Ensure your phone's operating system is up to date. |
| No GPS Signal | Ensure the GPS antenna is properly connected and mounted in a location with a clear view of the sky (e.g., dashboard, under the windshield). |
| No Sound | Check speaker wiring connections. Ensure volume is not muted or set too low. Verify audio output settings in the stereo's menu. |
| Backup Camera Not Displaying | Check the camera's power and video signal connections. Ensure the reverse trigger wire is correctly connected to the vehicle's reverse light circuit. |
For further assistance, please contact moseiny customer support.
8. Specifications
Key technical specifications of the moseiny 9.7-inch Car Stereo:
- Brand: moseiny
- Special Feature: Touchscreen
- Connectivity Technology: Bluetooth, USB, Wi-Fi
- Audio Output Mode: Stereo
- Operating System: Android 14
- Item Weight: 2128 Grams
- Touch Screen Type: Capacitive
- Display Type: LCD
- Compatible Devices: Smartphone
- Control Method: Touch
- Are Batteries Included: No
9. Warranty and Support
For warranty information, technical support, or service inquiries, please refer to the warranty card included with your product or contact moseiny customer service directly. Keep your purchase receipt as proof of purchase.