1. Introduction
The Tilswall HVLP Paint Sprayer is an ultra-light electric spray gun designed for efficient and professional-grade painting results. Its streamlined unibody design and intuitive controls make it suitable for both beginners and experienced users. This manual provides detailed instructions for safe operation, setup, maintenance, and troubleshooting to ensure optimal performance and extend the product's lifespan.

Figure 1: Tilswall HVLP Paint Sprayer, showing its compact and ergonomic design.
2. Safety Information
WARNING: Always read and understand all safety warnings and instructions provided with the product before use. Failure to follow the warnings and instructions may result in electric shock, fire, and/or serious injury.
- Ensure the work area is well-ventilated.
- Wear appropriate personal protective equipment (PPE), including safety glasses, gloves, and a respirator.
- Do not operate the sprayer near open flames or ignition sources.
- Keep children and bystanders away while operating the sprayer.
- Always disconnect the power supply before cleaning or performing maintenance.
- Use only recommended thinning agents and and paints.
3. Package Contents
Verify that all items listed below are included in your package:
- 1 x Dreamer 400 Paint Sprayer
- 1 x 1.5mm caliber nozzle
- 1 x 2.0mm caliber nozzle
- 1 x Cleaning Brush
- 1 x Through needle/Viscosity cup
- 1 x Instruction manual
- 1 x Tip card
4. Setup
- Prepare the Paint:
Before spraying, it is crucial to thin the paint to the correct viscosity for optimal atomization and a smooth finish. For best results, thin the paint to a 100 DIN viscosity. This helps reduce streaks and drips. Test viscosity using the included viscosity cup: paint should flow through the funnel in 100 ± 5 seconds. If it's too thick (>120s), add 3-5% more thinner and retest. If it's too thin (<100s), discard as over-thinned paint won't adhere properly.
Compatible paint types include water-based paints (latex, acrylics), oil-based paints (alkyd, enamel), lacquers (nitrocellulose, CAB-acrylic), primers (etching, epoxy), and stains & varnishes. Exclusions: Acidic/alkaline coatings (e.g., concrete etchants) and abrasive slurries (e.g., zinc-rich primers).
- Fill the Container:
Unscrew the paint container from the sprayer. Pour the prepared paint into the container. Securely reattach the container to the sprayer body.
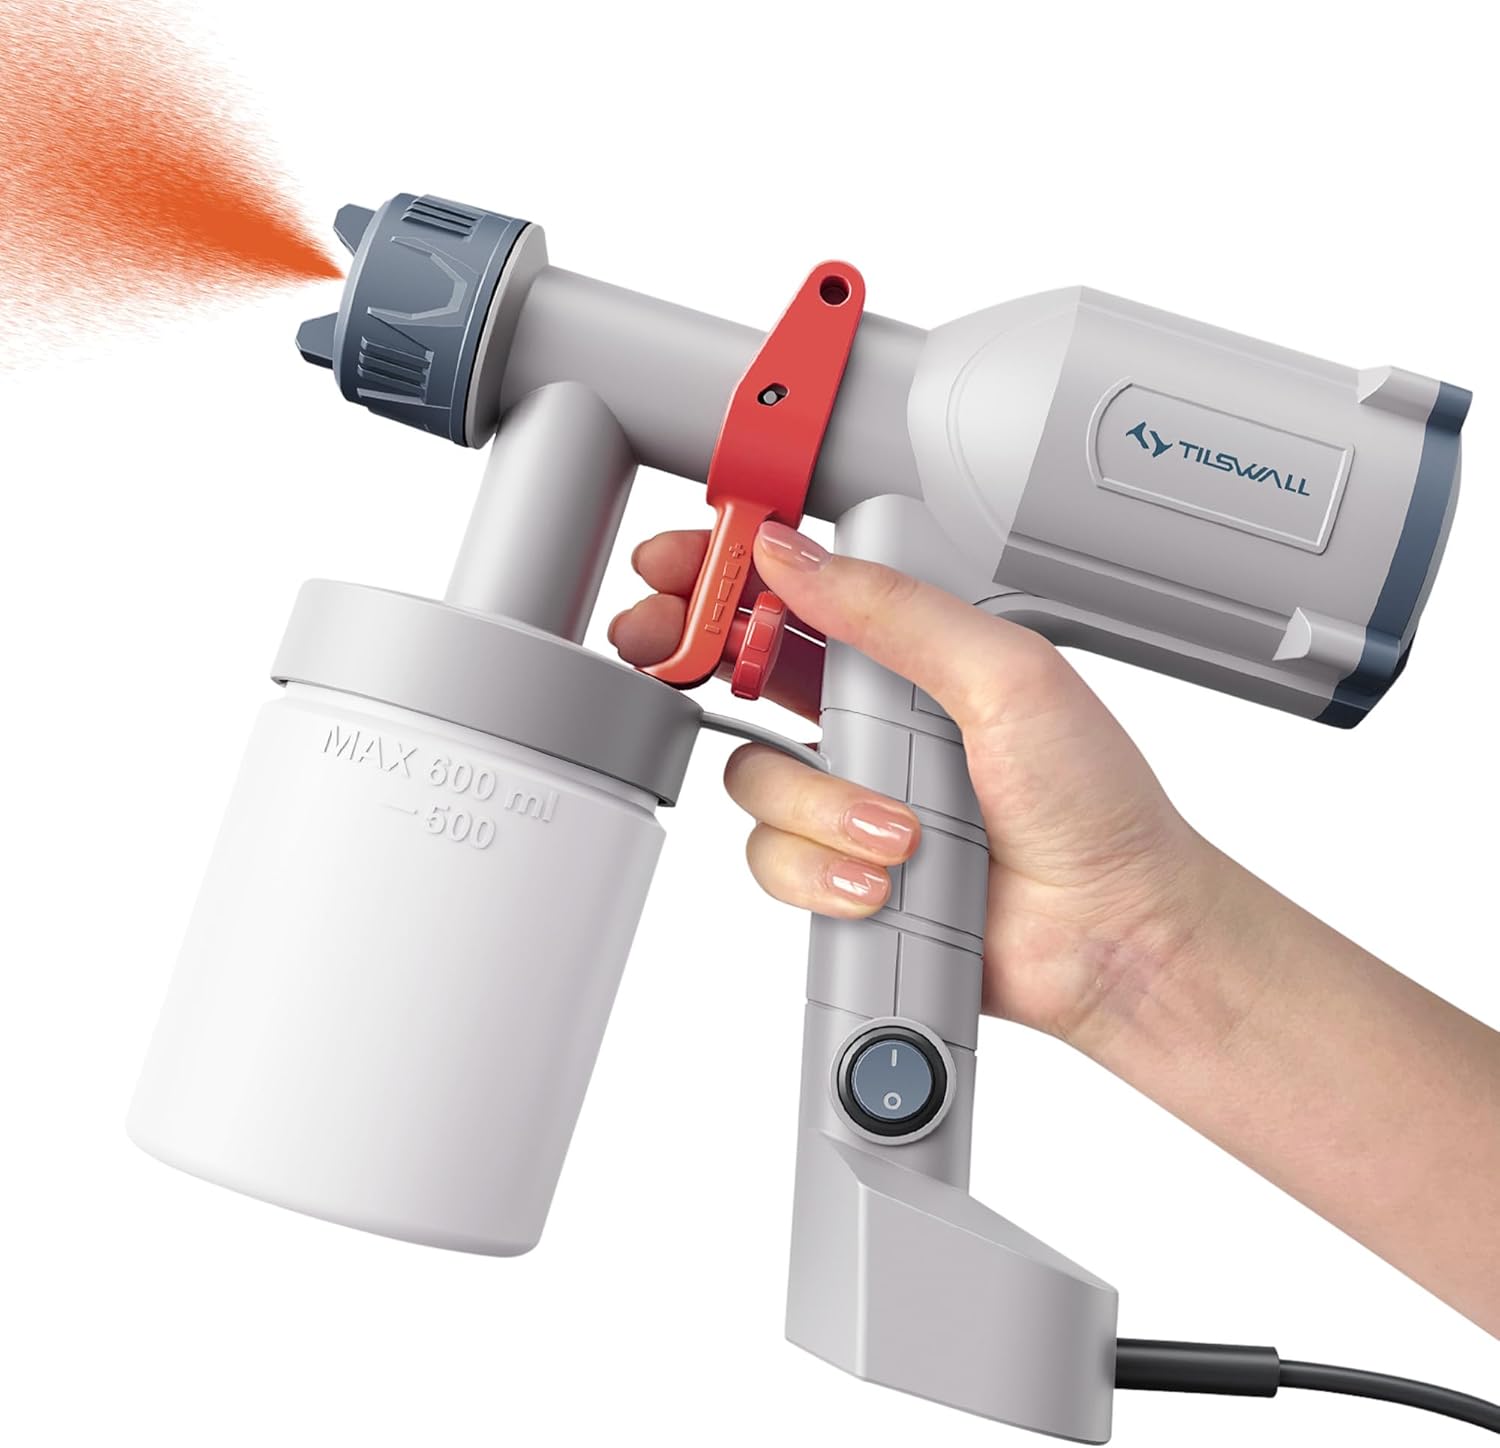
Figure 2: The paint container is easily detachable for filling with paint.
- Select and Install Nozzle:
The sprayer comes with interchangeable 1.5mm and 2.0mm nozzles. The 1.5mm nozzle is best for small surfaces like desks, chairs, and benches. The 2.0mm nozzle is ideal for larger areas such as fences, walls, and floors. Remove the cap nut by turning it counter-clockwise, separate the air cap and nozzle assembly, select the proper nozzle size for your project, align and seat the new nozzle into the gun's orifice, then reattach the air cap and tighten the cap nut clockwise.

Figure 3: Choose between 1.5mm and 2.0mm nozzles based on your painting task.
- Adjust Spray Pattern:
The sprayer offers three adjustable spray patterns: horizontal, vertical, and round. Rotate the air cap to select the desired pattern. Horizontal is for moving up and down, Vertical for moving side to side, and Circular for free movement.

Figure 4: Adjust the spray pattern for optimal coverage and control.
- Adjust Flow Control:
Use the adjustable flow control knob to fine-tune the paint flow for a smooth and even finish. This allows you to control the paint output from 0ml/min to 450ml/min.

Figure 5: The flow control knob allows precise adjustment of paint output.
- Protect Surfaces:
Before spraying, protect unpainted surfaces using high-quality tape and masking materials.
5. Operating Instructions
- Power On:
Plug the sprayer into a standard 110V AC outlet. The standard cord length is 1.5m (59"). It is suitable for temporary outdoor tasks near outlets (less than 30 minutes) and protected areas (under eaves/dry patios).
- Test Spray:
Before applying paint to your project, always test the spray pattern and flow on a piece of cardboard or scrap material at a 20cm distance. This allows you to make any necessary adjustments to the flow control and spray pattern for your desired finish.
- Begin Spraying:
Hold the sprayer approximately 6-8 inches (15-20 cm) from the surface. Pull the trigger to begin spraying. Maintain a consistent speed and distance for an even coat. Overlap each pass by about 50% to ensure complete coverage.

Figure 6: The sprayer provides effortless and efficient application for various projects.
The Tilswall Dreamer 400 offers superior texture and complete coverage compared to traditional brushes and rollers, leading to durable results.

Figure 7: Achieve professional results with superior texture and complete coverage.
Experience 4x faster spraying speed and 50% more spray coverage compared to traditional methods.

Figure 8: The sprayer significantly reduces painting time and increases coverage.
6. Maintenance
Immediate cleaning after each use is essential to prevent clogging, extend gun lifespan, and ensure consistent performance. Dried paint blocks nozzles and fluid passages, and solvents and pigments corrode seals over time. Residual paint alters spray patterns.
- Disassembly:
Unplug the sprayer. Unscrew the paint container. Disassemble the nozzle and air cap assembly by turning the cap nut counter-clockwise.
- Cleaning Components:
Clean all disassembled parts (container, suction tube, nozzle, air cap) thoroughly with warm water and mild soap (like Dawn) if using water-based paints, or appropriate solvent for oil-based paints. Use the included cleaning brush and through needle to clear any paint residue from small openings.
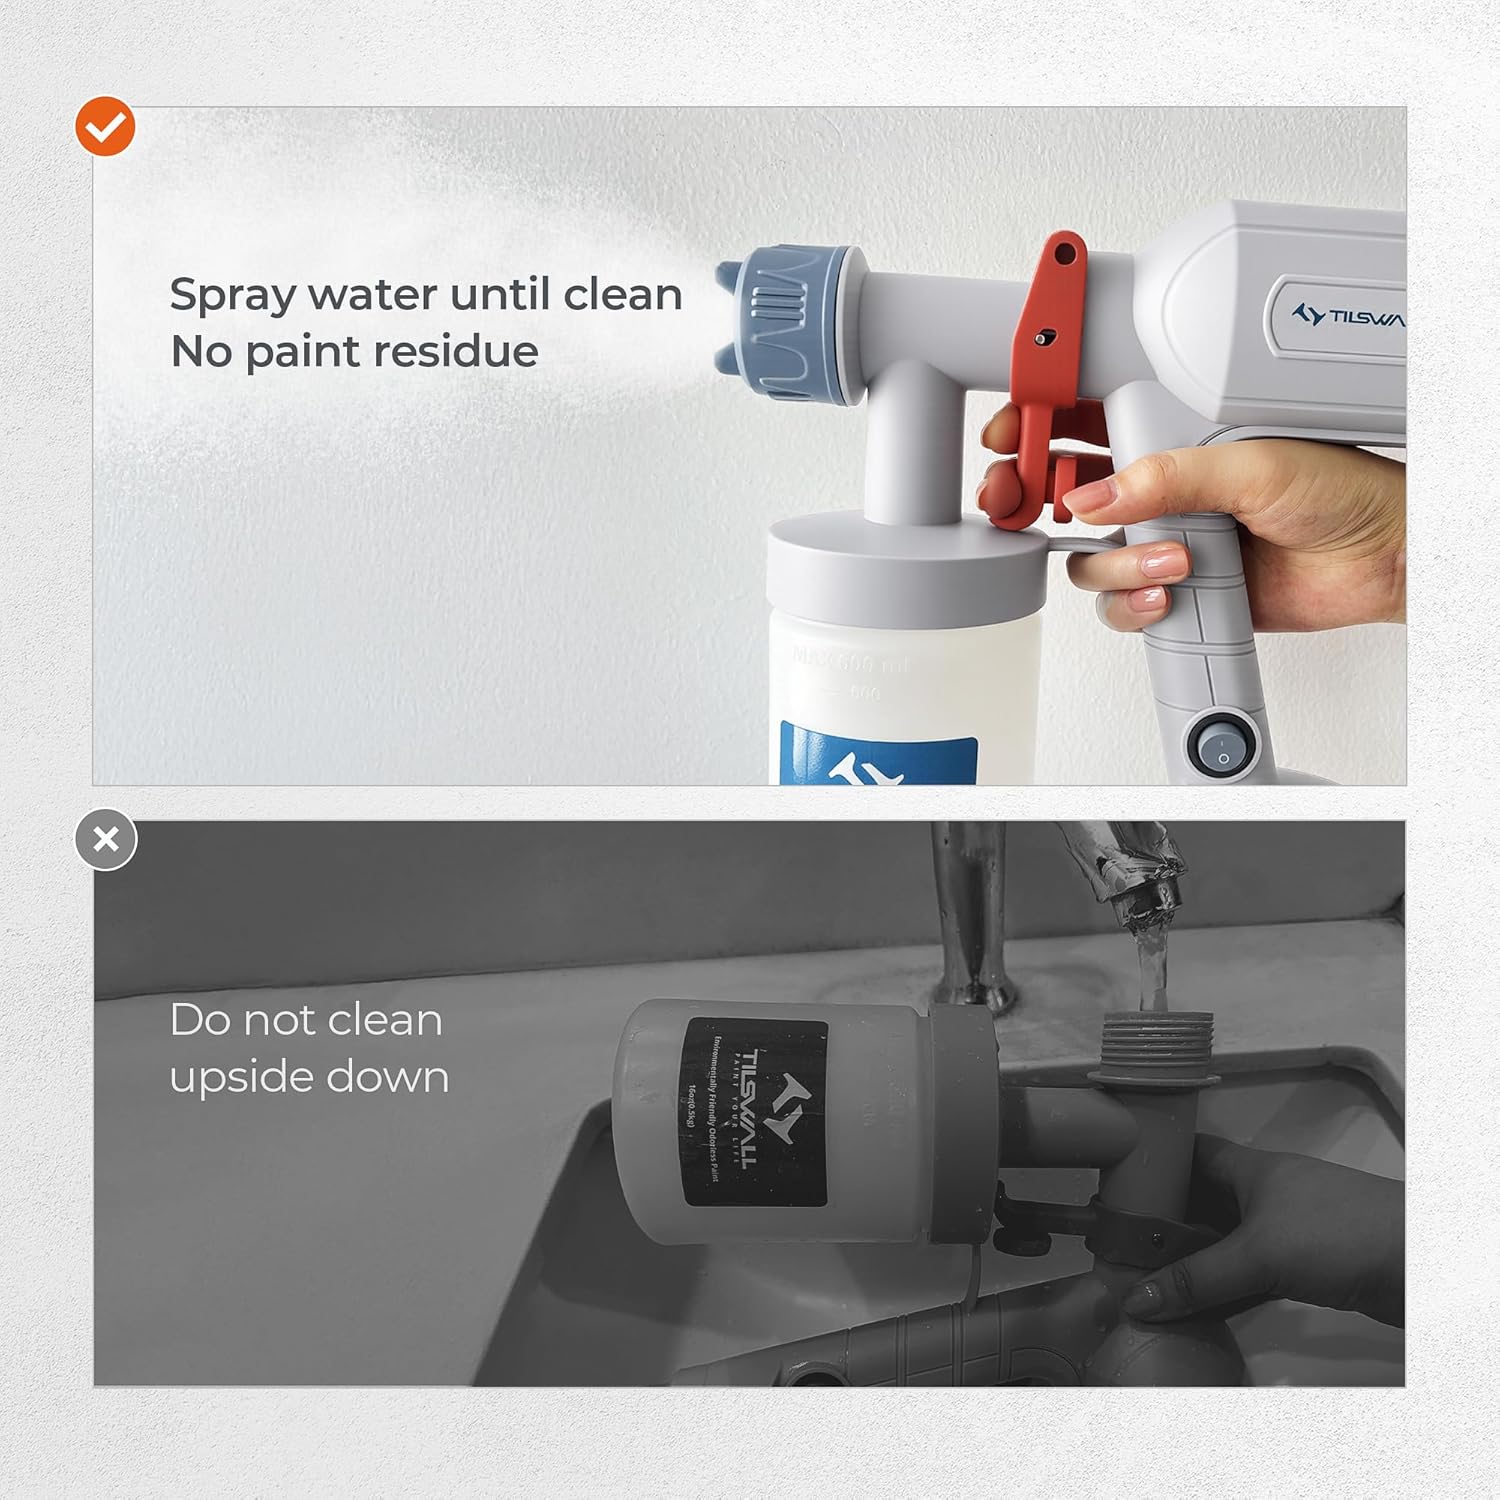
Figure 9: Proper cleaning involves spraying water until clear and avoiding upside-down cleaning.
- Flush the Sprayer:
Fill the clean container with clean water (or appropriate solvent). Reattach it to the sprayer. Spray the water until it runs completely clear, with no visible pigment. This flushes the internal passages of the gun. The spray gun should be tilted downwards during cleaning to avoid water flowing back into the motor.
- Drying and Storage:
Allow all parts to dry completely before reassembling. Store the sprayer in a clean, dry place.
7. Troubleshooting
| Problem | Possible Cause | Solution |
|---|---|---|
| Sprayer not spraying or working intermittently (Clog Alert) | Dried paint clogging the nozzle. | Do a needle test: you can freely move the needle back and forth. Soak in lacquer thinner overnight, then follow the spray gun cleaning video instructions to thoroughly flush the body. |
| Uneven spray or poor finish (Wrong Thinness) | Paint is too thick or too thin. | If too thick, add 5% thinner and retest. If too thin, start over with new paint. Refer to paint preparation in Section 4. |
| Clogged nozzles, uneven coverage, premature gun wear | Using unfiltered or improperly thinned paint. | Always filter paint through a 150-190µm strainer to remove debris. Select the correct thinner based on paint type. |
If these solutions don't resolve your issue, please contact TILSWALL Support Team directly for personalized assistance. Filming a 10-second video of the trigger pull action can help diagnose the problem.
8. Specifications
- Brand: TILSWALL
- Model Name: ZYY-Dreamer400-White-US
- Power Source: AC
- Tank Volume: 0.6 Quarts (20 fl oz)
- Material: Plastic
- Product Dimensions: 3.66"W x 10.15"H
- Item Weight: 2.57 pounds
- Style: Handheld
- Recommended Uses: Painting (Furniture, Cabinets, Fence, Walls, Doors, Garden & DIY)
- Nozzles Included: 1.5mm, 2.0mm
- Spray Patterns: Horizontal, Vertical, Round
9. Warranty and Support
At TILSWALL, we are 100% committed to our customers and provide attentive service. The product comes with a 30-day extended return window.
For any questions or concerns about the product, spraying techniques, or spraying results, please reach out to us on Amazon.

Figure 10: TILSWALL offers 24/7 service and a 30-day extended return window.