coospider-repta AQ028 H6F 390F
coospider-repta AQ028 H6F 390F Aquarium Filter Replacement Sponge User Manual
Essential guide for the installation and maintenance of your replacement filter sponges.
1. Introduction
This user manual provides comprehensive instructions for the coospider-repta AQ028 H6F 390F Aquarium Filter Replacement Sponges. These sponges are designed to maintain optimal water quality in your aquarium by providing mechanical and biological filtration. Proper installation and regular maintenance are crucial for the health of your aquatic environment.

Image 1.1: The coospider-repta AQ028 H6F 390F Aquarium Filter Replacement Sponges alongside a compatible filter unit.
2. Compatibility
These replacement filter sponges are specifically designed for use with the following coospider-repta aquarium filter models:
- AQ028 Aquarium Filter
- H6F Aquarium Filter
- 390F Aquarium Filter
Ensure your filter model matches one of the listed compatible units to guarantee proper fit and filtration performance.

Image 2.1: Visual representation of compatible filter models, H6F and AQ028, highlighting the replaceable filter component.
3. Installation and Replacement
Follow these steps to correctly install or replace the filter sponge in your coospider-repta aquarium filter:
- Power Off: Always unplug the aquarium filter from the power source before performing any maintenance or installation.
- Disassemble Filter: Carefully remove the filter unit from the aquarium. Depending on your specific model (AQ028, H6F, or 390F), gently separate the filter housing components to access the internal filter media chamber.
- Remove Old Sponge: Locate the existing filter sponge. Remove the old, soiled sponge from its compartment. Dispose of the old sponge responsibly.
- Insert New Sponge: Take a new coospider-repta replacement filter sponge. Carefully insert it into the designated filter media compartment, ensuring it fits snugly without being compressed excessively. The sponge should sit properly to allow water flow through it.
- Reassemble Filter: Reassemble the filter housing components, ensuring all parts are securely fastened.
- Reinstall and Power On: Place the filter unit back into the aquarium and plug it back into the power source. Verify that the filter is operating correctly and water is flowing as expected.
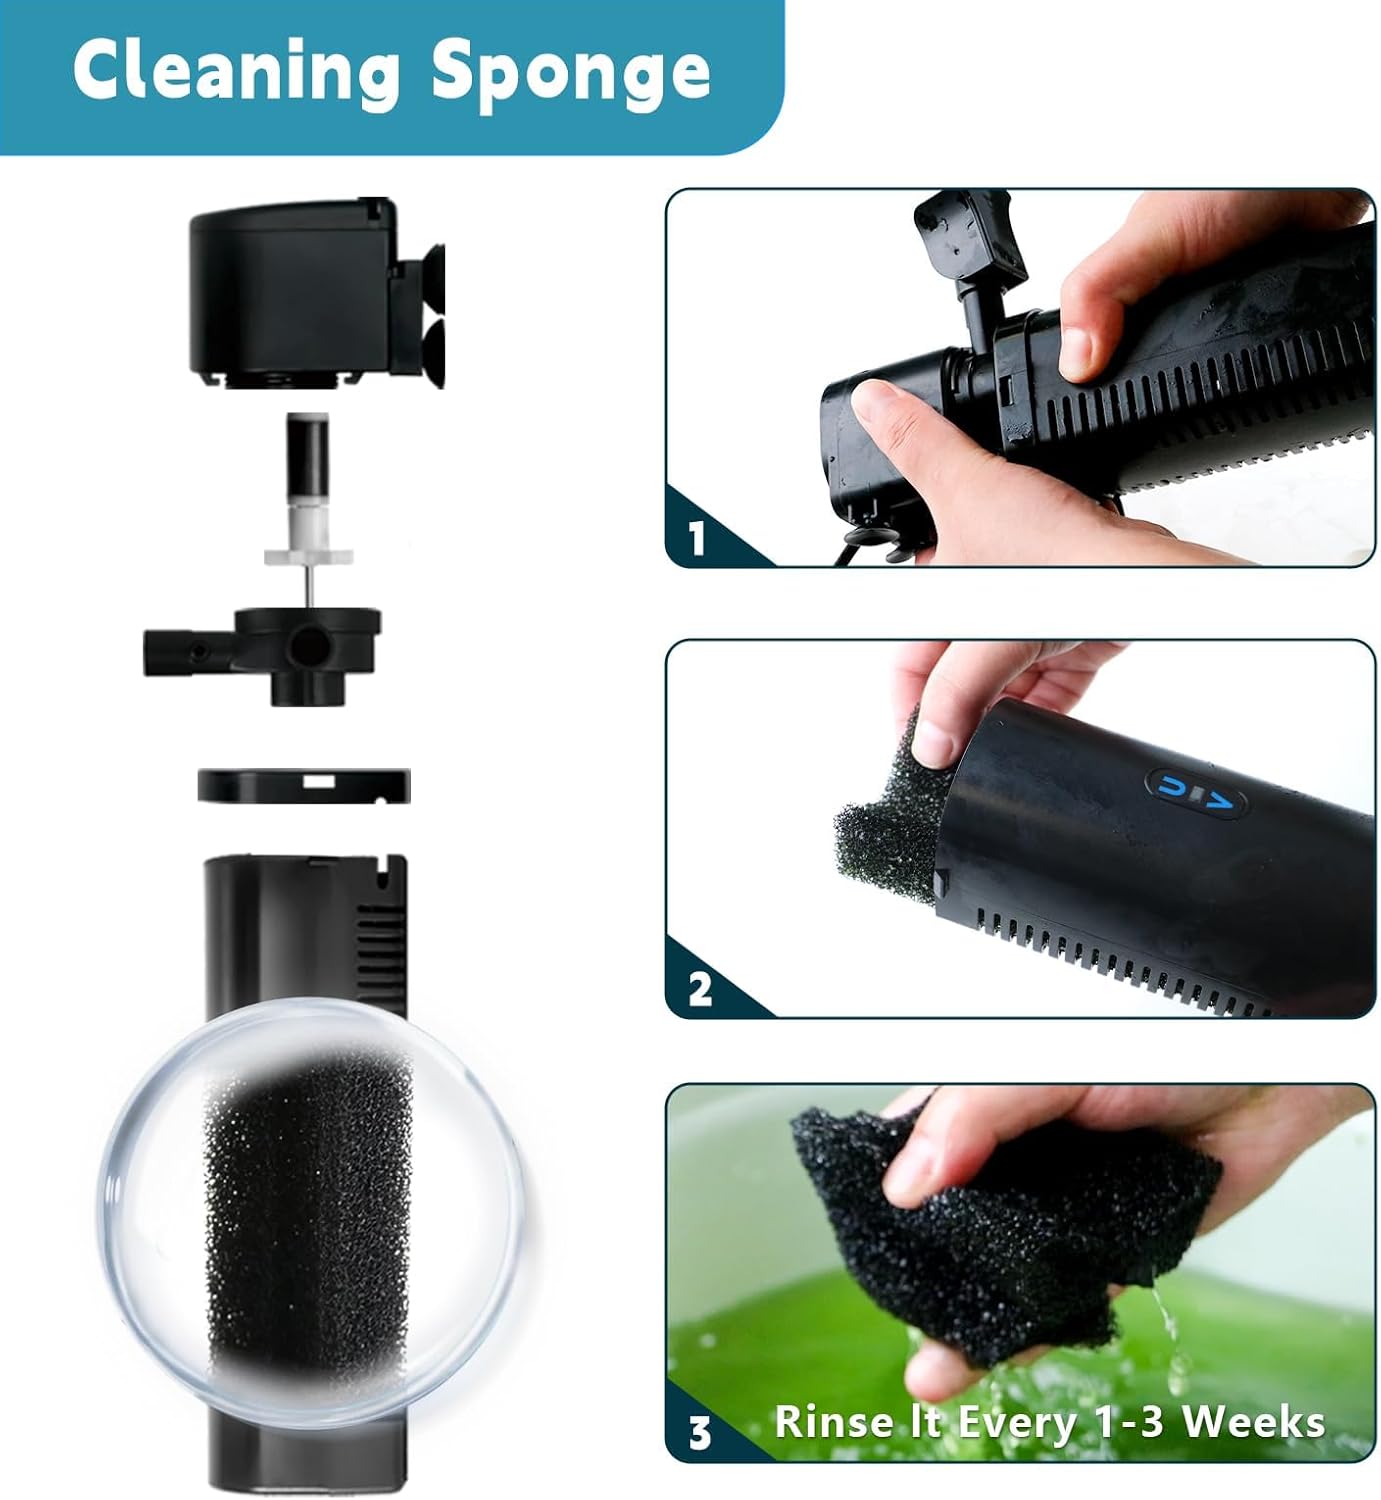
Image 3.1: Illustrated guide for accessing and replacing the filter sponge within the filter unit.
4. Operating Principle of the Filter Sponge
The replacement filter sponges play a vital role in the overall filtration process of your aquarium. They contribute to both mechanical and biological filtration:
- Mechanical Filtration: The porous structure of the sponge effectively traps physical debris, such as uneaten food, plant matter, and fish waste, preventing them from circulating in the water column.
- Biological Filtration: The sponge provides a large surface area for beneficial bacteria to colonize. These bacteria are essential for the nitrogen cycle, converting harmful ammonia and nitrites into less toxic nitrates, thus maintaining a healthy aquatic environment.

Image 4.1: Explanation of the filter's working principle, detailing how water passes through the sponge for filtration.
5. Maintenance and Cleaning
Regular cleaning and timely replacement of the filter sponges are essential for maintaining optimal water quality and filter efficiency.
Cleaning Schedule:
- It is recommended to rinse the filter sponge every 1 to 3 weeks, depending on the bioload of your aquarium and water clarity.
- When cleaning, use old aquarium water or dechlorinated tap water. Avoid using untreated tap water or harsh chemicals, as this can kill beneficial bacteria.
Replacement Schedule:
- Filter sponges should be replaced every 3 to 6 months, or sooner if they show signs of significant wear, clogging, or reduced filtration performance.
- When replacing, consider staggering the replacement of multiple sponges (if applicable) to preserve beneficial bacteria colonies.
Image 5.1: Visual instructions for rinsing the filter sponge to remove accumulated debris.
6. Specifications
| Product Type | Aquarium Filter Replacement Sponge |
| Brand | coospider-repta |
| Compatible Models | AQ028, H6F, 390F Aquarium Filters |
| Material | Filter Sponge (assumed standard filter foam) |
| Quantity | 4 Sponges per pack |
7. Troubleshooting
If you encounter issues related to your filter sponges, consider the following:
- Reduced Water Flow: This often indicates a clogged filter sponge. Remove and rinse the sponge thoroughly. If the issue persists after cleaning, the sponge may need replacement.
- Cloudy Water: While many factors can cause cloudy water, a saturated or ineffective filter sponge can contribute. Ensure the sponge is clean and properly seated. If water remains cloudy, consider replacing the sponge or checking other filter media.
- Unpleasant Odor: A strong odor from the filter can indicate excessive organic buildup on the sponge. Clean or replace the sponge immediately.
- Sponge Degradation: If the sponge appears to be breaking down or losing its structural integrity, it is time for a replacement.
8. Warranty and Support
For specific warranty information or technical support regarding your coospider-repta products, please refer to the original product packaging or visit the official coospider-repta website. Keep your purchase receipt as proof of purchase.
You can visit the coospider-repta store on Amazon for more products and information: coospider-repta Store
Ask a question about this manual
Ask about setup, troubleshooting, compatibility, parts, safety, or missing instructions. Manuals+ will review the question and use this page’s manual context to help answer it.