1. Important Safety Instructions
Please read and understand all safety instructions before operating the VEVOR 10L Meat Tumbler Marinator. Failure to follow these instructions may result in electric shock, fire, or serious injury.
- Electrical Safety: Ensure the power supply matches the voltage specified on the product label (AC 120V 60Hz). Do not operate the machine with a damaged power cord or plug. Keep the power cord away from heated surfaces.
- Food Safety: Always use fresh ingredients. Clean the machine thoroughly before and after each use to prevent cross-contamination and bacterial growth.
- Handling: Exercise caution when handling the drum and lid, especially around edges, as some surfaces may be sharp. Wear protective gloves if necessary during cleaning or assembly.
- Placement: Place the machine on a stable, level, and dry surface. Ensure adequate ventilation around the unit.
- Operation: Do not operate the machine without the lid securely sealed. Do not exceed the maximum capacity of 4 kg (8.8 lbs) of meat with marinade.
- Emergency Stop: Familiarize yourself with the location and function of the emergency stop button. In case of malfunction or emergency, press the button immediately to stop operation.
- Children and Pets: Keep the appliance out of reach of children and pets.
2. Product Overview
The VEVOR 10L Meat Tumbler Marinator is designed for efficient and even marination of various meats, suitable for both home and commercial use. It utilizes vacuum pressure and bidirectional rotation to enhance flavor absorption and tenderize meat quickly.
Key Features:
- Quick Marination: Achieves -50Kpa vacuum pressure and bidirectional rotation for faster, more uniform marination.
- Large Capacity: 10L drum accommodates up to 4 kg (8.8 lbs) of meat with marinade.
- Easy to Use: Features an intelligent digital control panel for precise time settings and simple operation.
- Efficient Sealing: Equipped with a lid seal with handle and a leak-proof silicone sealing ring to prevent air and liquid leakage during rotation.
- Durable Construction: Body and drum are made from high-quality stainless steel, ensuring scratch-resistance, corrosion-resistance, and easy cleaning.
Product Components:
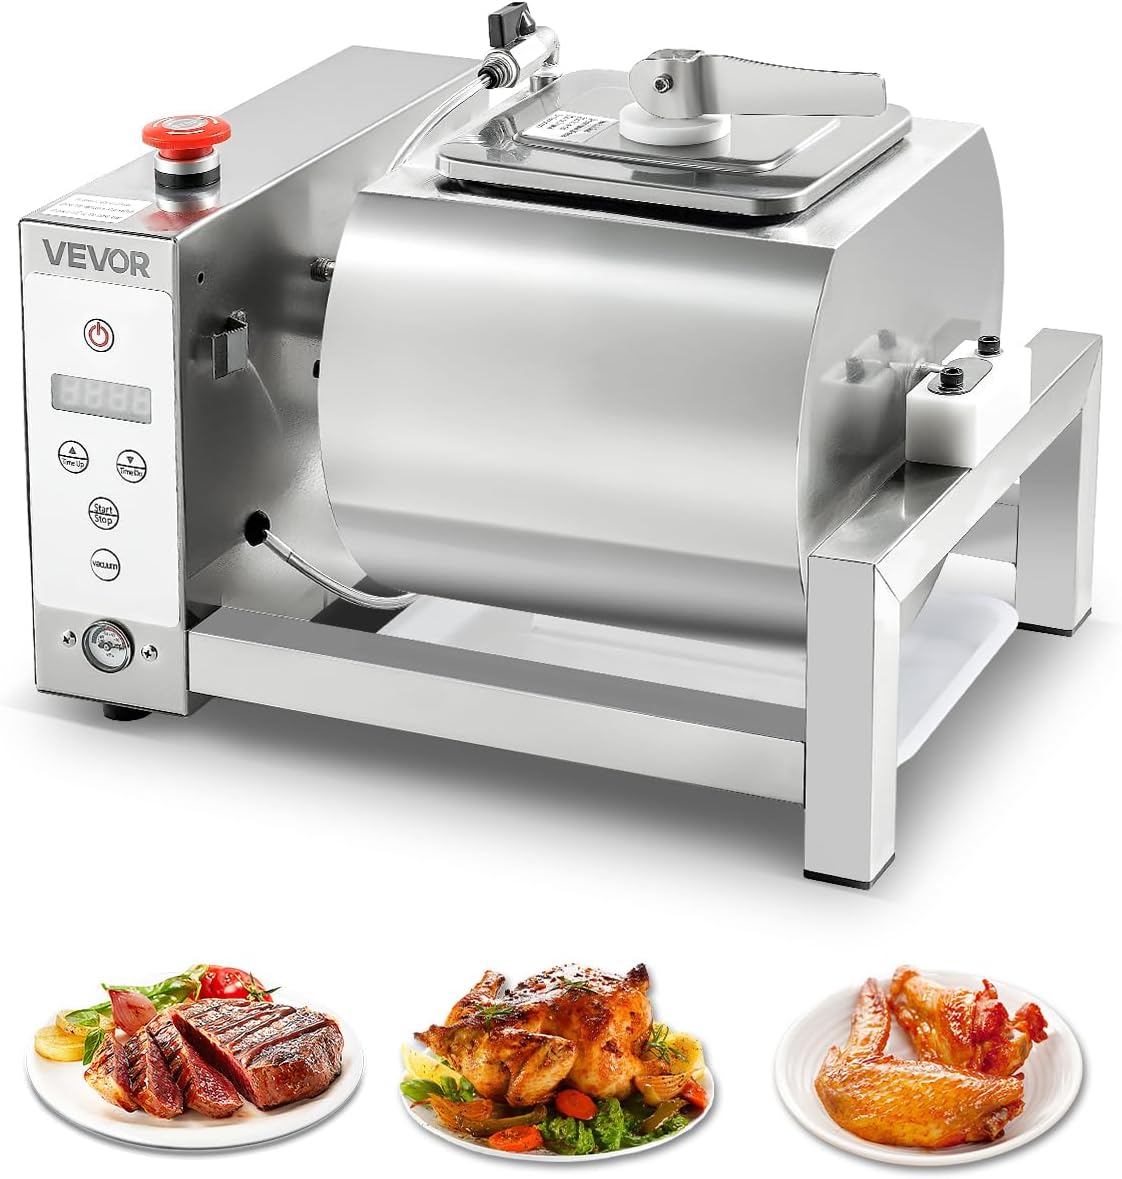
Image: The VEVOR 10L Meat Tumbler Marinator, showcasing its stainless steel construction, control panel, and the drum. Below the machine are examples of marinated chicken, steak, and chicken wings.
- Main Unit (Stainless Steel Body and Drum)
- Control Panel with Digital Display
- Lid with Sealing Handle
- Silicone Sealing Ring
- Emergency Stop Button
- Power Cord
- Plastic Basin (for drip collection)
- Foot Pads (x2)
- Hexagonal Wrench (x1)
- Connecting Flange (x1)
3. Setup
- Unpacking: Carefully remove all components from the packaging. Retain packaging for future storage or transport.
- Initial Cleaning: Before first use, clean all parts that will come into contact with food (drum, lid, sealing ring) with warm soapy water. Rinse thoroughly and dry completely.
- Placement: Place the main unit on a sturdy, level, and dry countertop or table. Ensure there is enough space around the machine for ventilation and operation.
- Install Foot Pads: Attach the two foot pads to the designated areas on the bottom of the machine's frame for added stability.
- Connect Power: Plug the power cord into a grounded electrical outlet that matches the specified voltage.
4. Operating Instructions
4.1 Loading Ingredients

Image: The VEVOR marinator can hold up to 4 kg of meat with marinade, suitable for various ingredients like chicken, steak, fish, pork, and chicken wings.
- Prepare your meat and marinade. Ensure the total weight of meat and marinade does not exceed 4 kg (8.8 lbs).
- Open the lid of the tumbler drum.
- Carefully place the meat and marinade into the drum.
4.2 Sealing the Drum

Image: A four-step guide demonstrating how to properly seal the tumbler drum to ensure a vacuum-tight closure.
- Ensure the silicone sealing ring is correctly seated in its groove on the lid.
- Place the lid onto the drum opening.
- With the handle facing you, close the lid and tighten it by turning the handle to the left or right until snug.
- Rotate the handle 90 degrees. The direction should be consistent with the drum's rotation, indicating the initial locked state.
- Press the handle to the other side of the lid to fully lock it, creating an airtight seal.
4.3 Using the Intelligent Digital Panel

Image: The intelligent digital control panel, highlighting the power button, time adjustment buttons, start/stop button, and vacuum button.
- Power On: Press the Power button (usually marked with a universal power symbol) to turn on the machine. The digital display will illuminate.
- Set Time: Use the Time Up and Time Down buttons to set the desired marinating time. The display shows the remaining time.
- Start Vacuum: Press the Vacuum button to initiate the vacuum process. The machine will create a vacuum inside the drum to -50Kpa.
- Start Tumbling: After the vacuum is established, press the Start/Stop button to begin the bidirectional rotation. The drum will rotate in alternating directions to ensure even marination.
- Monitor Progress: The digital display will count down the set time.
- Stop Operation: To pause or stop the process at any time, press the Start/Stop button. To completely stop the machine, press the Power button or the large red Emergency Stop button.
- Release Vacuum: Once marination is complete, the machine will automatically release the vacuum, or you can manually release it by pressing the vacuum button again (if applicable, refer to specific model instructions).
- Unload: Carefully unlock and remove the lid, then remove the marinated meat.
5. Maintenance
5.1 Cleaning

Image: The machine is shown being cleaned, highlighting its waterproof design and the ease of wiping down stainless steel surfaces.
Regular cleaning is essential for hygiene and to prolong the life of your marinator. The stainless steel construction is designed for easy cleaning.
- Disconnect Power: Always unplug the machine from the power outlet before cleaning.
- Disassemble: Remove the drum lid and the silicone sealing ring.
- Wash Components: Wash the drum, lid, and sealing ring with warm water and a mild, food-safe detergent. Use a soft brush or sponge to remove any food residue.
- Clean Main Unit: Wipe down the exterior of the main unit and control panel with a damp cloth. Avoid getting water directly into electrical components.
- Dry Thoroughly: Ensure all parts are completely dry before reassembling or storing the machine to prevent water spots or corrosion.
- Sharp Edges: Be mindful of potentially sharp edges, particularly around the drum opening, during cleaning. Consider wearing protective gloves.
5.2 Storage
Store the marinator in a clean, dry place away from direct sunlight and extreme temperatures. Ensure all components are dry before storage.
6. Troubleshooting
If you encounter issues with your VEVOR Meat Tumbler Marinator, refer to the following common problems and solutions:
| Problem | Possible Cause | Solution |
|---|---|---|
| Machine does not power on. | No power supply; power cord not properly connected; machine malfunction. | Check if the power cord is securely plugged into a working outlet. Ensure the power button is pressed. If the issue persists, contact customer support. |
| Drum does not rotate or rotates weakly. | Overloaded drum; motor issue; obstruction. | Reduce the amount of meat and marinade to stay within the 4 kg limit. Check for any obstructions preventing rotation. If a grinding noise or lack of power persists, the motor may be underpowered or faulty; contact customer support. |
| Vacuum not forming or leaking. | Lid not properly sealed; damaged silicone sealing ring. | Ensure the lid is securely locked following the 4-step sealing process. Inspect the silicone sealing ring for any cracks or damage and replace if necessary. |
| Unusual noises during operation. | Internal component issue; gears stripped (rare). | If the noise is excessive or indicates a malfunction, press the emergency stop button and contact customer support. Minor operational sounds are normal. |
If troubleshooting steps do not resolve the issue, please contact VEVOR customer support for assistance.
7. Specifications
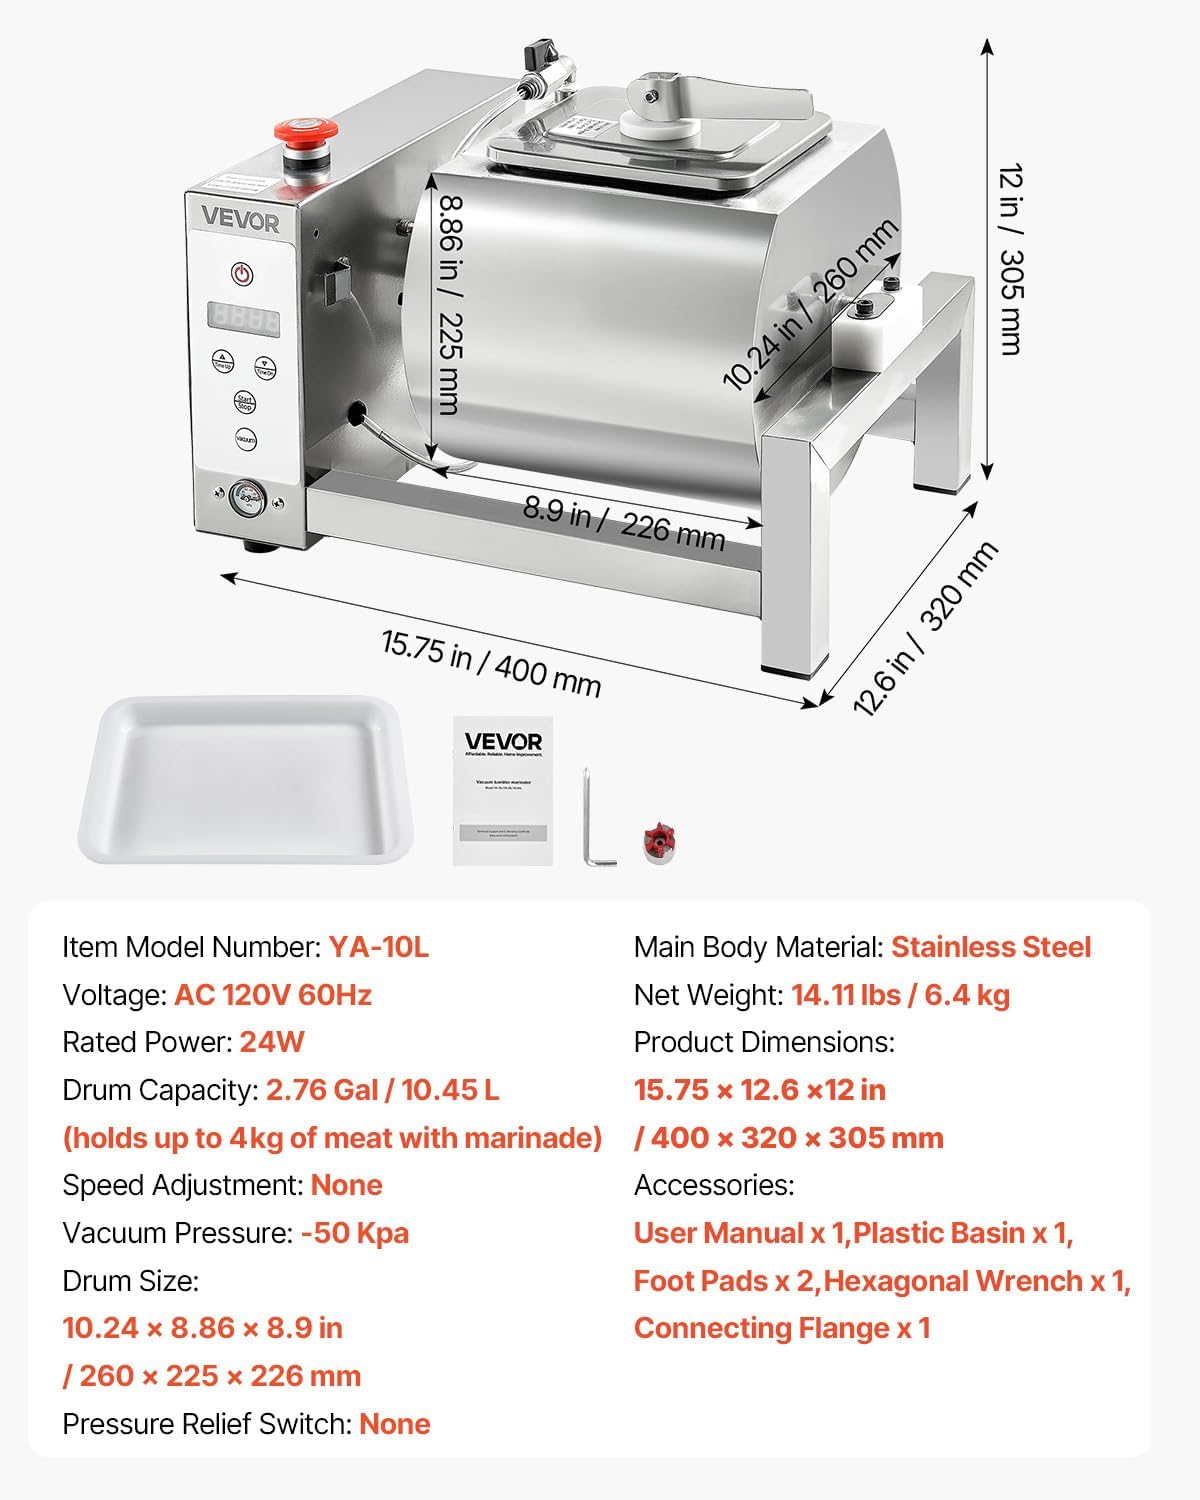
Image: Detailed product dimensions and a list of technical specifications for the VEVOR 10L Meat Tumbler Marinator.
| Feature | Detail |
|---|---|
| Item Model Number | YA-10L |
| Voltage | AC 120V 60Hz |
| Rated Power | 24W |
| Drum Capacity | 2.76 Gallons / 10.45 Liters (holds up to 4kg of meat with marinade) |
| Vacuum Pressure | -50 Kpa |
| Drum Size (L x W x H) | 10.24 x 8.86 x 8.9 inches / 260 x 225 x 226 mm |
| Main Body Material | Stainless Steel |
| Net Weight | 14.11 lbs / 6.4 kg |
| Product Dimensions (L x W x H) | 15.75 x 12.6 x 12.01 inches / 400 x 320 x 305 mm |
| Accessories Included | User Manual x 1, Plastic Basin x 1, Foot Pads x 2, Hexagonal Wrench x 1, Connecting Flange x 1 |
8. Warranty and Support
For warranty information, technical support, or replacement parts, please contact VEVOR customer service. You can find contact details on the official VEVOR website or through your purchase platform.
Visit the official VEVOR store for more products and support: VEVOR Store on Amazon