
1. Introduction
This manual provides detailed instructions for the installation, operation, and maintenance of your Hikity Android 15 Car Stereo, specifically designed for the Suzuki SX4 2006 model. Please read this manual thoroughly before using the product to ensure proper functionality and safety.
2. Safety Information
Always prioritize safety. Improper installation or operation can lead to accidents or damage. Observe the following precautions:
- Do not operate the system in a way that distracts you from driving.
- Ensure all wiring is correctly connected to prevent short circuits or electrical hazards.
- Consult a professional for installation if you are unsure about any steps.
- Keep the volume at a safe level to hear external traffic sounds.
3. Package Contents
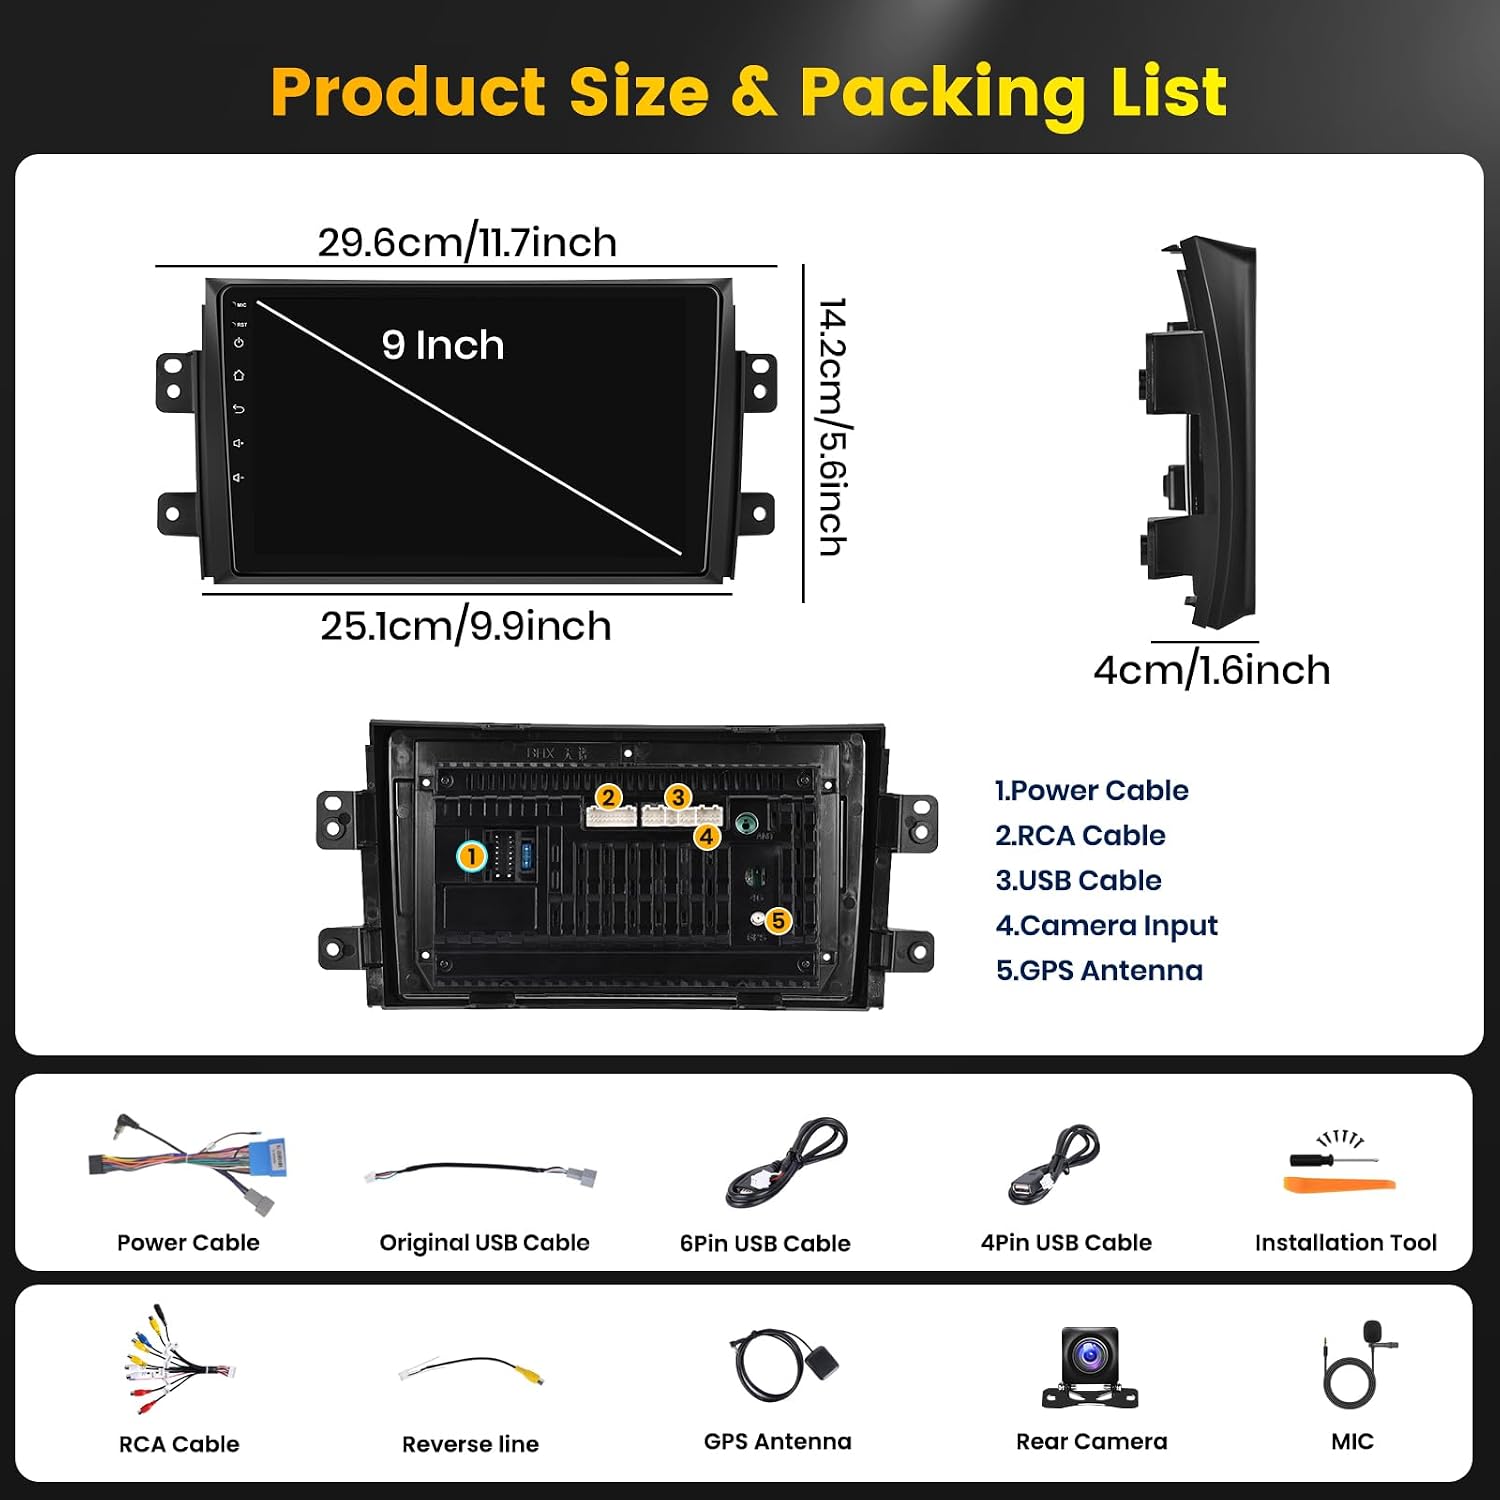
Verify that all items listed below are included in your package:
- 1 x Android Car Stereo
- 1 x Power Cable
- 1 x GPS Antenna
- 1 x Rear Camera Input Cable
- 1 x RCA Cable
- 2 x USB Cables
- 1 x User Manual (this document)
- 1 x Radio Housing
- 4 x Mounting Brackets
- 1 x Installation Tool
- 1 x Reversing Camera
- 1 x Microphone
- 1 x Canbus (if applicable)
4. Installation Guide
This section outlines the general steps for installing the car stereo. Specific vehicle wiring may vary. Professional installation is recommended.
4.1 Pre-Installation Checks
- Disconnect the vehicle's battery to prevent electrical shorts.
- Ensure the vehicle's dashboard opening matches the stereo's dimensions (9-inch screen, 2-DIN standard).
- Identify the existing wiring harness in your Suzuki SX4 2006.
4.2 Wiring Connections
Refer to the wiring diagram provided with your unit. Key connections include:
- Power Cable: Connect to vehicle's power, ground, and accessory wires.
- GPS Antenna: Mount in a location with a clear view of the sky.
- USB Cables: For external USB devices or charging.
- Rear Camera Input: Connect the provided reversing camera. Ensure the reverse trigger wire is connected to the vehicle's reverse light circuit.
- RCA Cables: For external amplifiers or video output (if supported).
- Microphone: Connect for hands-free calling and voice commands.
- CANBUS Decoder: If your vehicle requires it for steering wheel controls or other integrated functions, connect the CANBUS module as per its instructions.

4.3 Mounting the Unit
- Attach the mounting brackets to the sides of the stereo unit.
- Slide the unit into the dashboard opening, securing it with screws or clips as per your vehicle's design.
- Reconnect the vehicle's battery.
- Test all functions before fully reassembling the dashboard.
5. Initial Setup
5.1 First Power On
Upon first power-on, the system will boot up. You may be prompted to select a language and set the time zone.
5.2 Wi-Fi Connection
- Go to Settings > Network & Internet > Wi-Fi.
- Select your desired Wi-Fi network and enter the password.
- A stable Wi-Fi connection is required for online maps, app downloads, and system updates.

5.3 GPS Calibration
The built-in GPS/QZSS/SBAS positioning chip provides accurate navigation. Ensure the GPS antenna is properly installed for optimal signal reception. The system uses pre-installed offline maps, but online map data can be downloaded via Wi-Fi.
6. Operation
6.1 Wireless CarPlay & Android Auto
Connect your smartphone wirelessly via Bluetooth or Wi-Fi to access CarPlay or Android Auto. This allows for seamless integration of navigation, music, calls, and voice assistants (Siri, Google Assistant).
- Enable Bluetooth and Wi-Fi on your smartphone.
- On the car stereo, open the CarPlay or Android Auto application.
- Follow the on-screen prompts to pair your device.

6.2 Bluetooth Functions
The built-in Bluetooth 4.1 module supports A2DP for audio streaming, hands-free calling, and phonebook synchronization.
- Pairing: Go to Settings > Connected devices > Pair new device.
- Hands-Free Calling: Make and receive calls directly from the stereo screen.
- Audio Streaming: Play music from your phone via Bluetooth.
6.3 FM/RDS Radio
Access the FM radio tuner. RDS (Radio Data System) provides additional information like station name and program type.
- Select the Radio app from the main menu.
- Use the scan function to find available stations or manually tune.
- Save your favorite stations as presets.
6.4 Rear View Camera
When the vehicle is shifted into reverse, the display automatically switches to the rear camera view, providing a 170° wide-angle perspective with parking guidelines.

6.5 Steering Wheel Control (SWC)
If your vehicle supports it and the CANBUS is correctly connected, you can control basic stereo functions (volume, track change, mode) directly from your steering wheel buttons.
- Access the SWC settings in the system menu to map buttons if necessary.
6.6 Split Screen Function
The split-screen feature allows you to run two applications simultaneously, such as navigation on one side and music on the other.
- Long-press the recent apps button or drag an app to one side of the screen to activate split-screen mode.

6.7 EQ Settings
Customize your audio experience with the built-in equalizer (EQ) settings. Choose from various sound effects or adjust frequency bands manually.

7. Maintenance
7.1 Cleaning the Screen
Use a soft, lint-free cloth to gently wipe the touchscreen. Do not use abrasive cleaners or solvents, as they can damage the screen coating.
7.2 Software Updates
Periodically check for software updates via the system settings when connected to Wi-Fi. Updates can improve performance and add new features.
7.3 General Care
Avoid exposing the unit to extreme temperatures or direct sunlight for prolonged periods. Ensure proper ventilation around the unit.
8. Troubleshooting
| Problem | Possible Cause | Solution |
|---|---|---|
| No power | Incorrect wiring, blown fuse, vehicle battery disconnected. | Check power cable connections, inspect vehicle fuses, ensure battery is connected. |
| No sound | Volume too low, mute activated, speaker wiring issues, incorrect audio output settings. | Increase volume, check mute status, verify speaker connections, adjust audio settings. |
| GPS signal lost or inaccurate | GPS antenna obstructed or improperly installed, poor satellite reception. | Ensure GPS antenna has a clear view of the sky, check antenna connection. |
| CarPlay/Android Auto not connecting | Bluetooth/Wi-Fi off on phone/stereo, incompatible phone, app issues. | Enable Bluetooth/Wi-Fi, restart phone/stereo, update phone OS/apps. |
| Rear camera not displaying | Camera wiring incorrect, reverse trigger wire not connected, faulty camera. | Check camera power and video input connections, verify reverse trigger wire. |
9. Specifications
| Feature | Detail |
|---|---|
| System | Android 15 |
| Chipset | MT8163 |
| CPU Speed | 1.3 GHz |
| Screen Size | 9 inches |
| RAM | 2 GB |
| ROM | 64 GB |
| Screen Resolution | 1024*600 |
| Bluetooth Version | 4.1 |
| Radio Chip | MT6625N |
| Output Power | 4*45W |
| Operating Temperature | -20°C to 75°C |
| Amplifier Chip | YD7388 |
| Radio Band | FM/RDS |
| Reverse Input | AHD/CVBS |
| External Microphone | Supported |
| Maps | Built-in offline maps (online data download via internet) |
| USB Interface | Dual USB |
| Audio Formats | APE/FLAC/WAV/MP3/WMA etc. |
| Video Formats | MKV/RMVB/AVI/MP4/MDV etc. |
| Image Formats | PNG/JPEG/JPG/GIF/WBMP/BNP etc. |
| Model Number | A7283A3796A4MI2-63EU |
| Weight | 2.59 Kilograms |
10. Warranty and Support
For warranty information and technical support, please refer to the contact details provided with your purchase or visit the official Hikity website. Keep your purchase receipt as proof of purchase.
For further assistance, you may contact Hikity customer service through their official channels. Please have your model number (A7283A3796A4MI2-63EU) ready when contacting support.