TWSYOXPR dongguanshijianyingbaihuoshanghang
TWSYOXPR Three Lens Three Screen IP Camera User Manual
Model: dongguanshijianyingbaihuoshanghang
1. Introduction
Thank you for choosing the TWSYOXPR Three Lens Three Screen IP Camera. This advanced security camera features a unique three-lens, three-screen design, 15MP ultra-high pixel resolution, 4K HD video capabilities, and intelligent auto-tracking. This manual provides detailed instructions for installation, operation, and maintenance to ensure optimal performance and security for your property.
2. Product Overview
The TWSYOXPR IP Camera is designed for comprehensive indoor and outdoor surveillance. It offers multi-angle viewing, intelligent motion detection, and robust weather resistance.

Figure 2.1: TWSYOXPR Three Lens Three Screen IP Camera
Key Features:
- Three Lenses & Three Screens: Provides multi-angle, all-round video surveillance with simultaneous display.
- 15MP Ultra-High Pixel & 4K HD: Delivers exceptionally clear and detailed images.
- Dual Lens Automatic Tracking: Intelligently locks onto and tracks moving objects.
- Color & IR Night Vision: Offers clear visibility in various lighting conditions, including full-color night vision.
- IP66 Waterproof/Weatherproof: Suitable for outdoor use in diverse weather conditions.
- Pan 355° Tilt 90°: Extensive PTZ control for wide coverage.
- Two-Way Audio: Enables communication through the camera.
- Multiple Connectivity: Supports 2.4G WiFi and RJ-45 LAN connection.
3. Setup Guide
3.1 Package Contents
Before installation, please verify all components are present:
- TWSYOXPR Three Lens Three Screen IP Camera
- Power Adapter (EU Plug, DC 12V)
- Mounting Screws and Anchors
- User Manual (this document)
- Optional: 64GB TF Card (if purchased with bundle)

Figure 3.1: Camera with optional 64GB TF Card
3.2 Power Connection
- Connect the provided DC 12V power adapter to the camera's power input port.
- Plug the power adapter into a suitable electrical outlet.
- The camera will power on and initiate its self-test sequence.
3.3 Network Connection
The camera supports both Wi-Fi and wired LAN connections.
Wi-Fi Connection (2.4G WIFI Network):
- Download the recommended mobile application (refer to packaging or quick start guide for app name).
- Register an account and log in.
- Follow the in-app instructions to add the camera, typically by scanning a QR code on the camera or using an AP hotspot connection.
- Select your 2.4G Wi-Fi network and enter the password.
LAN Connection (RJ-45 Network Port):
- Connect an Ethernet cable from your router to the camera's RJ-45 port.
- The camera will automatically obtain an IP address via DHCP.
- Add the camera to the mobile application or PC software using its LAN connection.
3.4 SD Card Installation
The camera supports TF cards up to 128GB for local storage. The SD card slot is typically located near the RESET button.
- Locate the SD card slot, often under a protective cover.
- Insert the TF card with the gold contacts facing down until it clicks into place.
- Format the SD card via the mobile application for proper recording.
3.5 Mounting the Camera
The camera can be installed using various methods: ceiling, side, wall hanging, or vertical pole installation.
- Choose a suitable mounting location that provides optimal viewing angles and network signal strength.
- Use the included mounting template (if provided) to mark drill holes.
- Drill holes and insert wall anchors if mounting on masonry or drywall.
- Secure the camera's mounting bracket to the surface using the provided screws.
- Attach the camera to the mounting bracket.
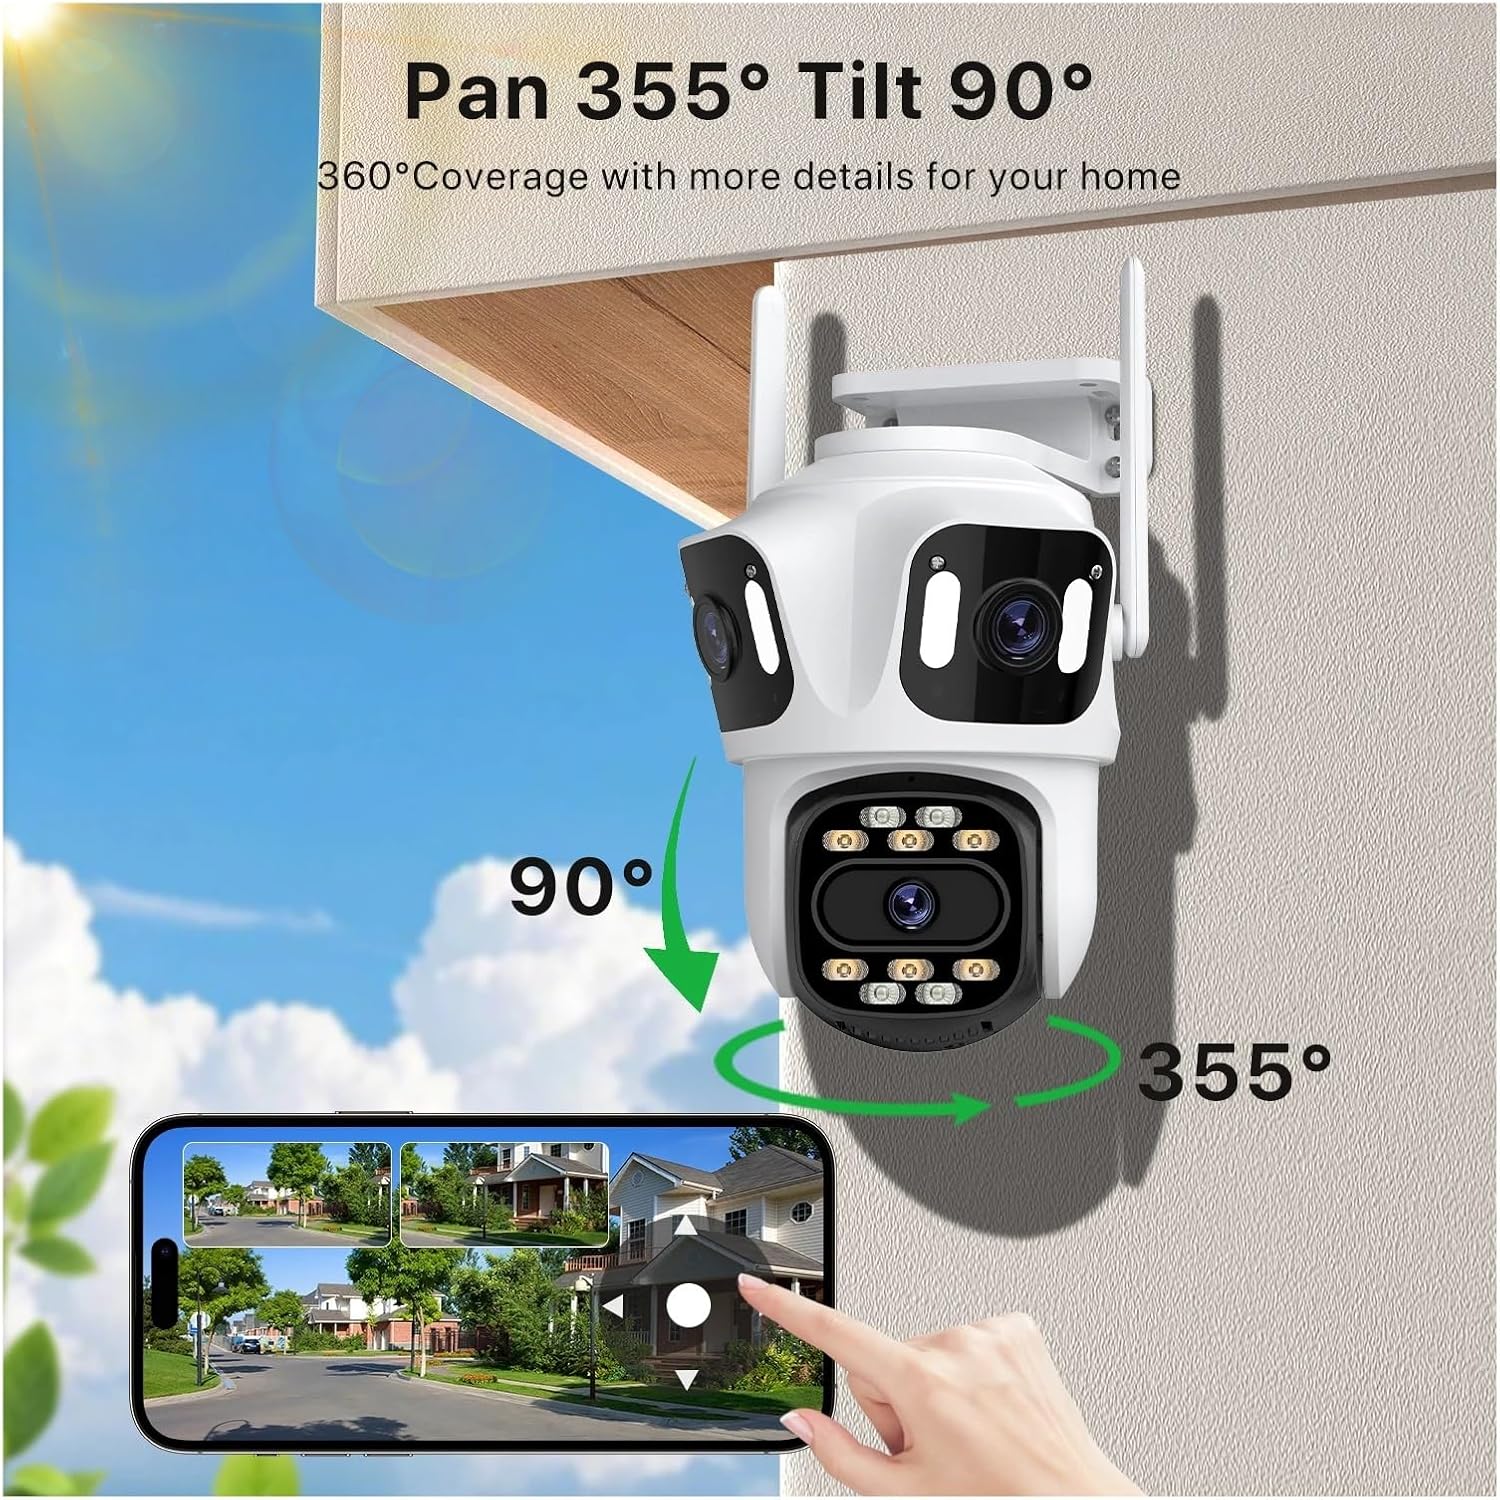
Figure 3.2: Pan and Tilt Capabilities
4. Operating Instructions
4.1 Live View and Multi-Screen Display
Access the live feed through the mobile application. The three-lens design allows for a unique three-screen display, providing comprehensive coverage.
- Open the app and select your camera from the device list.
- The live view will appear, often with options to switch between single-screen and multi-screen layouts.

Figure 4.1: 15MP Three-Lens Three-Screen View
4.2 PTZ Control
Use the PTZ (Pan, Tilt, Zoom) controls within the app to adjust the camera's viewing angle.
- Pan: Rotate the camera horizontally up to 355°.
- Tilt: Adjust the camera vertically up to 90°.
- Digital Zoom: Pinch to zoom on the live feed for closer inspection.
4.3 Motion Detection & Auto Tracking
The camera features intelligent motion detection and dual-lens automatic tracking.
- Enable motion detection in the app settings.
- Configure detection zones and sensitivity.
- When motion is detected, the camera can automatically track the moving object, ensuring it remains in view.
- The three-lens camera supports human detection across all three screens.

Figure 4.2: Auto Tracking in action
4.4 Night Vision
The camera offers both full-color and infrared (IR) night vision modes.
- Full Color Night Vision: Utilizes built-in white lights to provide color images in low-light conditions.
- IR Night Vision: Uses infrared LEDs for black and white images in complete darkness, with a maximum red light distance of 30 meters.
- Switch between modes or set to automatic in the app settings.

Figure 4.3: Color & IR Night Vision Comparison
4.5 Two-Way Audio
Use the two-way audio feature to listen and speak through the camera.
- Tap the microphone icon in the live view interface to speak.
- Ensure the speaker icon is enabled to hear audio from the camera's location.
4.6 Recording and Storage
The camera supports 24-hour recording to a TF card and optional paid cloud storage.
- TF Card Recording: Continuous recording or event-triggered recording can be configured. Playback is available through the app.
- Cloud Storage: Subscribe to cloud storage services via the app for off-site backup of recordings.
4.7 Alarm Actions
Configure alarm actions for motion detection events.
- Receive push notifications on your mobile device.
- Trigger local alarms (e.g., siren, flashing lights) on the camera.
5. Maintenance
5.1 Cleaning
- Regularly clean the camera lens and housing with a soft, dry cloth.
- Do not use harsh chemicals or abrasive cleaners.
5.2 Firmware Updates
- Check the mobile application periodically for available firmware updates.
- Keep the camera powered on and connected to the internet during updates to prevent interruption.
5.3 Environmental Considerations
The camera is designed for outdoor use with an IP66 rating, suitable for temperatures between -20°C and +50°C.

Figure 5.1: IP66 Waterproof Rating
- Ensure the camera is installed in a location that minimizes direct exposure to extreme weather conditions if possible, despite its IP66 rating.
- Avoid placing the camera near strong electromagnetic interference sources.
6. Troubleshooting
6.1 Common Issues and Solutions
- No Power:
Ensure the power adapter is securely connected to the camera and the power outlet. Verify the outlet is functional. - Cannot Connect to Wi-Fi:
Ensure your Wi-Fi network is 2.4G. Check Wi-Fi password. Move camera closer to router. Restart camera and router. - No Image/Offline:
Check network connection (Wi-Fi or LAN). Restart the camera. Verify internet connectivity. - Motion Detection Not Working:
Ensure motion detection is enabled in the app. Adjust sensitivity settings. Check detection zones. - SD Card Not Recording:
Ensure the SD card is inserted correctly and formatted via the app. Check if the card is full or corrupted. - Poor Night Vision:
Ensure the night vision mode is set correctly (Auto/Color/IR). Check for obstructions blocking the IR/white lights.
6.2 Resetting the Camera
If issues persist, you may need to reset the camera to factory defaults. The RESET button is typically located near the SD card slot.
- With the camera powered on, use a pin or small tool to press and hold the RESET button for approximately 5-10 seconds until you hear a prompt or see an indicator light change.
- The camera will restart. You will then need to reconfigure it as a new device in the app.
7. Specifications
| Feature | Detail |
|---|---|
| Model | Three-lens camera |
| Megapixels | 15 Million Pixels (4K HD) |
| Lens (mm) | 3.6mm |
| Viewing Angle | 85° |
| Video Compression Format | H.264, H.265 |
| Connectivity | IP/Network Wireless (2.4G WiFi), LAN (RJ-45) |
| AI Function | Motion Detection, Human Detection, Auto Tracking |
| Night Vision | Full Color + Red Light Night Vision, IR Night Vision (max 30M) |
| Audio Output | Two-way audio |
| Storage | TF card (up to 128G), Cloud storage (paid) |
| Power Supply | DC 12V |
| Power Consumption | 24W |
| Operating Temperature | -20°C ~ +50°C |
| IP Level | IP66 (Waterproof/Weatherproof) |
| Installation Methods | Ceiling, Side, Wall Hanging, Vertical Pole |
| Dimensions (L×W×D) | 210 × 150 × 140mm |
| Alarm Action | Local alarm |
8. Warranty and Support
For warranty information and technical support, please refer to the product packaging or contact the retailer/manufacturer directly. Keep your purchase receipt as proof of purchase.
Ask a question about this manual
Ask about setup, troubleshooting, compatibility, parts, safety, or missing instructions. Manuals+ will review the question and use this page’s manual context to help answer it.