
1. Introduction
This manual provides instructions for the installation, operation, and maintenance of the Generic Replacement Drain Pump, model ACTO-HAPT-PL-06032025-21474. This pump is designed as a replacement part for Kenmore washing machines, specifically compatible with models requiring part number 79641392510. Please read all instructions carefully before proceeding with installation to ensure proper function and safety.
2. Safety Information
- Disconnect Power: Always disconnect the washing machine from the power supply before attempting any installation, maintenance, or repair. Failure to do so can result in electric shock or serious injury.
- Water Shut-off: Turn off the water supply to the washing machine before beginning work to prevent water leaks.
- Professional Installation: If you are not comfortable performing appliance repairs, it is recommended to seek assistance from a qualified technician.
- Wear Protective Gear: Wear appropriate personal protective equipment, such as gloves and eye protection, during installation.
- Check for Leaks: After installation, carefully check all connections for leaks before fully operating the washing machine.
3. Package Contents
Verify that all items are present in the package:
- 1 x Generic Replacement Drain Pump (Model: ACTO-HAPT-PL-06032025-21474)
- 1 x O-ring/Gasket (as shown in product image)
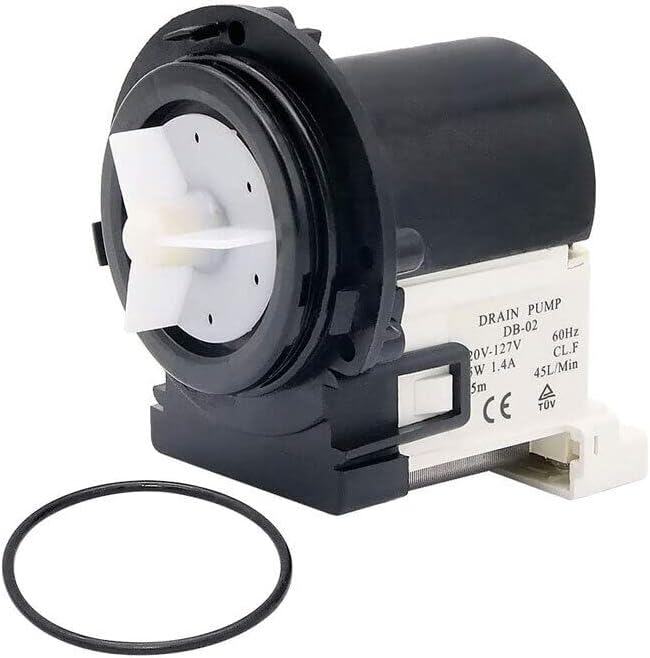
Image 1: Generic Replacement Drain Pump (Model ACTO-HAPT-PL-06032025-21474) with included O-ring. The pump features a black motor housing and a white impeller assembly. The O-ring is a black rubber seal.
4. Installation Instructions
This section outlines the general steps for replacing a washing machine drain pump. Specific procedures may vary slightly depending on your washing machine model. Always refer to your washing machine's service manual for detailed instructions.
4.1. Tools Required
- Screwdriver (Phillips and/or Flathead)
- Pliers
- Bucket or shallow pan
- Towels
- Work gloves
4.2. Preparation
- Disconnect Power: Unplug the washing machine from the electrical outlet.
- Shut Off Water: Turn off the hot and cold water supply valves to the washing machine.
- Drain Water: Disconnect the water inlet hoses and the drain hose from the back of the washer. Place the ends of the hoses into a bucket to drain any residual water.
- Access the Pump: Depending on your washer model, you may need to tilt the washer back, remove the front panel, or remove the back panel to access the drain pump. Consult your washer's manual for specific access instructions.
4.3. Removing the Old Drain Pump
- Locate the Pump: Identify the drain pump, typically located at the bottom front or rear of the washing machine.
- Disconnect Hoses: Use pliers to release the clamps securing the hoses to the drain pump. Carefully remove the hoses, being prepared for any remaining water to spill. Use towels to absorb water.
- Disconnect Wiring: Disconnect the electrical wiring harness from the drain pump. Note the orientation of the wires if necessary.
- Remove Mounting Screws/Clips: Unscrew any mounting screws or release clips that secure the drain pump to the washer chassis.
- Remove Old Pump: Carefully remove the old drain pump from the washing machine.
4.4. Installing the New Drain Pump
- Prepare New Pump: Ensure the new drain pump is clean and the O-ring/gasket is properly seated.
- Mount New Pump: Position the new drain pump in the same location as the old one. Secure it with the mounting screws or clips.
- Connect Wiring: Reconnect the electrical wiring harness to the new drain pump, ensuring a secure connection.
- Connect Hoses: Attach the hoses to the new drain pump and secure them with the clamps. Ensure all connections are tight to prevent leaks.
- Reassemble Washer: Reattach any panels or components that were removed to access the pump.
5. Operation and Testing
- Reconnect Water: Turn on the hot and cold water supply valves. Check for any leaks at the inlet hose connections.
- Reconnect Power: Plug the washing machine back into the electrical outlet.
- Test Cycle: Run a short wash cycle or a drain/spin cycle without laundry. Observe the drain pump's operation and carefully check for any water leaks around the pump and hose connections.
- Verify Drainage: Ensure that the water drains completely and efficiently from the tub.
6. Maintenance
The drain pump is generally a sealed unit and requires minimal maintenance. However, regular cleaning of the washer's drain filter (if applicable) can help prevent debris from reaching and clogging the pump.
- Regular Filter Cleaning: Consult your washing machine's user manual for instructions on how to access and clean the drain pump filter or coin trap. This should be done periodically to prevent blockages.
- Inspect Hoses: Periodically check the drain hoses for kinks, cracks, or blockages.
7. Troubleshooting
| Problem | Possible Cause | Solution |
|---|---|---|
| Washer not draining | Clogged drain pump filter/trap Kinked or blocked drain hose Faulty wiring connection Pump impeller obstructed | Clean the drain pump filter. Check and clear the drain hose. Verify all electrical connections to the pump are secure. Inspect the pump impeller for foreign objects (after disconnecting power). |
| Water leaks around pump | Loose hose clamps Damaged O-ring/gasket Improperly seated hoses | Tighten hose clamps. Ensure O-ring/gasket is correctly installed and not damaged. Re-seat hoses firmly onto pump connections. |
| Unusual noise from pump | Debris in pump Worn bearings (less common for new pump) | Disconnect power and inspect pump for foreign objects. If noise persists and pump is new, contact support. |
If troubleshooting steps do not resolve the issue, it may indicate a more complex problem with the washing machine or a defective part. Contact a qualified technician or the seller for further assistance.
8. Specifications
| Feature | Detail |
|---|---|
| Model Number | ACTO-HAPT-PL-06032025-21474 |
| Part Number (Replaces) | 79641392510, 4681EA2001T |
| Brand | Generic |
| Manufacturer | Actome-Parts |
| Color | Black/White |
| Voltage (from image OCR) | 120V-127V (60Hz) |
| Power (from image OCR) | 5W 1.4A |
| Flow Rate (from image OCR) | 45L/Min |
Note: Specifications are based on product information and OCR data from the product image. Actual performance may vary.
9. Warranty and Support
This product is sold by Actome. For specific warranty information, please refer to the seller's return policy or contact Actome directly. As per Amazon's policy, a 30-day return/replacement period is typically offered for eligible items.
- Return Policy: 30-day return/replacement (as per Amazon's buybox winner information).
- Seller: Actome (Seller Profile)
- For assistance: Contact the seller directly through the Amazon platform for product-specific inquiries or support.