GODOX LW-PA0809099
Godox TT520III Camera Flash User Manual
Brand: GODOX | Model: LW-PA0809099
1. Introduction
Thank you for choosing the Godox TT520III Camera Flash. This manual provides detailed instructions for the proper operation and maintenance of your flash unit. The TT520III is a powerful and versatile manual flash designed for a wide range of cameras with a single-contact hot shoe. It features a built-in 433MHz wireless receiver, allowing for remote triggering with the included RT-16 transmitter, and offers flexible power control for various lighting scenarios.
Please read this manual carefully before use to ensure optimal performance and to prevent damage to the product.
2. What's in the Box
Upon opening your Godox TT520III package, please verify that all the following components are included:
- 1x TT520III Camera Flash
- 1x RT Transmitter
- 1x Mini Stand
- 1x Storage Bag
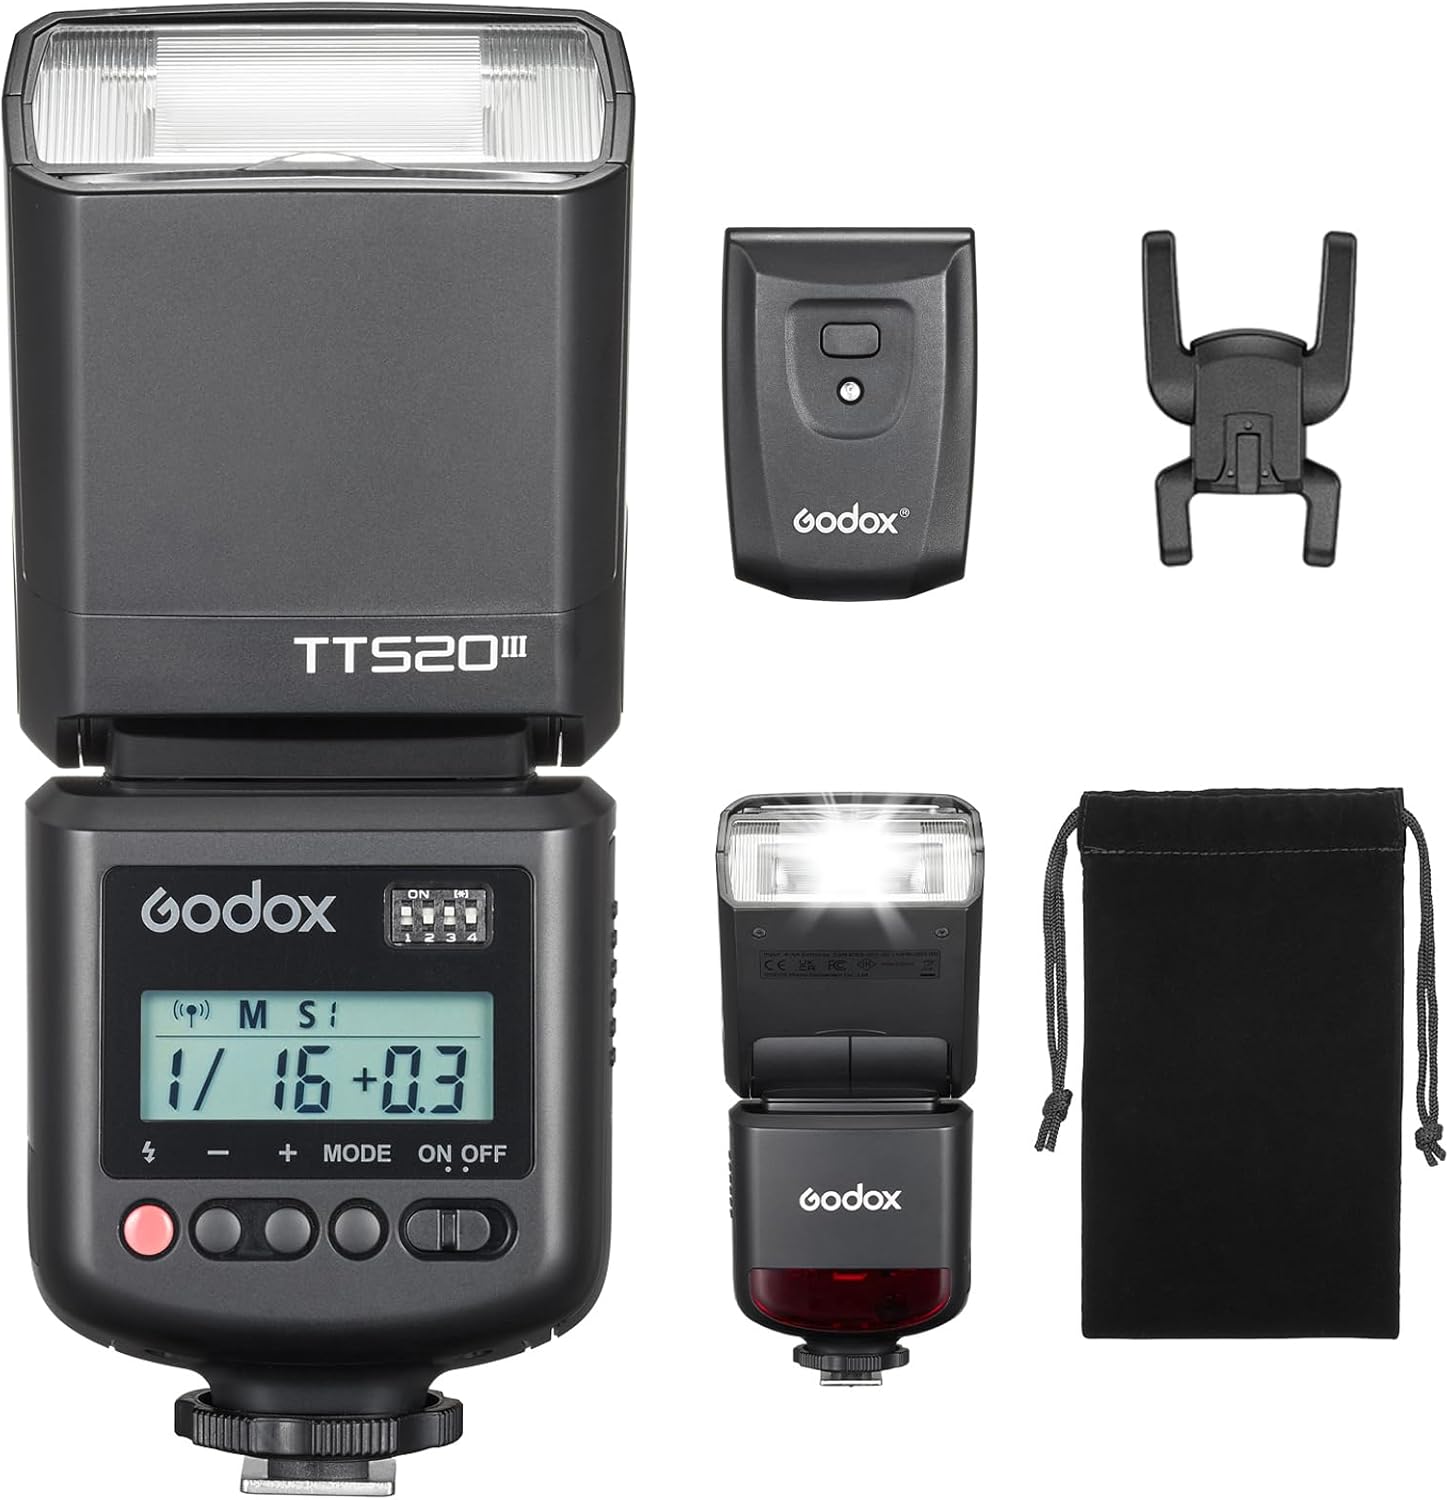
Figure 2.1: Included components of the Godox TT520III Camera Flash kit.
3. Setup
3.1. Battery Installation
The Godox TT520III flash unit requires 4x AA batteries (LR6 alkaline or NiMH recommended, sold separately) for operation. To install the batteries:
- Locate the battery compartment door on the side of the flash unit.
- Slide the battery compartment door open.
- Insert 4 AA batteries, ensuring correct polarity (+ and - ends) as indicated inside the compartment.
- Close the battery compartment door securely.

Figure 3.1: Proper installation of AA batteries into the flash unit.
3.2. Mounting the Flash
The TT520III features a single-contact hot shoe for universal compatibility with most camera brands (Canon, Nikon, Sony, Pentax, Olympus, Fuji, Panasonic, etc.) that have a single-contact hot shoe. Please confirm your camera's hot shoe type before purchase.
- Slide the flash unit onto your camera's hot shoe.
- Tighten the locking ring or lever on the flash unit to secure it firmly to the camera.

Figure 3.2: Universal hot shoe design and compatibility examples.
3.3. Wireless Transmitter Setup
The included RT-16 wireless transmitter allows for remote triggering of the flash. Ensure the transmitter also has batteries installed (typically a 23A 12V battery, not included).
- Locate the DIP switches on the back of the RT-16 transmitter.
- Set the DIP switches on the transmitter to match the desired channel on the flash unit (1-16 channels available).
- Slide the RT-16 transmitter onto your camera's hot shoe and secure it.

Figure 3.3: Wireless triggering setup with the RT-16 transmitter.
4. Operating Instructions
4.1. Power On/Off
To power on the flash unit, slide the ON/OFF switch to the 'ON' position. The LCD screen will illuminate. To power off, slide the switch to 'OFF'.
4.2. Manual (M) Mode
In Manual (M) mode, you can precisely control the flash output from 1/128 to 1/1 full power in ±1/3-stop increments. This allows for fine-tuning of light intensity to match your shooting requirements.
- Short-press the '+' or '-' buttons to adjust the power output.

Figure 4.1: Adjusting flash power in Manual (M) mode.
4.3. S1/S2 Optical Slave Modes
The TT520III supports S1 and S2 optical slave modes, allowing it to be triggered by another flash. This is useful for off-camera lighting without additional wireless triggers.
- Short-press the MODE button to toggle between M, S1, and S2 modes.
- S1 Mode: The flash will fire in response to the first flash from the master flash.
- S2 Mode: The flash will ignore the pre-flash from the master flash and fire on the second flash, suitable for cameras with pre-flash functions.
4.4. Wireless Triggering (433MHz)
To activate the built-in 433MHz wireless triggering:
- Long-press the MODE button on the flash unit until the wireless icon appears on the LCD.
- Ensure the channel settings on the flash unit (via DIP switches) match those on your RT-16 transmitter.
4.5. PC Sync Port
The flash unit includes a PC sync port for wired camera-to-flash synchronization, offering an alternative triggering method.
- Connect a PC sync cable (not included) from your camera's PC sync port to the flash unit's PC sync port.
4.6. Adjustable Flash Head
The flash head can be adjusted for various lighting angles:
- Vertical Rotation: -7° to 120°
- Horizontal Rotation: 0° to 330°
This flexibility allows for direct flash, bounce flash, and other creative lighting techniques to achieve accurate fill light and optimal lighting angles.

Figure 4.2: Adjustable flash head for versatile lighting.
4.7. External Power & PC Sync
The TT520III features a power box port compatible with the optional PB960 power pack (sold separately) to shorten recycle times and increase flash counts. It also has a PC sync port for wired camera-to-flash synchronization.
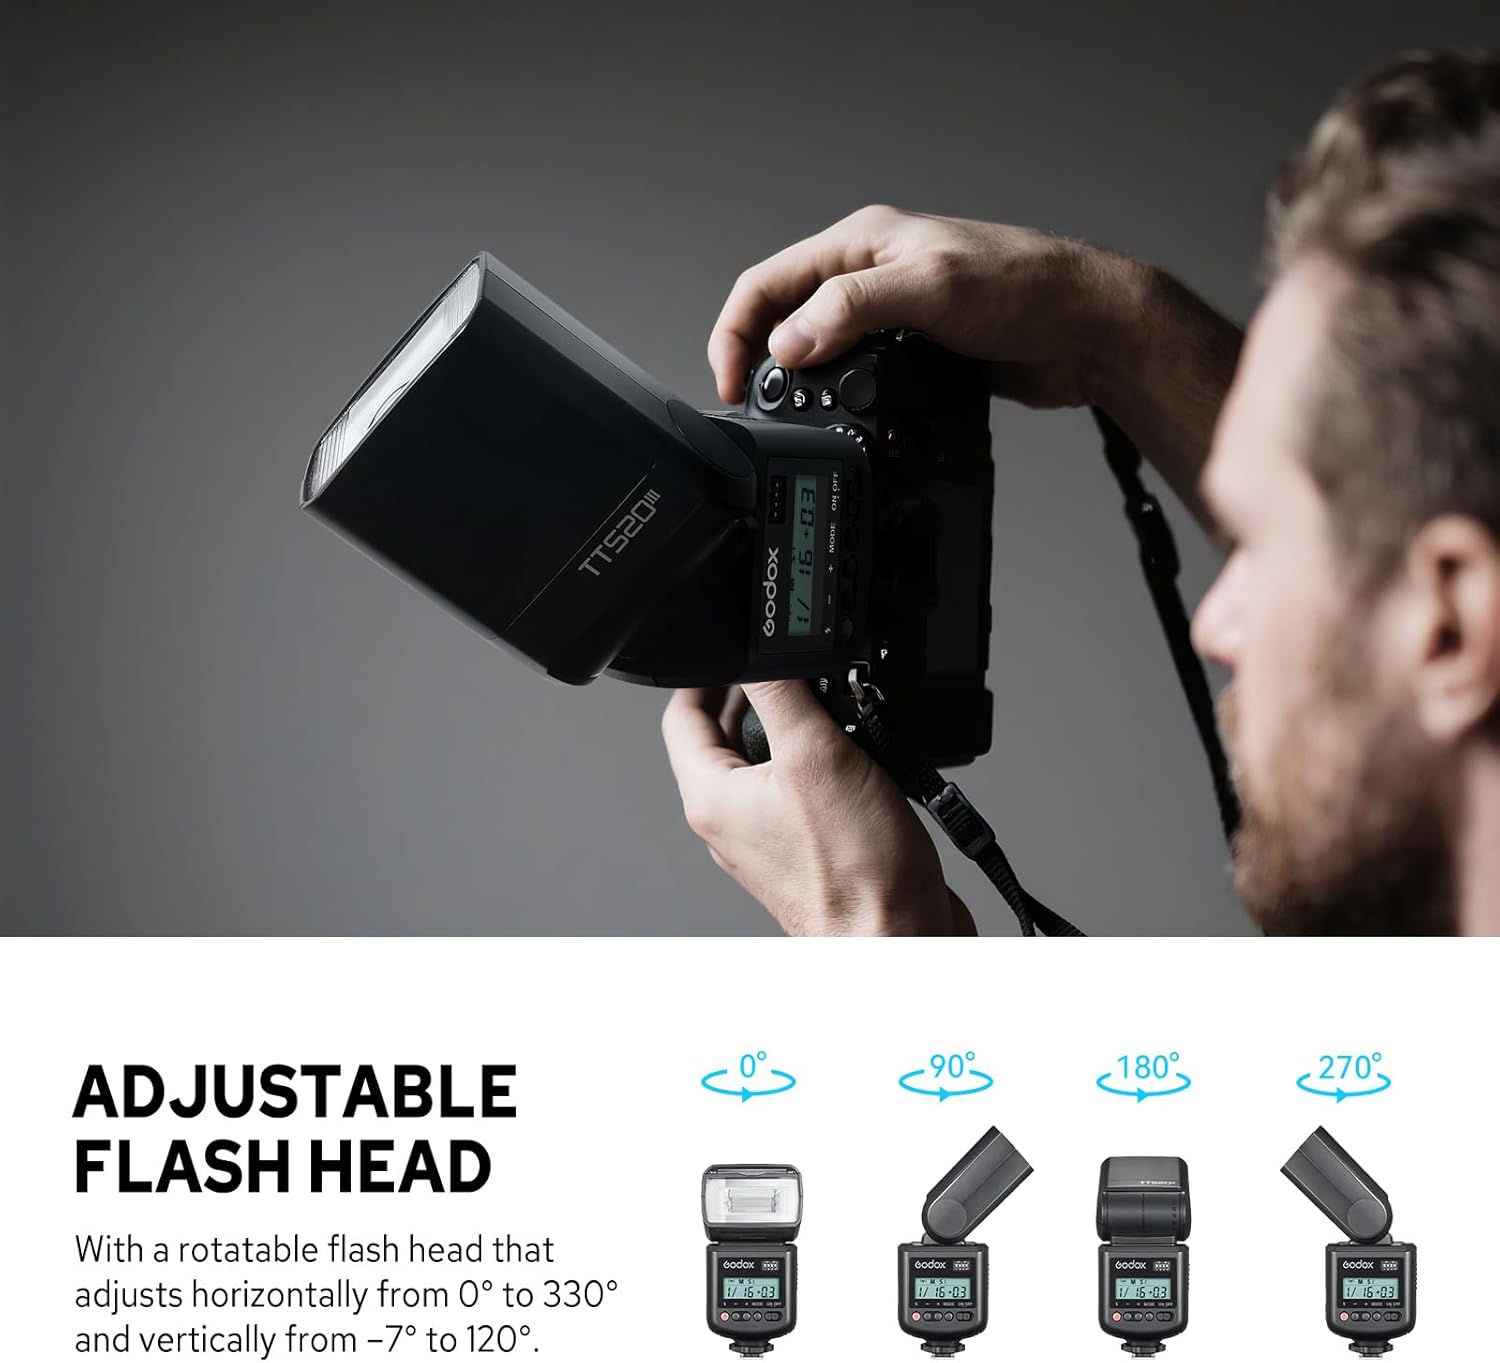
Figure 4.3: Connecting to an external power pack and using the PC sync port.
4.8. Operation Tutorial Video
For a visual guide on operating your Godox TT520III, please watch the official tutorial video below:
Video 4.1: Godox TT520III Camera Flash Operation Tutorial. This video demonstrates installation, M/S1/S2 modes, 433MHz wireless triggering, external power & PC sync, and an accessory showcase.
5. Maintenance
Proper maintenance ensures the longevity and optimal performance of your Godox TT520III flash unit.
- Cleaning: Use a soft, dry cloth to clean the flash body. For the flash tube and reflector, use a lens cleaning cloth. Avoid using solvents or harsh chemicals.
- Battery Care: Remove batteries if the flash will not be used for an extended period to prevent leakage and corrosion.
- Storage: Store the flash in a cool, dry place, away from direct sunlight, excessive heat, or humidity. Use the provided storage bag for protection.
- Handling: Avoid dropping or subjecting the flash to strong impacts, as this can damage internal components.
6. Troubleshooting
If you encounter issues with your Godox TT520III flash, refer to the following common problems and solutions:
| Problem | Possible Cause | Solution |
|---|---|---|
| Flash does not fire. | Low or dead batteries; incorrect hot shoe connection; incorrect wireless channel; flash in sleep mode. | Replace batteries; ensure flash is securely mounted; match wireless channels; press test button to wake flash. |
| Flash output is too weak/strong. | Incorrect power setting; distance to subject. | Adjust power output in Manual (M) mode; adjust aperture or ISO on camera. |
| Wireless triggering not working. | Transmitter batteries low; incorrect channel settings; flash not in wireless mode. | Check/replace transmitter batteries; ensure flash and transmitter channels match; long-press MODE button on flash to activate wireless mode. |
| Flash not compatible with my camera. | Camera does not have a single-contact hot shoe; specific camera model is listed as incompatible. | Verify camera hot shoe type. Note: Not compatible with Sony ZV-1F, A9III, A99, A77, A350; Canon EOS Rebel SL3, 250D, T6, T7, 1500D, 2000D, T100, 3000D, 4000D, 200DII, R7, R6II, R8, R10, R50; Fuji X-A3, X100F, X100T. |
If the problem persists after attempting these solutions, please contact Godox customer support for further assistance.
7. Specifications
| Feature | Specification |
|---|---|
| Model | TT520III |
| Guide Number (GN) | 33 (ISO 100, in meters) |
| Photocell | S1/S2 |
| Vertical Rotation Angle | -7° to 120° |
| Horizontal Rotation Angle | 0° to 330° |
| Battery | 4 AA NiMH batteries (recommended)/LR6 alkaline batteries |
| Flash Duration (t0.1) | 1/510s - 1/31000s |
| Time of Flashes (1/1 step) | Approx. 400 (NiMH batteries) |
| Recycle Time (1/1 step) | Approx. 1.8s (NiMH batteries) |
| Channel | 16 groups |
| Wireless Transmission Freq. | 433MHz |
| Wireless Transmission Max. | Approx. 15m |
| Dimensions | 7.17 x 2.91 x 2.83 inches |
| Net Weight | Approx. 304g |
| Included Components | 1x TT520III Camera Flash; 1x RT Transmitter; 1x Mini Stand; 1x Storage Bag |
7.1. RT-16 Transmitter Specifications
| Feature | Specification |
|---|---|
| Model | RT-16 |
| Power Source | 23A (12V) Li-ion battery |
| Wireless Transmission Distance (Max.) | Approx. 20m (indoor) / Approx. 30m (outdoor) |
| Wireless Frequency | 433MHz |
| Dimensions | 2.36 x 1.65 x 1.18 inches |
| Net Weight | Approx. 31g |
8. Warranty and Support
For warranty information, please refer to the documentation included with your purchase or visit the official Godox website. If you require technical support or have questions regarding your Godox TT520III Camera Flash, please contact Godox customer service through their official channels.
Ask a question about this manual
Ask about setup, troubleshooting, compatibility, parts, safety, or missing instructions. Manuals+ will review the question and use this page’s manual context to help answer it.