1. Safety Information
Please read and understand all safety instructions before operating the HARDELL Digital Angle Finder. Failure to follow these instructions may result in injury or damage to the device.
- Keep the device away from water and excessive humidity to prevent electrical shock or damage.
- Do not expose the device to extreme temperatures or direct sunlight for prolonged periods.
- Avoid dropping the device or subjecting it to strong impacts, as this may affect its accuracy and functionality.
- Do not attempt to disassemble or modify the device. Repairs should only be performed by qualified personnel.
- Dispose of batteries according to local regulations. Do not mix old and new batteries.
2. Product Overview
The HARDELL Digital Angle Finder is a versatile measuring tool designed for precision angle measurements in various applications, including woodworking, metal fabrication, and DIY projects. It features a large LED screen for clear readings, a T-bevel protractor ruler, and integrated horizontal and vertical bubble levels.
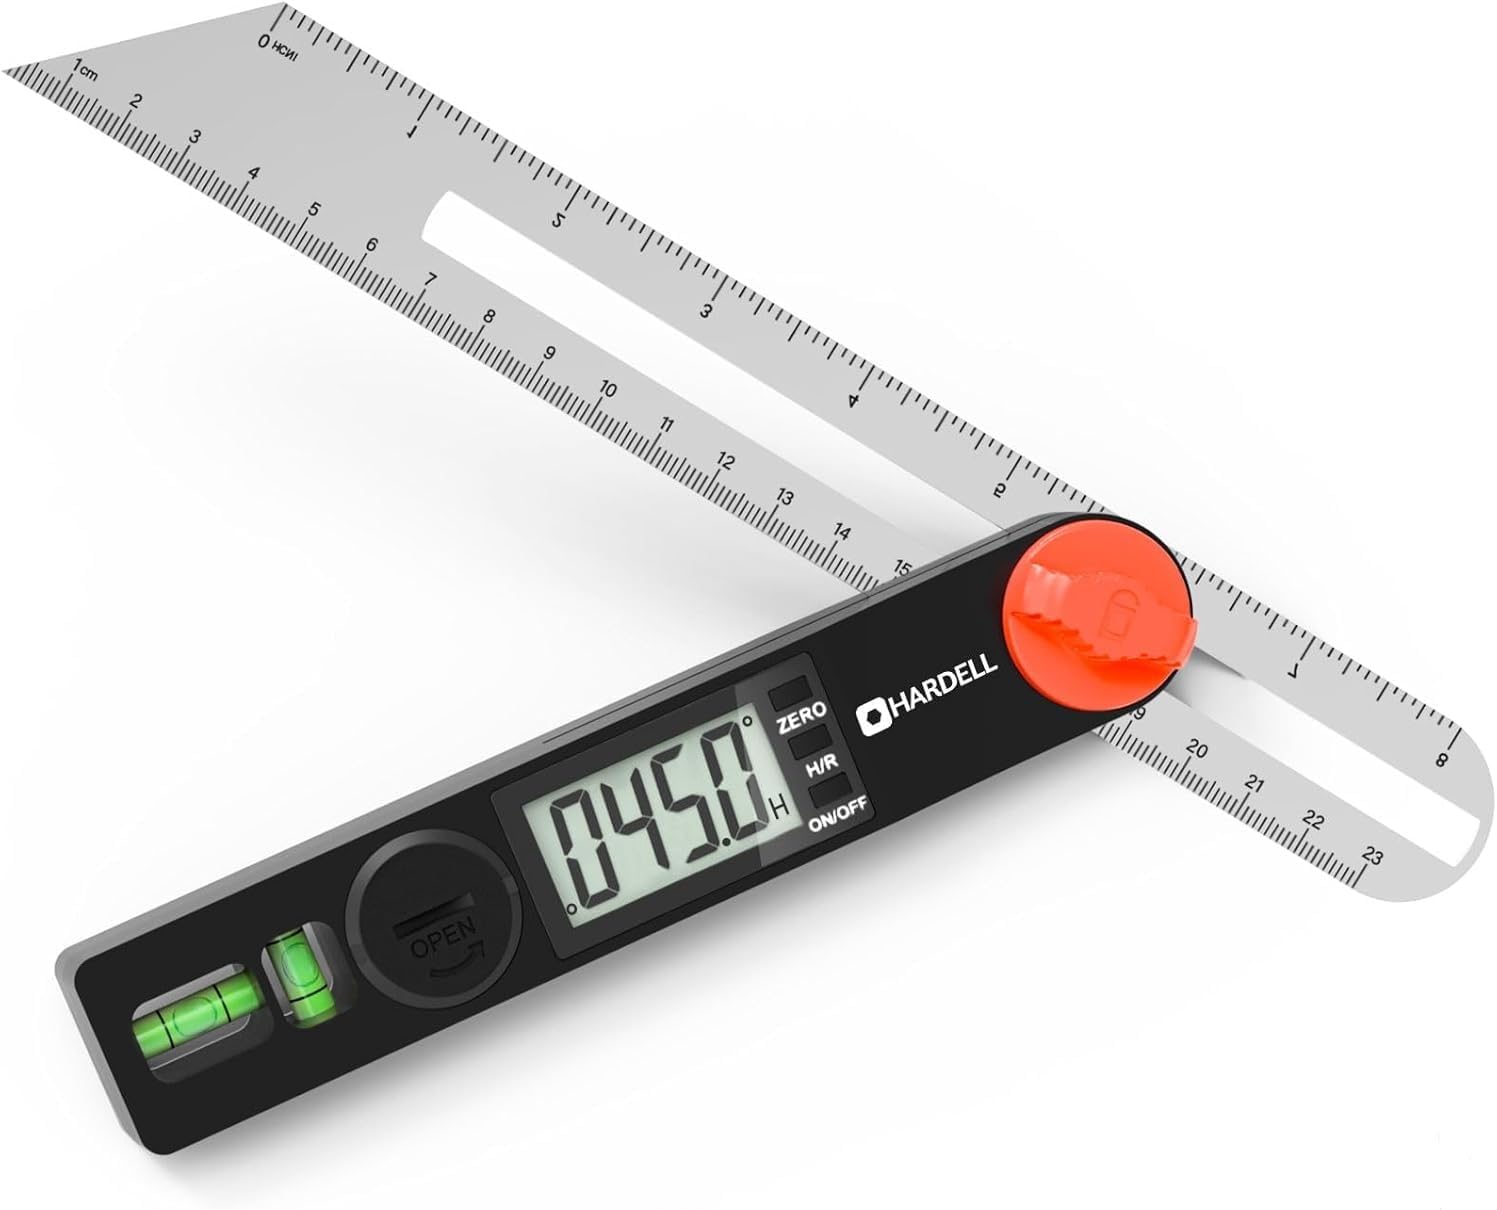
Figure 2.1: HARDELL Digital Angle Finder. This image displays the overall design of the angle finder, including its digital display, measurement ruler, and integrated bubble levels.
2.1. Key Components
- Digital Display: Large LED screen for clear angle readings.
- Measurement Ruler: 8-inch (230mm) stainless steel ruler for linear measurements and angle extension.
- Locking Knob: Secures the ruler at any desired angle.
- ZERO Button: Resets the display to zero for relative measurements.
- H/R Button: Short press to hold the reading, long press to flip the display 180 degrees.
- ON/OFF Button: Powers the device on or off.
- Bubble Levels: Integrated horizontal and vertical vials for leveling.
3. Specifications
| Feature | Specification |
|---|---|
| Measuring Range | 0-338 degrees |
| Accuracy | ±0.3° |
| Resolution | 0.1° |
| Ruler Length | 8 inch (230mm) |
| Power Source | 2 x 3V Batteries (included) |
| Item Weight | 5.3 ounces |
| Dimensions | 13.78 x 2.64 x 1.02 inches |
| Material | Stainless Steel (ruler), Durable Body |
4. Setup
4.1. Battery Installation
The HARDELL Digital Angle Finder requires two 3V batteries for operation. These are typically included with the product.
- Locate the battery compartment cover on the back of the main unit.
- Open the cover by sliding or twisting it as indicated.
- Insert the two 3V batteries, ensuring the correct polarity (+/-) as marked inside the compartment.
- Close the battery compartment cover securely.

Figure 4.1: Quick Battery Replacement. This image illustrates how to access and replace the batteries in the angle finder's compartment.
5. Operating Instructions
5.1. Power On/Off
Press the ON/OFF button to turn the device on or off. The display will illuminate when powered on.
5.2. Zero Calibration
The ZERO button allows for instant zero calibration, which is useful for relative measurements. To set a new zero point:
- Place the angle finder on a reference surface or set it to a desired initial angle.
- Press the ZERO button. The display will show 0.0°, indicating that this is now the reference point for subsequent measurements.

Figure 5.1: ZERO Button Function. This image demonstrates how to use the ZERO button to establish a new reference point for angle measurements.
5.3. Hold and Reverse (H/R) Function
The H/R button serves two functions:
- Short Press: Locks the current reading on the display. This is useful for retaining a measurement when the device cannot be viewed directly.
- Long Press: Flips the display reading 180 degrees. This feature is ideal for taking measurements in awkward positions or tight spaces where the display might be upside down.

Figure 5.2: H/R Button Functions. This image explains how to use the H/R button to either hold the current measurement or reverse the display orientation.
5.4. Using the Locking Knob
The ergonomic locking knob allows you to secure the ruler at any angle, preventing measurement drift during critical tasks or when transferring angles.
- Adjust the ruler to the desired angle.
- Rotate the red locking knob clockwise to tighten and secure the ruler in place.
- Rotate counter-clockwise to loosen and adjust the angle.

Figure 5.3: Locking Screw Operation. This image demonstrates how to use the locking screw to fix the measurement angle of the ruler.
5.5. Utilizing Bubble Levels
The built-in horizontal and vertical bubble vials allow for quick and accurate leveling, ensuring perfect alignment on various surfaces. These are particularly useful for tasks requiring a true horizontal or vertical reference.

Figure 5.4: Bubble Horizontal and Vertical Level. This image illustrates the use of the integrated bubble levels to ensure accurate horizontal and vertical alignment.
5.6. Measuring Angles
The angle finder can measure angles from 0° to 338° with high precision.
- General Angle Measurement: Simply open the ruler to the desired angle and read the value on the digital display.
- Measuring Internal Angles: Place the two arms of the angle finder into the corner or internal angle you wish to measure. The display will show the internal angle.

Figure 5.5: Measuring Internal Angle. This image demonstrates how to position the angle finder to accurately measure an internal corner angle.
- Measuring Exterior Angles: Position the angle finder along the exterior edges of the object. The display will show the exterior angle.

Figure 5.6: Measuring Exterior Angle. This image illustrates the method for measuring an exterior angle using the angle finder.
- Adjusting Cutting Angles: The T-bevel design allows for easy transfer of angles to cutting tools like miter saws or table saws.

Figure 5.7: Adjust Cutting Angle. This image demonstrates how the angle finder can be used to precisely adjust the cutting angle of a saw blade.
5.7. Drawing Lines and Angles
The integrated ruler and adjustable angle allow for precise marking and drawing of lines at specific angles.
- Set the angle finder to the desired angle.
- Place the edge of the ruler against the surface where you want to draw the line.
- Use a pencil or marking tool along the ruler's edge to draw the precise angle.

Figure 5.8: Drawing Line and Angle. This image illustrates the use of the angle finder to accurately draw lines at precise angles on a workpiece.
6. Maintenance
6.1. Cleaning
To maintain the accuracy and longevity of your angle finder:
- Wipe the device with a soft, dry cloth after each use to remove dust and debris.
- For stubborn dirt, use a slightly damp cloth with mild soap, then dry thoroughly.
- Do not use abrasive cleaners, solvents, or immerse the device in water.
6.2. Storage
Store the angle finder in a clean, dry place, away from direct sunlight and extreme temperatures. If storing for an extended period, remove the batteries to prevent leakage.
6.3. Battery Replacement
Replace batteries when the display becomes dim or the device fails to power on. Refer to Section 4.1 for battery installation instructions.
7. Troubleshooting
| Problem | Possible Cause | Solution |
|---|---|---|
| Device does not power on | Dead or incorrectly installed batteries | Check battery polarity or replace with new batteries. |
| Inaccurate readings | Device not zeroed; debris in hinge; physical damage | Perform zero calibration. Clean the hinge area. If damaged, contact support. |
| Display is dim or flickering | Low battery power | Replace batteries. |
| Ruler does not lock securely | Locking knob not tightened sufficiently; debris in mechanism | Ensure knob is fully tightened. Clean around the locking mechanism. |
8. Warranty and Support
HARDELL products are manufactured to high-quality standards. For specific warranty information, please refer to the warranty card included with your purchase or visit the official HARDELL website. If you encounter any issues or require technical assistance, please contact HARDELL customer support through the contact information provided on the product packaging or website.