Introduction
Thank you for choosing the Backnets Thermostatic Shower Valve with 2-Way Diverter. This manual provides detailed instructions for the proper installation, operation, and maintenance of your new shower valve. Please read this manual thoroughly before installation and retain it for future reference.
Safety Information
- Always turn off the main water supply before beginning any installation or maintenance.
- If you are unsure about any part of the installation process, consult a qualified plumber.
- Ensure all connections are secure and watertight to prevent leaks.
- Do not use harsh chemicals or abrasive cleaners on the valve's finish.
Setup and Installation
The Backnets shower mixer valve and trim kit are designed for easy installation with US standard female NPT 1/2 inch threads, facilitating a straightforward upgrade to your bathroom plumbing system.
Components Overview

Figure 1: Internal Brass Construction. This image displays the robust brass construction of the valve body, highlighting its durability and quality material.
Piping Specifications
Refer to the diagram below for correct piping connections. Ensure hot water is connected to the designated hot inlet and cold water to the cold inlet. The two outlets provide connections for different shower functions.

Figure 2: Piping Specification. This diagram illustrates the standard 1/2 inch NPT connections for hot water inlet (Inlet 1), cold water inlet (Inlet 2), and two outlets (Outlet 1 for rain shower head, Outlet 2 for handheld shower/tub).
Installation Steps
- Turn off the main water supply to your home.
- Mount the valve body securely within the wall, ensuring it is level and at the correct depth for the trim kit.
- Connect the hot water supply line to Inlet 1 (typically marked 'H' or red).
- Connect the cold water supply line to Inlet 2 (typically marked 'C' or blue).
- Connect your desired shower components (e.g., rain shower head, handheld shower) to Outlet 1 and Outlet 2 as needed.
- Ensure all NPT 1/2 inch connections are properly sealed with plumber's tape or sealant and tightened to prevent leaks.
- Install the decorative trim plate and control handles according to the manufacturer's instructions for the specific trim kit.
- Once all connections are made and secured, slowly turn on the main water supply and check for any leaks.
Operating Instructions
The Backnets Thermostatic Shower Valve offers precise control over water flow and temperature, ensuring a comfortable and safe showering experience.
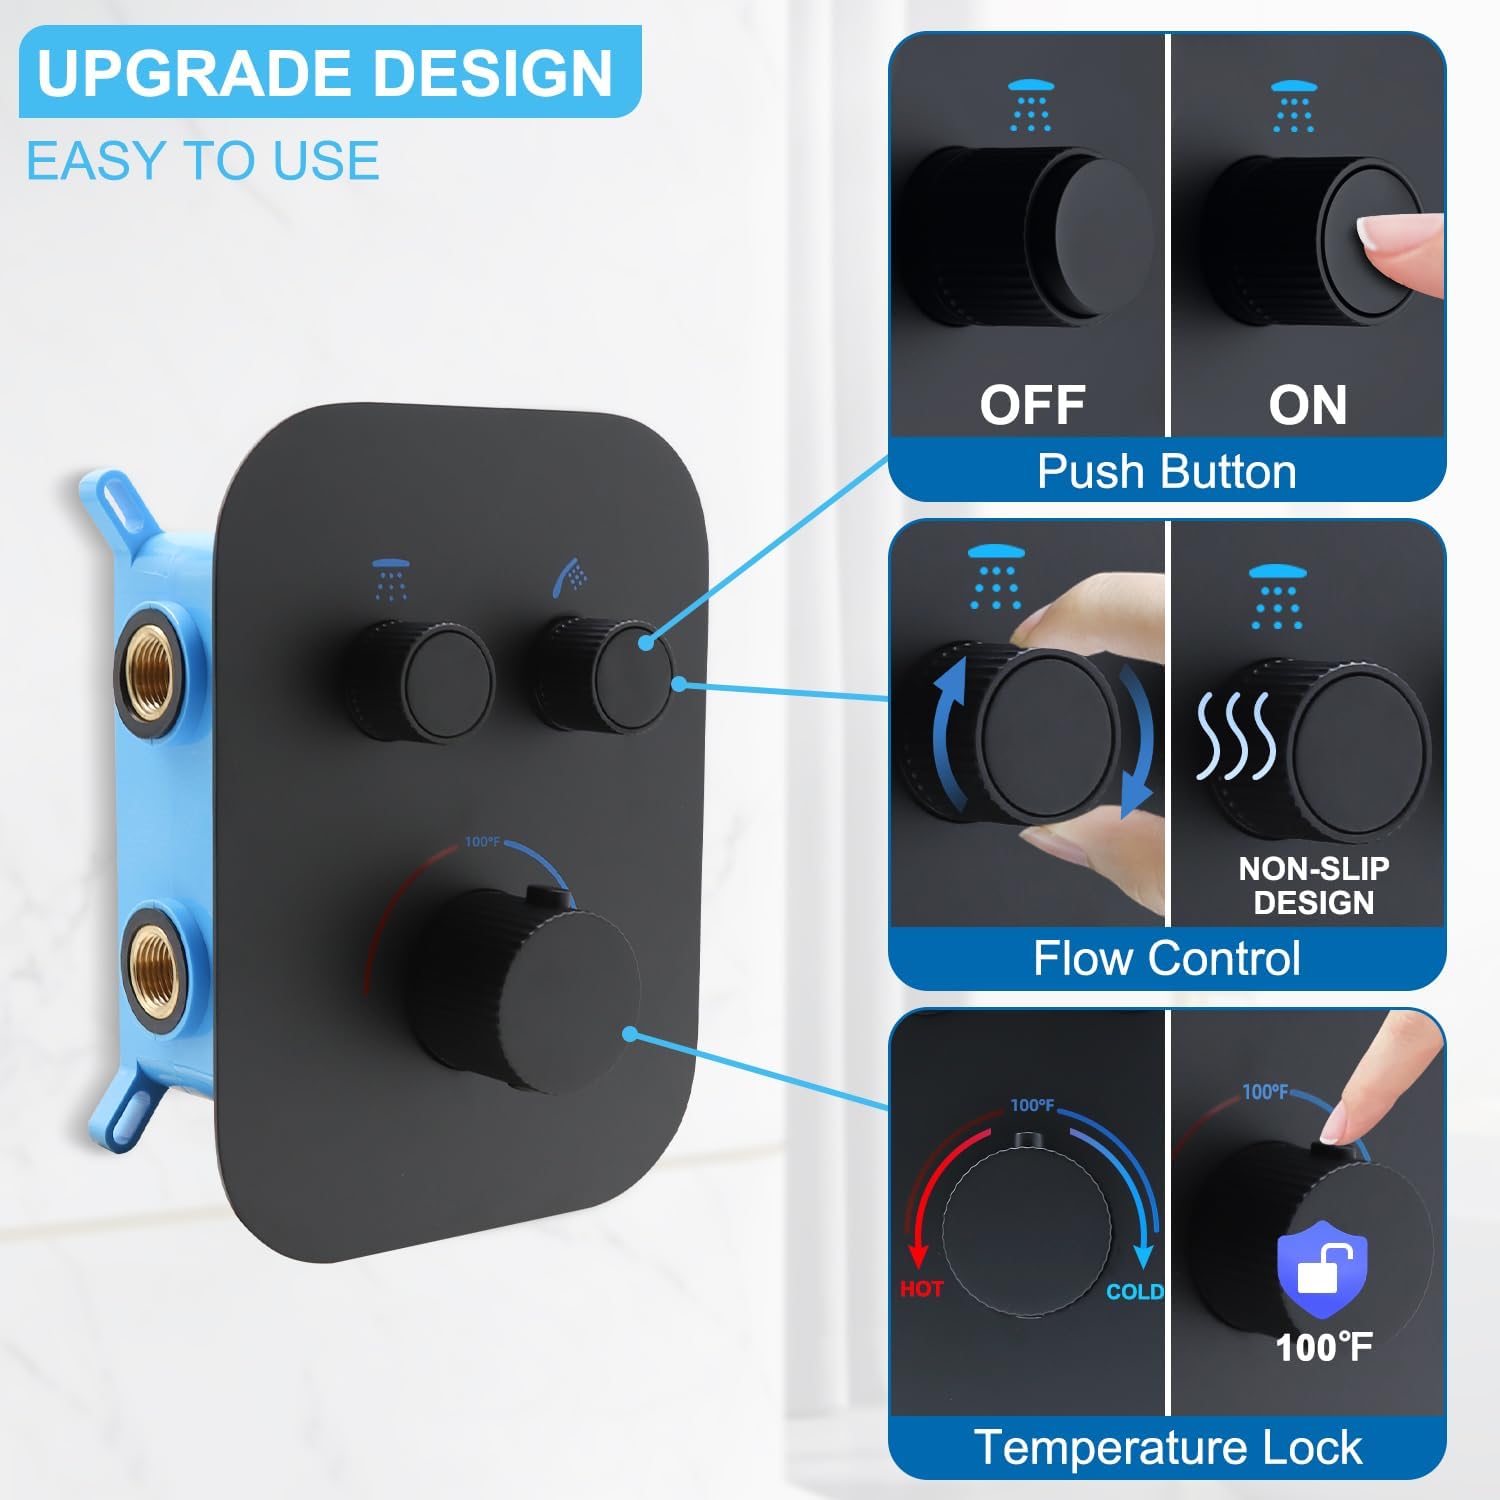
Figure 3: Control Functions. This image highlights the three main control functions: Push Button for ON/OFF, Non-Slip Design Flow Control, and Temperature Lock set at 100°F.
Temperature Control
- The thermostatic shower valve features a dedicated temperature control knob.
- To adjust the temperature, rotate the lower knob. The valve is designed to precisely set the temperature at 100°F (38°C) to prevent scalding.
- For temperatures above 100°F, you may need to press a safety override button (if present on your specific trim kit) while rotating the knob.
- This constant temperature protection ensures a stable water temperature, eliminating the need for frequent adjustments.

Figure 4: Constant Temperature Protection. This graphic demonstrates how the thermostatic cartridge maintains a consistent 100°F water temperature, preventing sudden changes and scalding.
Flow Control and Diverter Function
- The valve features a 2-way diverter, allowing you to easily control water output to two different shower functions (e.g., overhead shower and handheld spray).
- To turn the water ON or OFF for a specific outlet, press the corresponding push button.
- To adjust the water flow (volume) for an active outlet, rotate the flow control knob. Turning it clockwise typically increases flow, and counter-clockwise decreases it.
- Both functions can be used simultaneously, allowing for flexible showering options.

Figure 5: Simultaneous Functionality. This image demonstrates how to activate and adjust two shower functions concurrently using the push buttons for ON/OFF and rotary knobs for volume control.
Maintenance
Regular cleaning and simple maintenance will ensure the longevity and optimal performance of your Backnets shower valve.
- Cleaning the Finish: Clean the matte black finish with a soft, damp cloth. For stubborn spots, use a mild soap solution and rinse thoroughly. Avoid abrasive cleaners, scouring pads, or harsh chemicals (e.g., ammonia, bleach, acid-based cleaners) as these can damage the finish.
- Checking for Leaks: Periodically inspect all connections for any signs of leaks. Tighten connections as necessary, ensuring not to overtighten.
- Cartridge Maintenance: In areas with hard water, mineral deposits can affect the performance of the thermostatic cartridge. If you notice inconsistent temperature control or reduced flow, the cartridge may need cleaning or replacement. Consult a professional plumber for cartridge maintenance.
Troubleshooting
This section addresses common issues you might encounter with your shower valve.
| Problem | Possible Cause | Solution |
|---|---|---|
| No water flow or low pressure | Main water supply off; Clogged inlet filters; Blocked shower head/handheld; Valve not fully open. | Check main water supply; Clean or replace inlet filters; Clean shower head/handheld; Ensure flow control knob is fully open. |
| Inconsistent water temperature | Thermostatic cartridge issues (e.g., mineral buildup); Imbalance in hot/cold water pressure. | Clean or replace thermostatic cartridge; Check hot and cold water supply pressures. |
| Water leaking from connections | Loose connections; Damaged seals/plumber's tape. | Turn off water supply, tighten connections, reapply plumber's tape or replace seals if necessary. |
| Diverter not switching properly | Diverter mechanism obstruction or wear. | Inspect diverter for obstructions; if issue persists, professional service may be required. |
If you experience issues not listed here or if the suggested solutions do not resolve the problem, please contact Backnets customer support.
Specifications
| Feature | Detail |
|---|---|
| Model Number | Backnets_2P |
| Material | Brass |
| Exterior Finish | Matte Black |
| Item Dimensions (L x W x H) | 22 x 15 x 11 inches |
| Product Dimensions | 22 x 15 x 11 inches |
| Size | 15 inches (W) x 22 inches (L) x 11 inches (H) |
| Item Weight | 6.98 pounds |
| Outlet Connection Type | NPT 1/2 inch |
| Number of Ports | 2 (Inlets) / 2 (Outlets) |
| Specification Met | ASME, ANSI, IAPMO |
| Included Components | Valve |
Support and Contact Information
Backnets is committed to ensuring every customer's shopping experience comes first. For any questions, concerns, or assistance with your product, please contact our customer support team.
- Manufacturer: Backnets
- Online Support: Visit the Backnets Store on Amazon for product information and support resources.