Locksworth AZ17609-PK
Locksworth 0.23 Cubic Feet Digital Electronic Security Safe Box Instruction Manual
Model: AZ17609-PK
Introduction
This manual provides essential instructions for the setup, operation, and maintenance of your Locksworth 0.23 Cubic Feet Digital Electronic Security Safe Box. Please read this manual thoroughly before use to ensure proper function and security.

Image: The Locksworth 0.23 Cubic Feet Digital Electronic Security Safe Box in pink, with its door open, showcasing its interior capacity. Various valuables like a passport, gold bars, cash, and a camera are depicted inside. A fireproof bag is positioned in the foreground.
Package Contents
- 1 x Locksworth Safe Box
- 2 x Emergency Keys
- 2 x Expansion Bolts
- 1 x Floor Mat
- 1 x Fireproof Bag
- 1 x User Manual (this document)

Image: A visual representation of the safe box dimensions (6.69"D x 9.06"W x 6.69"H exterior, 6.1"D x 8.6"W x 6.2"H interior) and all items included in the package: two keys, two mounting bolts, one fireproof bag, and one floor mat.
Safety Precautions
- Do not store emergency keys inside the safe. Keep them in a secure, separate location.
- Ensure the safe is placed on a stable, level surface or securely mounted.
- Keep batteries out of reach of children.
- Replace batteries promptly when the low battery indicator appears to avoid being locked out.
Setup
1. Initial Opening (First Use)
- Locate the emergency keyhole cover on the digital keypad.
- Remove the cover.
- Insert one of the emergency keys into the keyhole and turn it counter-clockwise.
- While holding the key turned, rotate the knob clockwise to open the safe door.

Image: A visual guide demonstrating the initial setup process, including how to open the safe for the first time using the emergency key, install batteries, and prepare for passcode programming.
2. Battery Installation
- With the safe door open, locate the battery compartment on the inside of the door.
- Insert four (4) AA batteries (not included) into the compartment, ensuring correct polarity.
- Close the battery compartment cover.
Note: Batteries are not included and must be purchased separately.

Image: An exploded view highlighting various features of the safe, such as the battery holder, dual steel locking bolts, and the reset button, which is crucial for programming.
3. Programming Your Passcode
- With the safe door open and batteries installed, press the red reset button located inside the battery compartment. The safe will emit two beeps, and the yellow indicator light on the keypad will illuminate.
- Enter your desired passcode (1 to 8 digits) on the digital keypad.
- Press the "#" key to confirm. The safe will emit two beeps, and the yellow indicator light will turn off, indicating successful programming.
- Test your new passcode with the door open to ensure it works correctly before closing the safe.
Video: This video demonstrates the process of installing batteries and programming a new passcode for the Locksworth Small Safe. It shows how to open the safe with the emergency key, insert AA batteries, press the reset button, and enter a new digital code.
4. Mounting the Safe
The safe includes pre-drilled holes on the back for secure mounting to a wall or floor. Use the provided expansion bolts for installation.
- Choose a suitable location for mounting (e.g., inside a closet, drawer, or under a table).
- Mark the drilling points through the pre-drilled holes on the back of the safe onto the mounting surface.
- Drill pilot holes at the marked locations.
- Align the safe with the drilled holes and secure it using the expansion bolts.
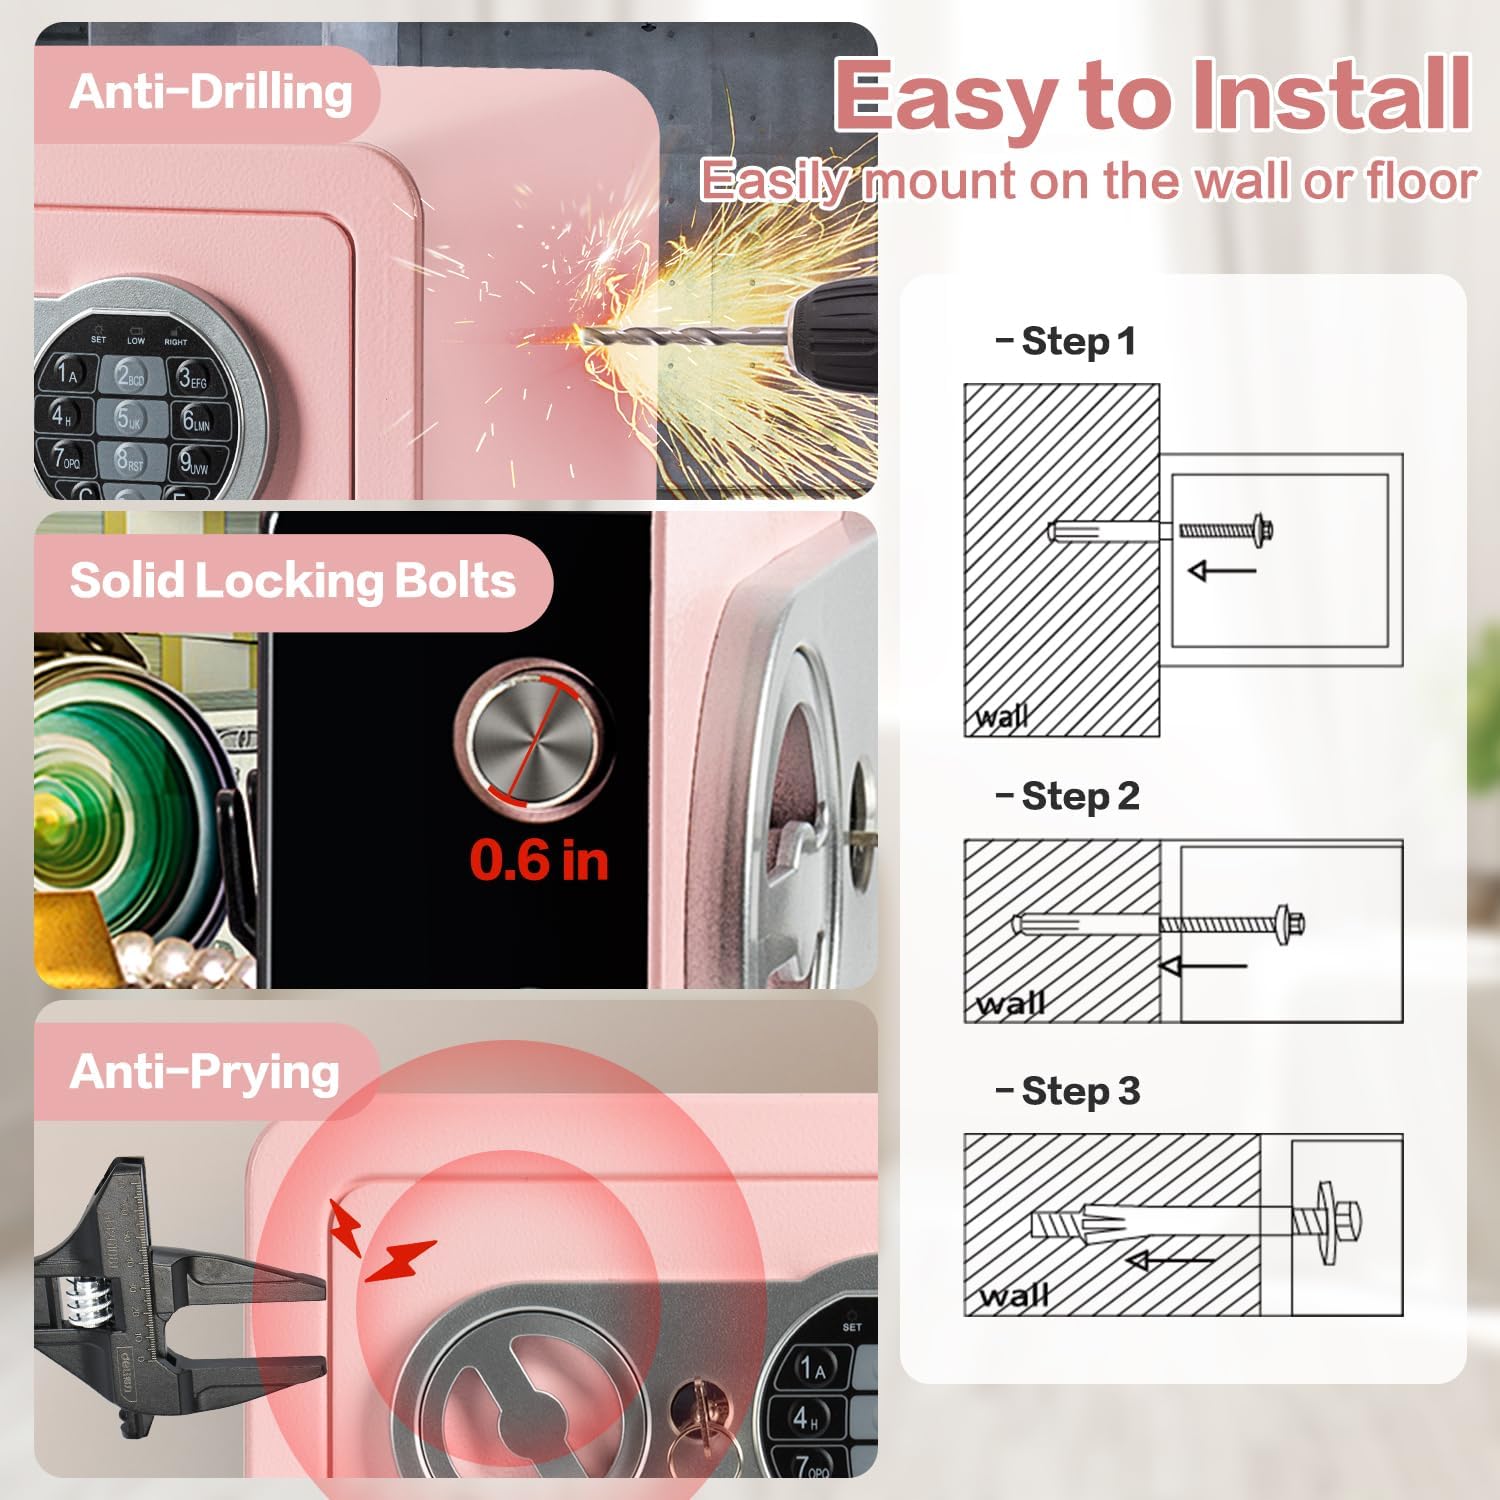
Image: A three-step diagram showing how to easily install the safe by mounting it to a wall or floor using the provided expansion bolts.
Operating Instructions
1. Opening the Safe
There are two methods to open your Locksworth safe:
- Using Your Passcode: Enter your programmed 1-8 digit passcode on the digital keypad, then press "E" to confirm. The green indicator light will illuminate. Within 5 seconds, rotate the knob clockwise to open the door.
- Using Emergency Keys: Insert an emergency key into the keyhole and turn it counter-clockwise. While holding the key turned, rotate the knob clockwise to open the door. This method is used if batteries are depleted or the passcode is forgotten.

Image: A visual guide detailing the two methods for opening the safe: using the digital keypad with a passcode, and using the emergency key.
Video: This video provides a general overview of the Locksworth Small Safe Box, demonstrating its features and basic operation, including opening with a key and passcode.
2. Closing and Locking the Safe
- Close the safe door firmly.
- Rotate the knob counter-clockwise to engage the locking bolts.
- Remove the emergency key if used.
3. Alarm System
The safe is equipped with a password-protection alarm. If three consecutive incorrect passcodes are entered, the alarm will activate for 20 seconds, emitting warning beeps.
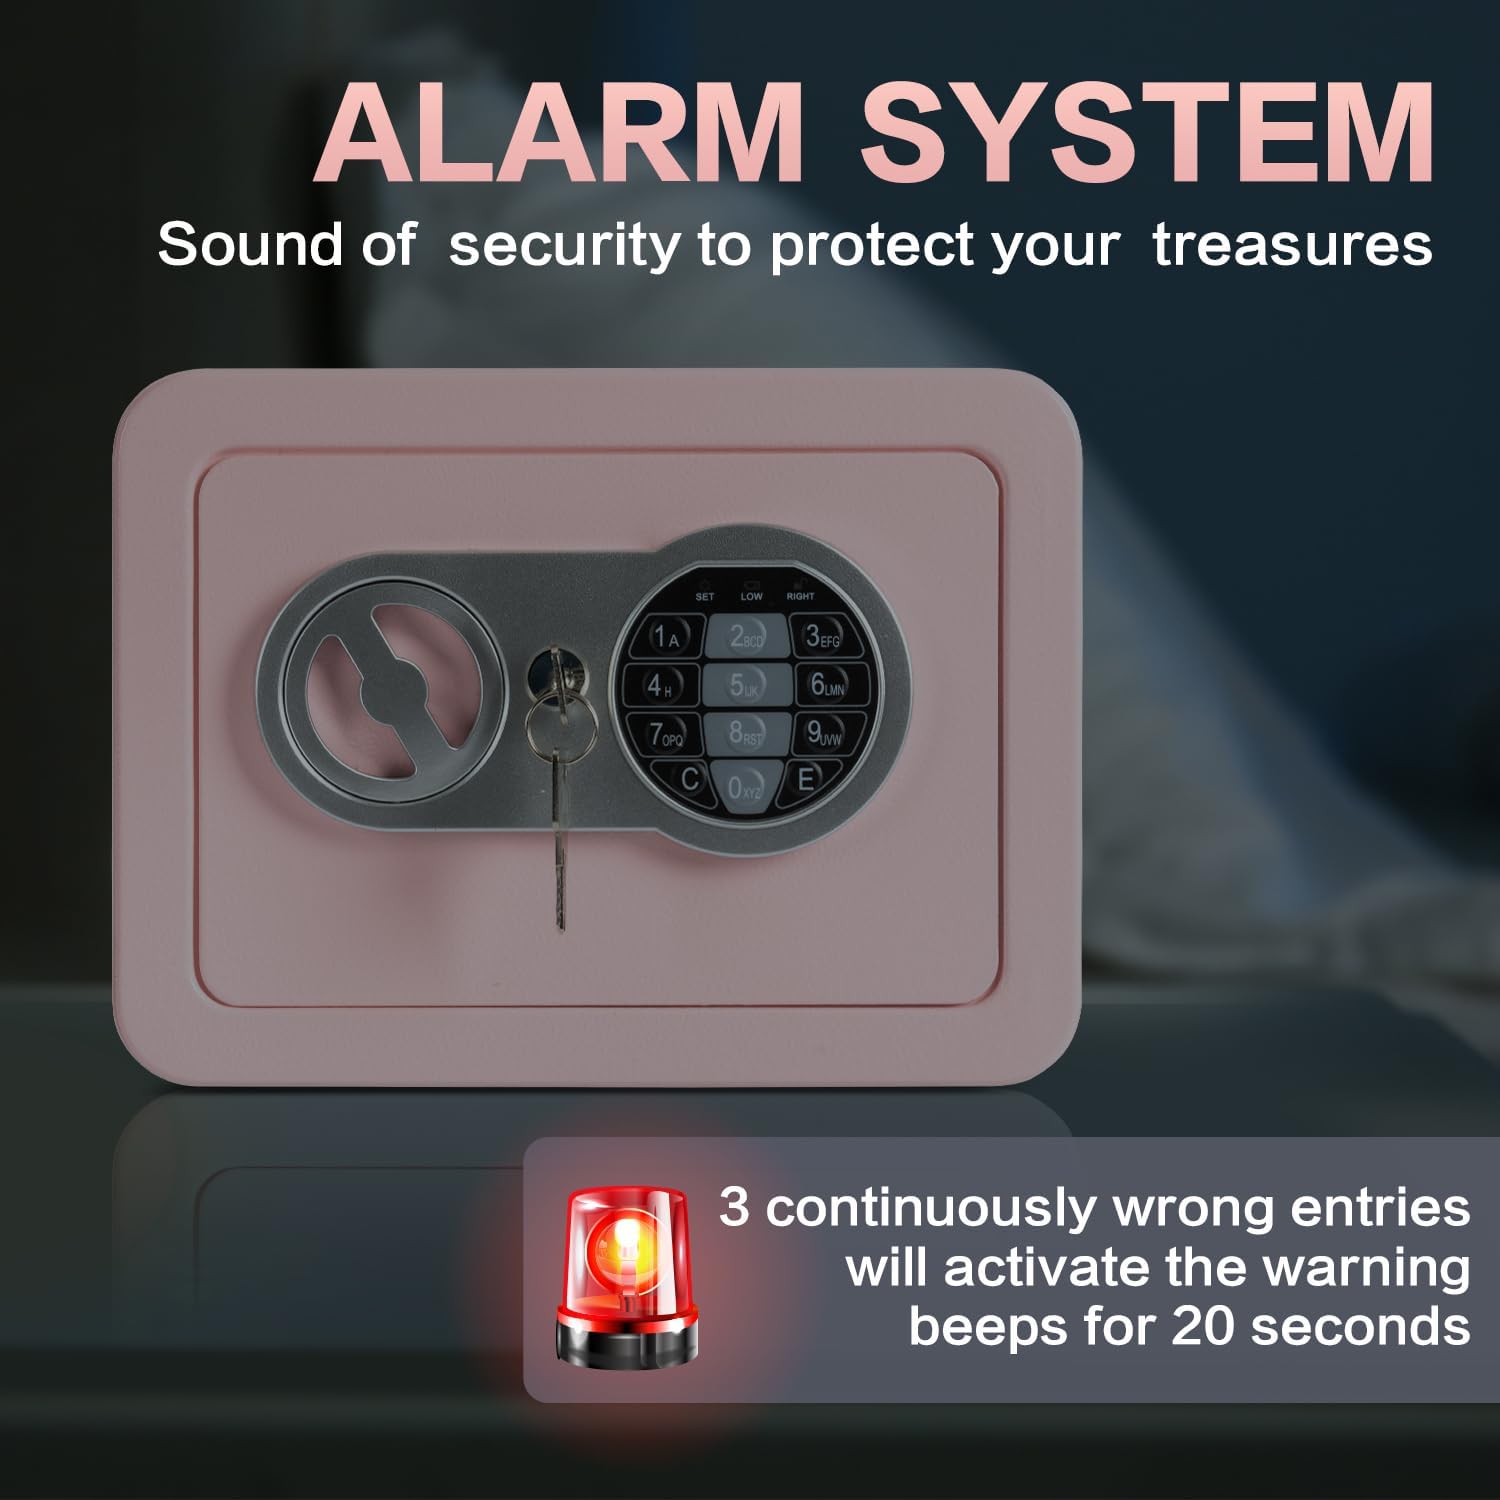
Image: A visual representation of the safe's alarm system, illustrating how it activates after three incorrect passcode entries, emitting warning beeps for 20 seconds.
Maintenance
- Battery Replacement: When the red indicator light flashes during operation, it signifies low battery power. Replace all four AA batteries promptly to avoid being locked out.
- Cleaning: Wipe the exterior of the safe with a soft, damp cloth. Avoid abrasive cleaners or solvents that could damage the finish.
- Interior Care: The interior is lined with scratch-proof carpeting. Ensure no sharp objects are stored directly against the interior walls to prevent damage.
Troubleshooting
| Problem | Possible Cause | Solution |
|---|---|---|
| Safe does not open with passcode. | Incorrect passcode entered; batteries are low or dead. | Re-enter the correct passcode. If unsuccessful, replace batteries. Use emergency key to open if batteries are dead. |
| Keypad is unresponsive. | Batteries are dead or incorrectly installed. | Check battery polarity and ensure they are fresh. Replace all four AA batteries. |
| Alarm sounds frequently. | Multiple incorrect passcode attempts. | Ensure only authorized users know the passcode. Re-enter the correct passcode. |
| Door does not close or lock properly. | Obstruction in the door frame; locking bolts are not aligned. | Check for any obstructions. Ensure the door is fully closed before rotating the knob to lock. |
Specifications
- Brand: Locksworth
- Model: AZ17609-PK
- Exterior Dimensions (D x W x H): 6.69" x 9.06" x 6.69"
- Interior Dimensions (D x W x H): 6.1" x 8.6" x 6.2"
- Capacity: 0.23 Cubic Feet
- Material: Alloy Steel
- Lock Type: Electronic Combination Lock, Key
- Power: 4 x AA Batteries (not included)
- Special Features: Alarm System, Anti-Theft, Combination Lock, Portable, Scratch Resistant, Fireproof Bag Included
- Mounting Type: Under Counter Mount, Wall Mount, Floor Mount
- Item Weight: 3.4 Pounds
Warranty and Support
For warranty information or technical support, please refer to the contact details provided with your purchase documentation or visit the official Locksworth website. Keep your purchase receipt as proof of purchase for warranty claims.
Locksworth Store: Visit the Locksworth Store on Amazon
Related Documents - AZ17609-PK
 |
LOCKSWORTH Digital Safe User Manual User manual for the LOCKSWORTH Digital Safe, providing instructions on unboxing, setup, operation, and installation. |
 |
PROMPOWER PK-L Фотоэлектрические Датчики: Руководство по эксплуатации и спецификации Полное руководство по эксплуатации и технические характеристики для компактных фотоэлектрических датчиков PROMPOWER серии PK-L. Охватывает модели среднего/дальнего действия, ретро-рефлективные и на пересечение луча, с деталями подключения и предупреждениями. |
 |
Basic Electronic Experiments PK-101 User Manual Explore the world of electronics with Elenco's Basic Electronic Experiments kit, model PK-101. This comprehensive guide transforms a standard breadboard into an electronic learning center, offering 50 hands-on experiments to teach fundamental electronic principles, component functions, and circuit design. Ideal for beginners, it requires no soldering and includes all necessary parts. |
 |
Paramount Bed K6 Series Transport Stretcher Instruction Manual This instruction manual provides essential safety precautions, operating procedures, and maintenance guidelines for the Paramount Bed K6 Series Transport Stretcher. Learn how to safely use, transport, and care for this medical device. |
 |
Proslat Fusion Plus & Lux Cabinet Set Installation Guide Comprehensive installation guide for Proslat Fusion Plus and Lux cabinet sets, covering safety, assembly steps, hardware, and warranty information. Features detailed instructions for various cabinet types, doors, drawers, shelves, and accessories. |
 |
Modular Pratika 700 Series Tilting Bratt Pans - Technical Specifications Detailed technical specifications, features, and installation information for the Modular Pratika 700 series of tilting bratt pans. This document covers both gas (BRG) and electric (BRE) models, highlighting their construction, performance, and connection requirements. |
Ask a question about this manual
Ask about setup, troubleshooting, compatibility, parts, safety, or missing instructions. Manuals+ will review the question and use this page’s manual context to help answer it.