1. Product Overview
The SAIYERUS Pneumatic Steel Strapping Tool is a robust and efficient solution for securing heavy-duty packages with steel straps. This split-type system comprises a pneumatic strapping tensioner and a pneumatic alloy locking machine, designed to integrate the functions of tensioning, sealing, and cutting. It is engineered for high-intensity packing demands in various industrial applications, including steel, paper, wood, building materials, and metal products.

Figure 1.1: Complete SAIYERUS Pneumatic Steel Strapping Tool kit, including the tensioner, sealer, and accessories.
Key Features:
- Split Combination Design: Separate tools for tensioning and sealing/cutting, offering flexibility and ease of use.
- High Tensioning Force: Capable of up to 8500N tension, ensuring secure strapping.
- Strong Locking Force: The sealer provides up to 15000N load capacity with a double clip mechanism for reliable sealing.
- Durable Construction: Made from high-strength steel for durability, drop resistance, and corrosion resistance.
- Pneumatic Operation: Requires an air compressor (not included) for efficient, labor-saving operation.
- Versatile Application: Suitable for steel straps of 19mm, 25mm, and 32mm width, and 0.6-1.2mm thickness.
2. Safety Information
Read and understand all safety warnings and instructions before operating this tool. Failure to follow these instructions may result in serious injury.
General Safety Warnings:
- Personal Protective Equipment (PPE): Always wear safety glasses, gloves, and hearing protection when operating the tool.
- Work Area: Keep the work area clean, well-lit, and free from obstructions. Ensure bystanders are at a safe distance.
- Air Supply: Use only clean, dry, regulated compressed air at the specified pressure (0.49-0.63Mpa). Do not exceed the maximum operating pressure.
- Tool Condition: Inspect the tool for damage before each use. Do not operate a damaged tool.
- Strap Handling: Steel strapping can be sharp. Handle with care and wear appropriate gloves. Be aware of potential recoil when tensioning or cutting straps.
- Maintenance: Disconnect the air supply before performing any adjustments, maintenance, or when changing accessories.
- Modifications: Do not modify the tool or use it for purposes other than its intended use.
- Training: Ensure all operators are properly trained in the safe and correct use of the tool.
3. Package Contents
Upon opening the package, verify that all components are present and undamaged.
- Pneumatic Steel Strapping Tensioner x 1
- Pneumatic Steel Strapping Sealer x 1
- Mounting accessories x 1 set (includes wrenches, hex keys, air connector, spare parts)
4. Specifications
| Feature | Specification |
|---|---|
| Product Name | Pneumatic Steel Strapping Tensioner + Pneumatic Steel Strapping Sealer |
| Model | FTL-25(GSC) + FTS-25(DYA) (for 25mm/1.0in strap) |
| Color | Silver |
| Material | Steel |
| Compatible Strapping | Steel straps / Iron belt |
| Work Mode | Pneumatic |
| Air Pressure Requirement | 0.49~0.63Mpa (71-91 PSI) |
| Strap Width | 19/25/32mm (0.75''/1''/1.25'') - This model is for 25mm/1.0in |
| Strap Thickness | 0.6~1.2mm (0.024-0.047'') |
| Tensioning Speed | ≥7.5cm/s |
| Tension Force | ≥8.5KN (8500N) |
| Clip Under Pressure (Sealing Force) | 15KN (15000N) |
| Tensioner Weight | 4.1 kg (9.04 lbs) |
| Sealer Weight | 3.1 kg (6.83 lbs) |
| Overall Package Dimensions | 15.55 x 14.8 x 11.54 inches |
| Overall Item Weight | 37.6 pounds (includes packaging and accessories) |

Figure 4.1: Dimensions of the Pneumatic Alloy Locking Machine (left) and the Pneumatic Strapping Tensioner (right).
5. Setup
Before operating the strapping tool, ensure proper setup of the air supply and tool components.
5.1 Air Compressor Connection
- Ensure your air compressor is capable of providing an air pressure between 0.49-0.63Mpa (71-91 PSI). An air compressor is not included with this tool.
- Connect the air hose from your compressor to the gas nozzle on both the Pneumatic Strapping Tensioner and the Pneumatic Alloy Locking Machine. Use the provided air connector if necessary.
- Verify that all connections are secure to prevent air leaks.
- Set the air compressor regulator to the recommended operating pressure. Insufficient air pressure will negatively affect the strapping performance.

Figure 5.1: The Pneumatic Alloy Locking Machine, showing the gas nozzle connection point and the requirement for an external air compressor.
5.2 Tool Familiarization (Pneumatic Strapping Tensioner)
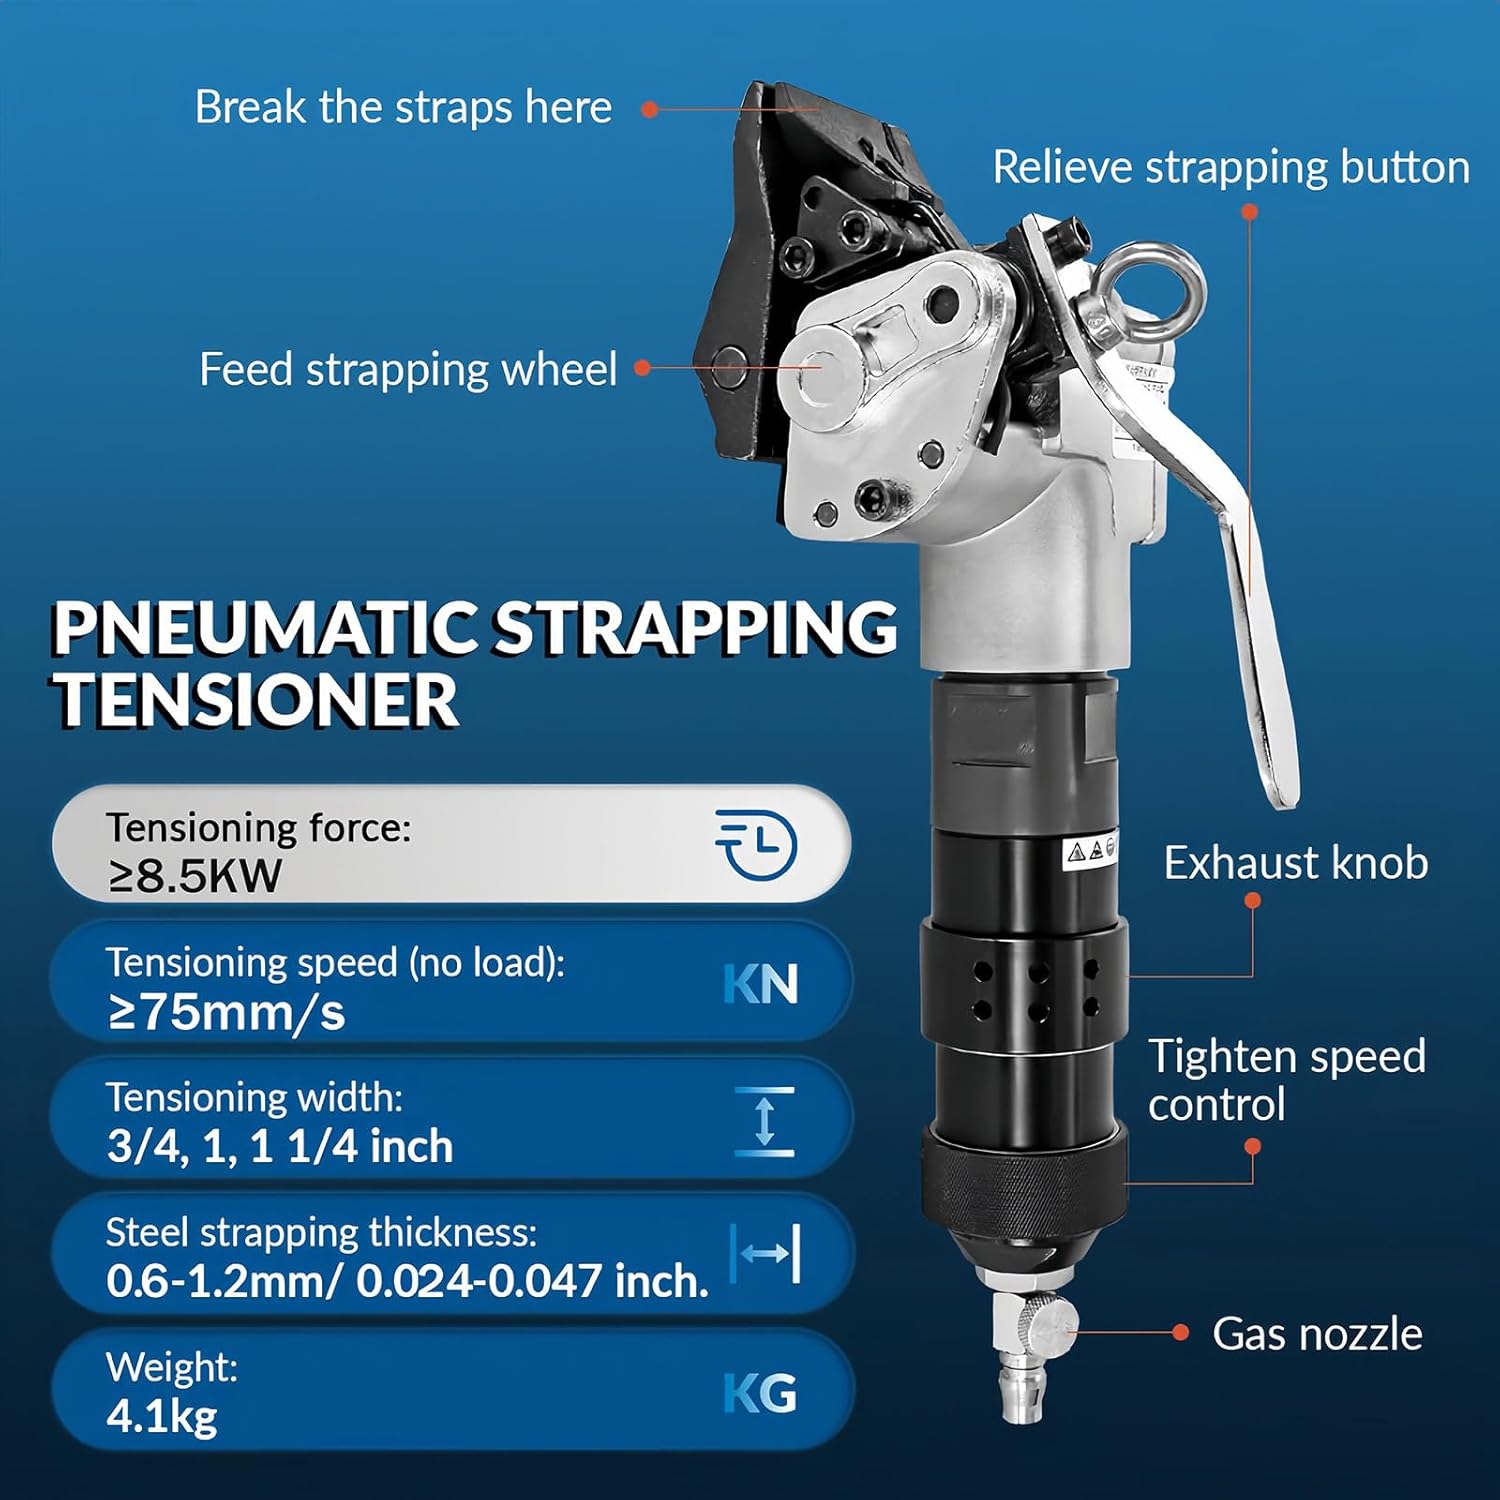
Figure 5.2: Labeled components of the Pneumatic Strapping Tensioner, including the feed strapping wheel, exhaust knob, tighten speed control, and gas nozzle.
5.3 Tool Familiarization (Pneumatic Alloy Locking Machine)
Figure 5.3: Labeled components of the Pneumatic Alloy Locking Machine, highlighting the lock slot, lock trigger, and gas nozzle.
6. Operating Instructions
Follow these steps for safe and effective operation of the pneumatic steel strapping tool.
- Prepare the Strap and Seal:
Place an open metal seal onto the steel strapping. Bend the steel strapping approximately 50mm (2 inches) away from the seal, creating a loop for the tensioner.
- Position the Strapping:
Wrap the steel strapping around the package or item to be secured. Ensure the strapping is correctly aligned and positioned.
- Tension the Strapping (Using Pneumatic Strapping Tensioner):
Insert the strapping into the tensioner. Turn the tension rotating knob (tighten speed control) clockwise. Continue turning until the strapping is tightened to the desired tension, ensuring it is secure around the package. The tensioner will automatically feed the strapping.
- Seal the Strapping (Using Pneumatic Alloy Locking Machine):
Position the Pneumatic Alloy Locking Machine over the metal seal and the overlapped strapping. Press the lock trigger handle of the sealer firmly to complete the locking process. This will crimp the seal, securing the strap ends together.
- Cut the Strapping (Using Pneumatic Strapping Tensioner):
After sealing, tilt the tensioner upwards vertically. This action will cut the excess strapping. Then, turn the rotary knob on the tensioner to its stop position to release the tool from the strap.
- Inspect the Strapping:
Verify that the strap is tightly secured and the seal is properly crimped. If necessary, repeat the process or adjust tension for optimal security.

Figure 6.1: Visual guide illustrating the four main steps: Put Seals, Tension, Seal, and Cut, for completing a steel strapping operation.

Figure 6.2: Examples of the pneumatic steel strapping tool in use, securing various industrial materials like steel pipes and sheets.
7. Maintenance
Regular maintenance ensures the longevity and optimal performance of your pneumatic strapping tool. Always disconnect the air supply before performing any maintenance.
- Daily Cleaning: Wipe down the tools with a clean, dry cloth to remove dust, dirt, and debris.
- Lubrication: Apply a few drops of pneumatic tool oil into the air inlet of both tools daily or before each use. This lubricates internal components and prevents corrosion.
- Inspect Air Connections: Regularly check air hoses and connections for wear, damage, or leaks. Replace any damaged components immediately.
- Check Moving Parts: Inspect the feed wheel, cutting blade, and sealing jaws for wear or damage. Replace worn parts as needed.
- Storage: Store the tools in a clean, dry environment when not in use.
8. Troubleshooting
This section addresses common issues you might encounter and provides solutions.
| Problem | Possible Cause | Solution |
|---|---|---|
| Insufficient Tensioning | Low air pressure; Worn feed wheel; Incorrect strap thickness. | Check air compressor pressure (0.49-0.63Mpa); Replace feed wheel; Ensure strap thickness is within 0.6-1.2mm range. |
| Poor Sealing/Crimping | Low air pressure; Worn sealing jaws; Incorrect seal type/size. | Verify air pressure; Inspect and replace sealing jaws if worn; Use appropriate metal seals for steel strapping. |
| Strap Not Cutting Cleanly | Dull or damaged cutting blade. | Inspect and replace the cutting blade on the tensioner. |
| Air Leaks | Loose connections; Damaged O-rings or seals. | Tighten all air connections; Inspect and replace O-rings or seals as needed. |
| Tool Not Operating | No air supply; Air pressure too low; Internal blockage. | Check air compressor and hose connection; Adjust air pressure; Consult support if internal blockage is suspected. |
9. Warranty and Support
For any questions, technical assistance, or warranty inquiries, please contact SAIYERUS customer support.
You can send us an email with your query, and we commit to replying within 24 hours. Please refer to your purchase documentation for specific warranty terms and contact details.