1. Introduction
Thank you for choosing the Evtevision 4K NVR 36-Channel Network Video Recorder. This device is designed to provide a robust and scalable surveillance solution, supporting up to 36 IP cameras with advanced features like H.265+ video compression, 4K resolution recording, and intelligent motion detection. This manual will guide you through the installation, operation, and maintenance of your NVR system to ensure optimal performance and security.
2. Package Contents
Please check the package contents carefully. If any items are missing or damaged, contact your retailer.
- 1 x Evtevision 4K NVR 36-Channel Network Video Recorder (HDD not included)
- 1 x Power Adapter
- 1 x USB Mouse
- 1 x User Manual
- 1 x HDD Screw Bag
3. Product Overview
The Evtevision 4K NVR is a high-performance network video recorder capable of managing up to 36 IP cameras. It features H.265+ compression for efficient storage and bandwidth usage, 4K video output, and various smart surveillance functions.

Figure 3.1: Evtevision 4K NVR highlighting its main features.
3.1 Rear Panel Connections
The rear panel of the NVR provides various ports for connecting power, network, display, and peripheral devices.

Figure 3.2: Rear panel connections of the NVR.
- Audio Out (RCA): For connecting to an external audio output device.
- VGA Port: For connecting to a VGA monitor.
- HDMI Port: For connecting to an HDMI monitor or TV, supporting up to 4K resolution.
- Ethernet (RJ-45) Port: For network connection to your router or PoE switch.
- USB 2.0 Ports: For connecting the USB mouse, external storage for backup, or other USB devices.
- DC 12V Power Input: For connecting the provided power adapter.
4. Installation Guide
4.1 Hard Drive (HDD) Installation
The NVR does not include a hard drive. An internal SATA HDD is required for recording and playback. The NVR supports up to two SATA HDDs.
- Unscrew and remove the top cover of the NVR chassis.
- Connect the SATA data cable and power cable from the NVR to the HDD.
- Secure the HDD to the NVR chassis using the provided screws.
- Replace the top cover and secure it with screws.
4.2 Connecting IP Cameras
This NVR does not have built-in PoE ports. You must use an external PoE switch (48-52V) to power and connect your IP cameras.
- Connect your IP cameras to a standard PoE switch using Ethernet cables.
- Connect the PoE switch to the NVR's Ethernet port using an Ethernet cable.
- Ensure all cameras and the NVR are on the same local network.
4.3 Network and Display Connection
- Connect the NVR's Ethernet port to your router or network switch.
- Connect a monitor to the NVR's HDMI or VGA port.
- Connect the USB mouse to one of the NVR's USB ports.
- Connect the power adapter to the NVR's DC 12V input and plug it into a power outlet. The NVR will power on automatically.
5. Operating Instructions
5.1 Initial Setup
Upon first boot, the NVR will guide you through an initial setup wizard. Follow the on-screen prompts to configure basic settings such as language, date/time, network settings, and hard drive initialization. Ensure the hard drive is formatted before use.
5.2 Remote Access
Access your NVR remotely from mobile devices or computers.
- Mobile App: Download the "XMeye Pro" app from the App Store (iOS) or Google Play (Android). Register an account, add your NVR by scanning its QR code or entering its serial number, and view live video or playback remotely.
- PC/Mac Software: Use CMS/VMS software for remote viewing and management on your computer. Refer to the Evtevision website for software downloads and instructions.

Figure 5.1: Remote viewing via mobile application.
5.3 Recording Modes
The NVR supports various recording modes:
- Manual Recording: Start and stop recording manually.
- Scheduled Recording: Set specific times for continuous recording.
- Motion Detection Recording: Records only when motion is detected by the cameras.
- Alarm Recording: Records when an alarm event is triggered.
5.4 Smart Surveillance Features
The NVR offers intelligent detection capabilities to reduce false alarms.
- Human and Vehicle Detection: Configure the NVR to detect only human and vehicle shapes, minimizing alerts from environmental factors like leaves or animals. This feature is fully compatible with Evtevision IP cameras and has limited compatibility with third-party ONVIF cameras due to protocol differences.

Figure 5.2: Human and Vehicle Detection in action.
5.5 Alerts and Notifications
Receive instant alerts when events are detected.
- Email Alerts: Configure email settings to receive notifications with snapshots of detected events.
- App Push Notifications: Receive instant alerts directly on your mobile device via the XMeye Pro app.

Figure 5.3: Instant alerts and app push notifications.
5.6 Playback and Backup
Review recorded footage and back up important video clips.
- Video Playback: Access the playback interface to search for recordings by date, time, or event type. The NVR supports up to 8x playback speed.
- Backup: Export recorded video files to a USB portable hard drive or via the network.
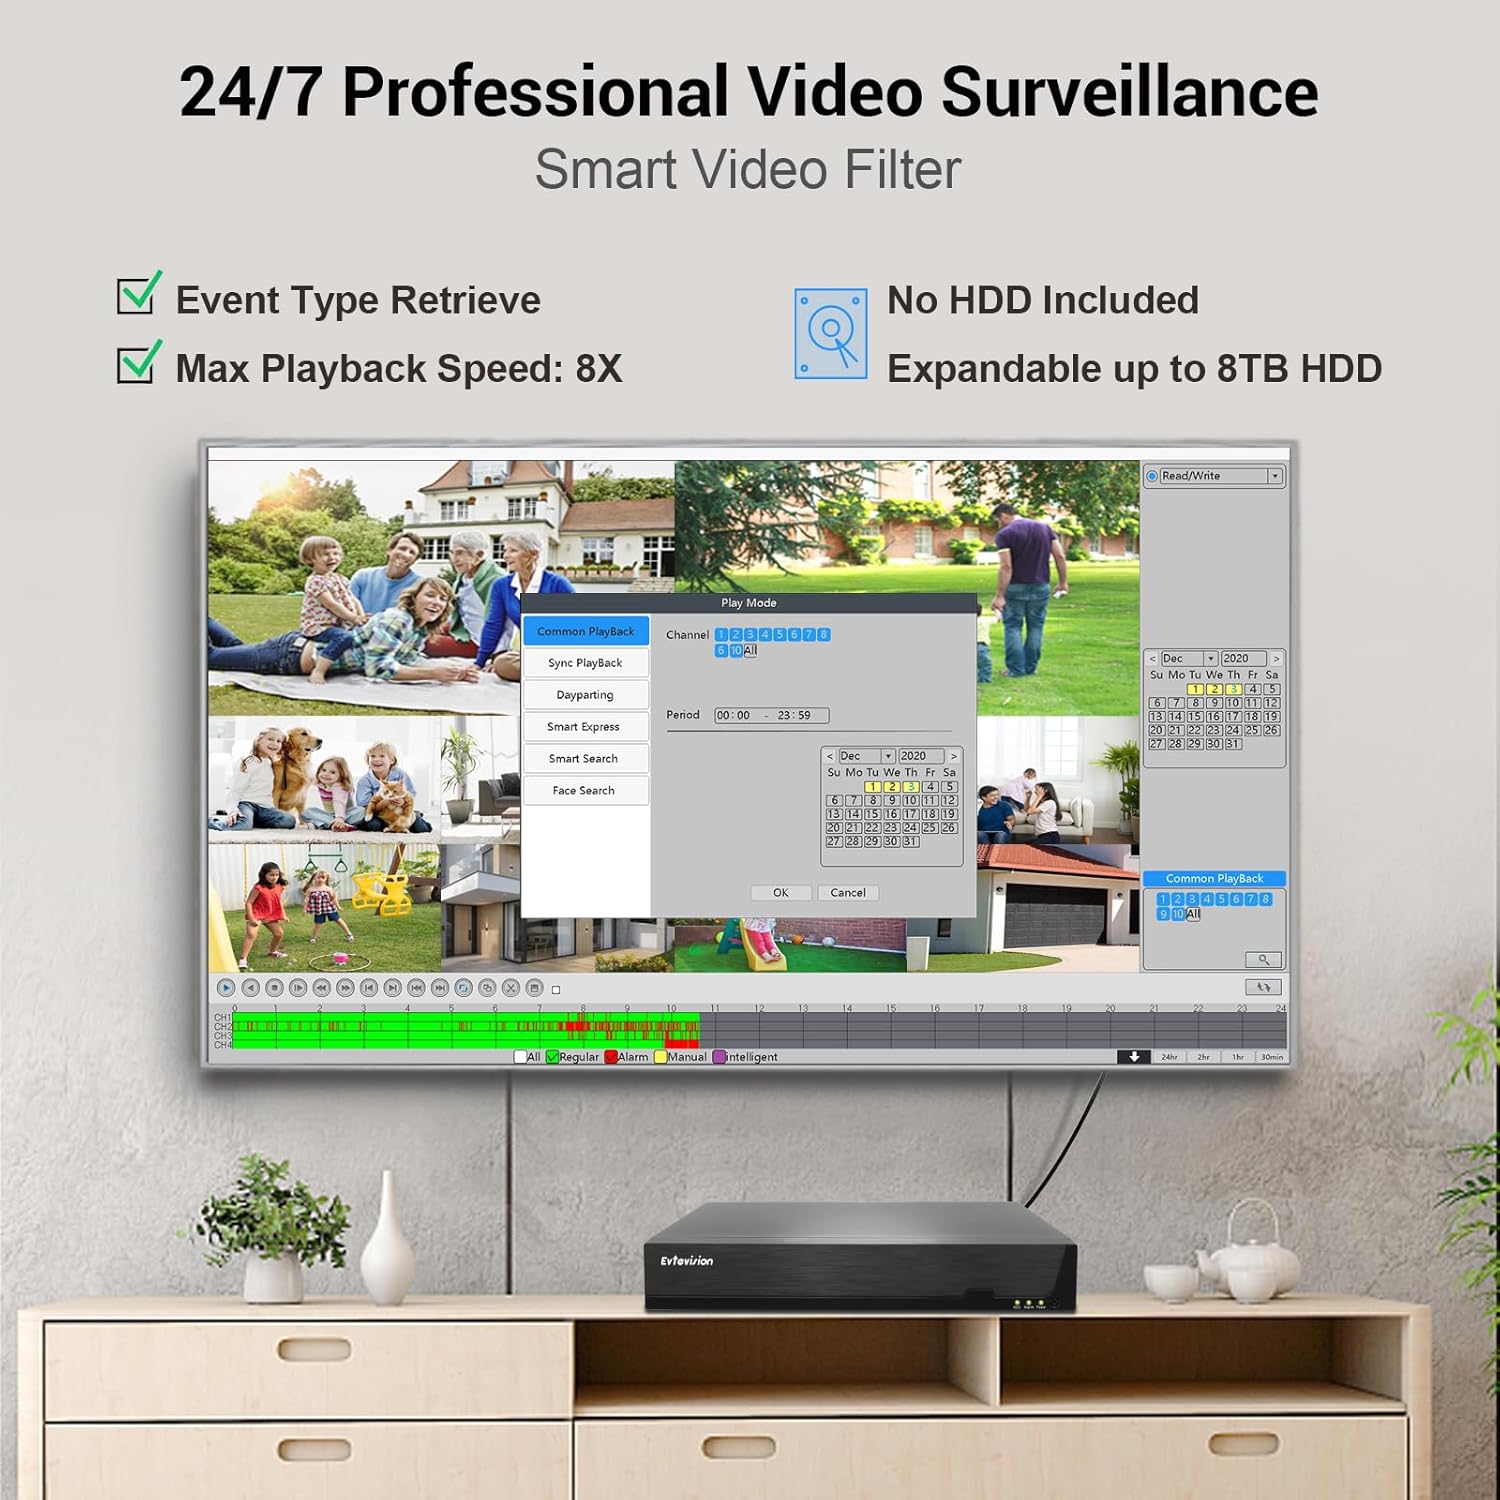
Figure 5.4: NVR playback interface.
6. Maintenance
Regular maintenance ensures the longevity and optimal performance of your NVR system.
- Cleaning: Keep the NVR free from dust. Use a soft, dry cloth for cleaning. Do not use liquid cleaners.
- Firmware Updates: Periodically check the Evtevision official website for firmware updates. Updating firmware can improve performance, add new features, and fix bugs.
- Hard Drive Health: Monitor the health of your hard drives through the NVR's system settings. Replace failing drives promptly to avoid data loss.
- Power Supply: Use only the provided power adapter. Ensure stable power to prevent damage.
7. Troubleshooting
If you encounter issues, refer to the following common problems and solutions:
- No Video Output:
- Check HDMI/VGA cable connections to the monitor and NVR.
- Ensure the monitor is set to the correct input source.
- Verify the NVR is powered on.
- Cameras Not Displaying:
- Ensure IP cameras are powered by a PoE switch and connected to the network.
- Verify the NVR and cameras are on the same network segment.
- Check camera IP addresses and ensure they are correctly added to the NVR.
- Confirm camera compatibility, especially for third-party brands.
- No Recording:
- Ensure an HDD is installed and properly initialized/formatted in the NVR settings.
- Check recording schedules and motion detection settings.
- Verify the HDD is not full or faulty.
- Remote Access Not Working:
- Ensure the NVR has an active internet connection.
- Verify network settings (DHCP or static IP) are correct.
- Check if the XMeye Pro app is updated to the latest version.
- Confirm the NVR is correctly added to your XMeye Pro account.
For further assistance, please contact Evtevision customer support.
8. Specifications
| Feature | Specification |
|---|---|
| Brand | Evtevision |
| Model Number | ES-N2536 |
| Video Input | 36-channel RJ45 IP input |
| Video Output | 1 x HDMI (max 4K), 1 x VGA (max 1080p) |
| Audio Output | 1 x RCA |
| Video Compression | H.265+ |
| Preview Resolution | 36 channels x 4K |
| Playback Quality | 2 channels x 4K/5MP @ 12fps |
| Recording Modes | Manual, Alarm, Motion Detection, Scheduled |
| Backup Modes | Network, USB Portable HDD |
| HDD Interface | 2 x SATA HDD ports (HDD not included) |
| Max HDD Capacity | Up to 8TB per drive |
| Network Interface | 1 x RJ-45 10M/100M/1000Mbps Ethernet port |
| USB Interface | 2 x USB 2.0 ports |
| Compatible Devices | IP cameras, PoE switches (48-52V) |
| Product Dimensions | 32.5L x 24.3W x 5.4H cm |
| Color | White |
9. Warranty and Support
For warranty information and technical support, please refer to the documentation included with your purchase or visit the official Evtevision website. If you encounter any issues not covered in this manual, please contact Evtevision customer service for assistance.