1. Introduction
Thank you for purchasing the Gochanmi MX16 PRO 16-Channel Professional Audio Mixer. This mixer is designed for high-quality audio mixing, offering a wide range of features including 48V phantom power, USB connectivity, Bluetooth, and integrated DSP effects. This manual provides essential information for the proper setup, operation, and maintenance of your device. Please read it thoroughly before use to ensure optimal performance and longevity.
2. Safety Instructions
- Power Supply: Use only the specified power adapter (110-220V, 30W). Ensure the voltage matches your local power supply.
- Water and Moisture: Do not expose the unit to rain, moisture, or excessive humidity. Avoid placing liquid containers on the mixer.
- Ventilation: Ensure adequate ventilation around the unit. Do not block ventilation openings.
- Heat Sources: Keep the unit away from heat sources such as radiators, heat registers, stoves, or other heat-producing appliances.
- Cleaning: Clean only with a dry cloth. Do not use liquid cleaners or aerosols.
- Servicing: Do not attempt to service this unit yourself. Refer all servicing to qualified service personnel.
- Cables: Protect power cords from being walked on or pinched, particularly at plugs, convenience receptacles, and the point where they exit from the apparatus.
3. Product Features
- 16 professional microphone inputs with ultra-low noise discrete preamplifiers.
- 16 dual-purpose XLR interfaces and 16 mono line inputs.
- Individual +48V phantom power for each microphone input channel.
- Dual-row LED level meters for precise monitoring.
- Each mono input channel features a 4-segment equalizer (stereo channels have 3-segment EQ).
- Channel bypass equipped with pressure limit control and peak indicator light.
- Integrated 256-bit DSP effects processor.
- Multiple output options: 4 AUX outputs, 4 Group outputs, 1 Stereo Monitor output, 1 Headphone Monitor output, and 1 Subwoofer output.
- Bluetooth connectivity for wireless audio streaming.
- USB interface for MP3 playback, sound card functionality, and direct recording to computer or U disk.
4. Panel Layout and Controls
Familiarize yourself with the various inputs, outputs, and controls on your MX16 PRO mixer.

Image: Detailed view of the Gochanmi MX16 PRO mixer with numbered labels indicating various jacks and controls.
- Microphone Input Jacks: XLR and 1/4-inch TRS combo jacks for connecting microphones.
- +48V Phantom Power Switch: Activates phantom power for condenser microphones.
- Gain Control: Adjusts the input sensitivity for each channel.
- Equalizer (EQ): Controls for High, Mid, and Low frequencies to shape the sound of each channel.
- AUX Control: Sends signal to auxiliary outputs for monitor mixes or external effects.
- FX Control: Adjusts the amount of signal sent to the internal DSP effects processor.
- Pan Control: Positions the channel's signal in the stereo field (left to right).
- Sound Effect Control: (Likely refers to the DSP effects selection and parameter adjustment).
- Channel Volume Fader: Adjusts the output level of individual channels.
- XLR Output: Main balanced XLR outputs for connecting to power amplifiers or recording devices.
- Central Control Output: (Refers to main mix or group outputs).
- Input/Output Recording: USB port for connecting to a computer for recording and playback.
- Auxiliary Outputs: Additional outputs for various routing needs.
- MP3 Playback Control: Controls for the integrated MP3 player.
- Monitor Volume: Adjusts the volume of the monitor output.
- Master Volume Adjustment: Controls the overall output level of the main mix.
- Effect Volume Adjustment: Controls the overall level of the applied DSP effects.
5. Setup and Connections
Proper connection of your audio equipment is crucial for optimal sound quality and system stability.
5.1 Power Connection
Connect the provided power adapter to the mixer's power input and then to a suitable electrical outlet (110-220V). Ensure the mixer is switched off before connecting or disconnecting power.
5.2 Input Connections
- Microphones: Connect microphones to the XLR or 1/4-inch TRS combo jacks (1). For condenser microphones requiring power, activate the +48V phantom power switch (2) for the respective channel.
- Line-Level Devices: Connect instruments, media players, or other line-level devices to the 1/4-inch TRS line inputs.
- USB: Connect a USB drive for MP3 playback or a computer for recording/playback via the USB port.
5.3 Output Connections
- Main Output: Connect the main XLR outputs to your power amplifier or active speakers.
- Monitor Output: Connect monitor speakers or headphones to the dedicated monitor outputs.
- AUX/Group Outputs: Use these for sending signals to external effects processors, stage monitors, or sub-mixes.

Image: A visual diagram illustrating various connection possibilities for the Gochanmi MX16 PRO mixer, including wireless microphones, guitars, amplifiers, powered speakers, condenser microphones, dynamic microphones, computers (Windows/MacBook), USB drives, smartphones (Android/iPhone/iPad), headphones, and monitoring systems.
6. Operating Instructions
6.1 Powering On/Off
Always ensure all volume controls are at their minimum before powering on the mixer. Power on the mixer first, then your amplifiers/active speakers. When powering off, reverse the order: turn off amplifiers/active speakers first, then the mixer.
6.2 Adjusting Input Gain and EQ

Image: Section of the mixer showing high gain input (1) compatible with 6.35mm and XLR connectors, and a detailed diagram of the 4-band EQ adjustment (2) with frequency response curves for high, mid, and low frequencies. Also shows the reverb control (3).
- Gain (3): Use the Gain knob to set the input level for each channel. Adjust it so that the peak indicator light (if present) flashes only occasionally during the loudest parts of the signal.
- Equalizer (4): Use the High, Mid, and Low EQ knobs to shape the tone of each input.
6.3 Using Phantom Power and Mute

Image: Close-up of the mixer channels showing individual +48V phantom power buttons (1) and independent mute buttons (2) for each channel.
- +48V Phantom Power (1): Press this button to supply +48V power to condenser microphones connected to the corresponding channel. Ensure the microphone is compatible before activating.
- Mute Button (2): Press the Mute button to silence the corresponding channel. This is useful for temporarily cutting off a signal without changing its fader position.
6.4 DSP Effects
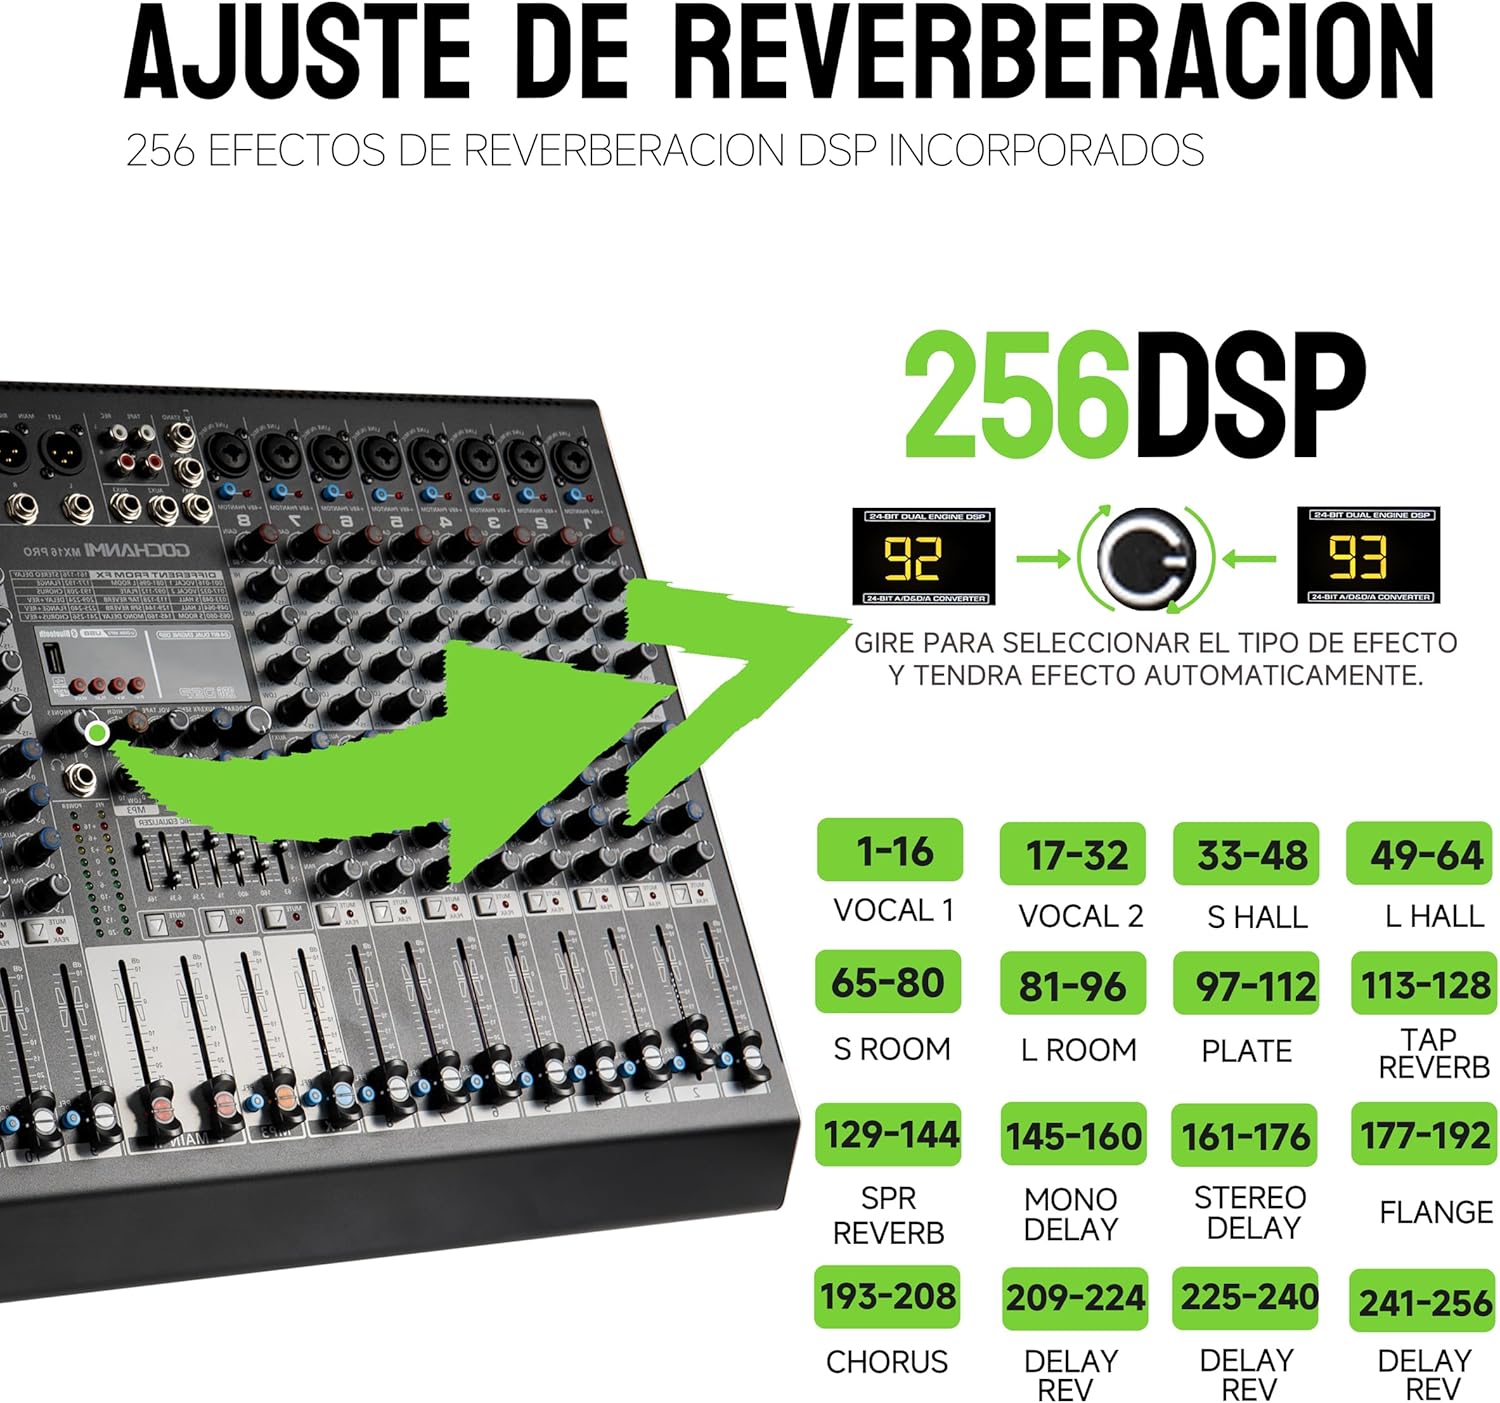
Image: Section of the mixer highlighting the 256 DSP effects. An arrow indicates turning a knob to select effects, with a list of effect categories such as Vocal, Hall, Room, Plate, Delay, and Chorus.
The MX16 PRO features an integrated 256-bit DSP effects processor. Use the dedicated knob to scroll through and select different effects (e.g., Reverb, Delay, Chorus). Adjust the FX control (6) on each channel to send the desired amount of signal to the effects processor, and use the Effect Volume Adjustment (17) to control the overall level of the effects.
6.5 Bluetooth Connectivity

Image: The mixer with a smartphone connected via Bluetooth, displaying the Bluetooth pairing name "BT-Speaker" and indicating a reception distance of 10 meters. A phone holder is also shown.
To connect a Bluetooth device:
- Activate Bluetooth on your smart device.
- On your device, search for Bluetooth devices and select "BT-Speaker".
- Once paired, you can stream audio wirelessly to the mixer. The effective range is approximately 10 meters.
6.6 USB/Computer Connection and Recording

Image: The mixer connected to a computer via USB, with a USB flash drive also shown. The mixer's display shows "PC" indicating computer connection mode.
- USB Playback: Insert a USB flash drive containing MP3 files into the USB port. Use the MP3 Playback Controls (14) to navigate and play tracks.
- USB Audio Interface: Connect the mixer to a computer (Windows or Mac) using a USB cable. The mixer will function as an audio interface, allowing you to record the main mix directly to your computer's digital audio workstation (DAW) software or play audio from your computer through the mixer.
- USB Recording: The mixer supports direct recording to a U disk or computer via USB. Refer to your DAW software's instructions for computer recording.
7. Maintenance
- Cleaning: Regularly wipe the mixer's surface with a soft, dry cloth. Avoid abrasive cleaners or solvents that could damage the finish.
- Dust Protection: When not in use, cover the mixer to protect it from dust and debris.
- Cable Management: Ensure all cables are neatly organized and not under tension to prevent damage to connectors and ports.
- Storage: Store the mixer in a cool, dry place away from direct sunlight and extreme temperatures.
8. Troubleshooting
- No Sound Output:
- Check all power connections and ensure the mixer is turned on.
- Verify that main volume faders and individual channel faders are raised.
- Ensure input sources are connected correctly and producing a signal.
- Check if any channels are muted.
- Confirm that output cables are connected to active speakers or an amplifier that is powered on.
- Hum or Noise:
- Check all cable connections for proper seating and damage.
- Ensure proper grounding for all equipment.
- Reduce input gain if the signal is too hot, causing distortion.
- Keep audio cables away from power cables.
- Bluetooth Connection Issues:
- Ensure the mixer's Bluetooth is active and discoverable.
- Check that your smart device's Bluetooth is on and searching for devices.
- Move closer to the mixer to ensure you are within the 10-meter range.
- Try unpairing and re-pairing the device.
9. Specifications
| Microphone Inputs: | 16 channels (XLR dual-purpose interfaces) |
| Line Inputs: | 16 channels (mono single-plug) |
| Phantom Power: | +48V per microphone input |
| DSP Effects: | 256-bit integrated effects processor |
| Output Channels: | 4 AUX, 4 Group, 1 Stereo Monitor, 1 Headphone Monitor, 1 Subwoofer |
| Frequency Response: | 20Hz-20kHz, ±3dB |
| Distortion: | <0.003% (A-weighted) |
| Mic Input Noise: | -119dB (A-weighted, balanced) |
| Common Mode Rejection Ratio: | 60dB |
| Single Channel Input Gain: | MIC: 0 to 48dB, LINE: -33 to +15dB |
| Stereo Channel Input Gain: | LINE: -8 to +6dB |
| Max Output Level: | +20dBu |
| MIC Input High-Pass Filter: | 75 Hz, 18 dB/oct. |
| Single Channel EQ: | High: ±15dB@12KHz, Mid: ±12dB@2.5KHz, Low: ±15dB@80Hz |
| Power Supply: | Built-in switching power adapter 110-220V, 30W |
| Power Consumption: | <=23W |
| Connectivity: | Bluetooth, USB |
| Weight: | 8 Kilograms |
10. Warranty and Support
This product comes with a 30-day seller warranty from the date of purchase. This warranty covers manufacturing defects and malfunctions under normal use. It does not cover damage caused by misuse, accidents, unauthorized modifications, or improper installation.
For warranty claims or technical support, please contact your retailer or the Gochanmi customer service department with your purchase receipt and product model information.
11. Typical Applications

Image: A collage showing various scenarios where the Gochanmi MX16 PRO mixer can be used, including live music events, DJ performances, recording sessions, and public address systems for gatherings.
The Gochanmi MX16 PRO mixer is suitable for a variety of audio applications, including:
- Live sound reinforcement for bands and performers.
- DJ setups and events.
- Studio recording and home studio use.
- Public address systems for conferences, presentations, and events.
- Educational institutions and houses of worship.