Introduction
This manual provides detailed instructions for the operation and maintenance of your Personal AM FM Portable Radio with Bluetooth Speaker. Please read this manual thoroughly before using the device to ensure proper function and longevity.

Image: Front view of the Personal AM FM Portable Radio, showing the display, numeric keypad, speaker grille, and extended antenna.
The Personal AM FM Portable Radio is a versatile device combining a traditional AM/FM radio with modern features like Bluetooth connectivity and TF card playback. Its compact design and long battery life make it ideal for various activities, including walking and jogging.
Key Features
- Wireless Bluetooth Connection: Wide and stable transmission range for easy pairing with smartphones or tablets.
- Immersive Sound: Built-in magnetic speaker with 3W output for clear and resonant audio.
- TF Card Playback: Supports MP3/WMA/WAV/APE/FLAC formats for music playback from a TF card.
- Private Audio Oasis: 3.5mm stereo earphone jack for personal listening.
- Mini Pocket Size: Compact dimensions (91.2*56.3*24mm) for portability.
- Large-capacity Battery: Built-in 1100mAh rechargeable battery providing up to 30 hours of use.
- Multiple Station Search Modes: Manual, automatic, and numeral keyboard selection for radio tuning.
- Automatic Scan Stations: Automatically finds and stores up to 30 preset channels.
- Scheduled Power Off (Sleep Timer): Auto shutdown feature adjustable from 10 to 90 minutes.
- Large LED Screen: Real-time display of frequency, playback mode, battery level, and other information.
- Power Failure Memory: Resumes last playback after power interruption.
Setup
1. Charging the Device
Before first use, fully charge the radio. Use the provided Type-C charging cable to connect the radio to a DC5V/1A power source (e.g., a USB wall adapter or computer USB port).

Image: The radio with a Type-C charging cable plugged into its port, illustrating the charging process. The image also highlights the 1100mAh battery capacity and 30 hours of battery life.
- The LED display will indicate charging status.
- A full charge provides up to 30 hours of usage.
2. Powering On/Off
Press and hold the power button (usually located on the side or top) to turn the radio on or off. The LED display will illuminate upon powering on.
Operating Instructions
1. Radio Mode (AM/FM)
Extend the telescopic antenna for optimal reception. The radio supports both FM and AM bands.
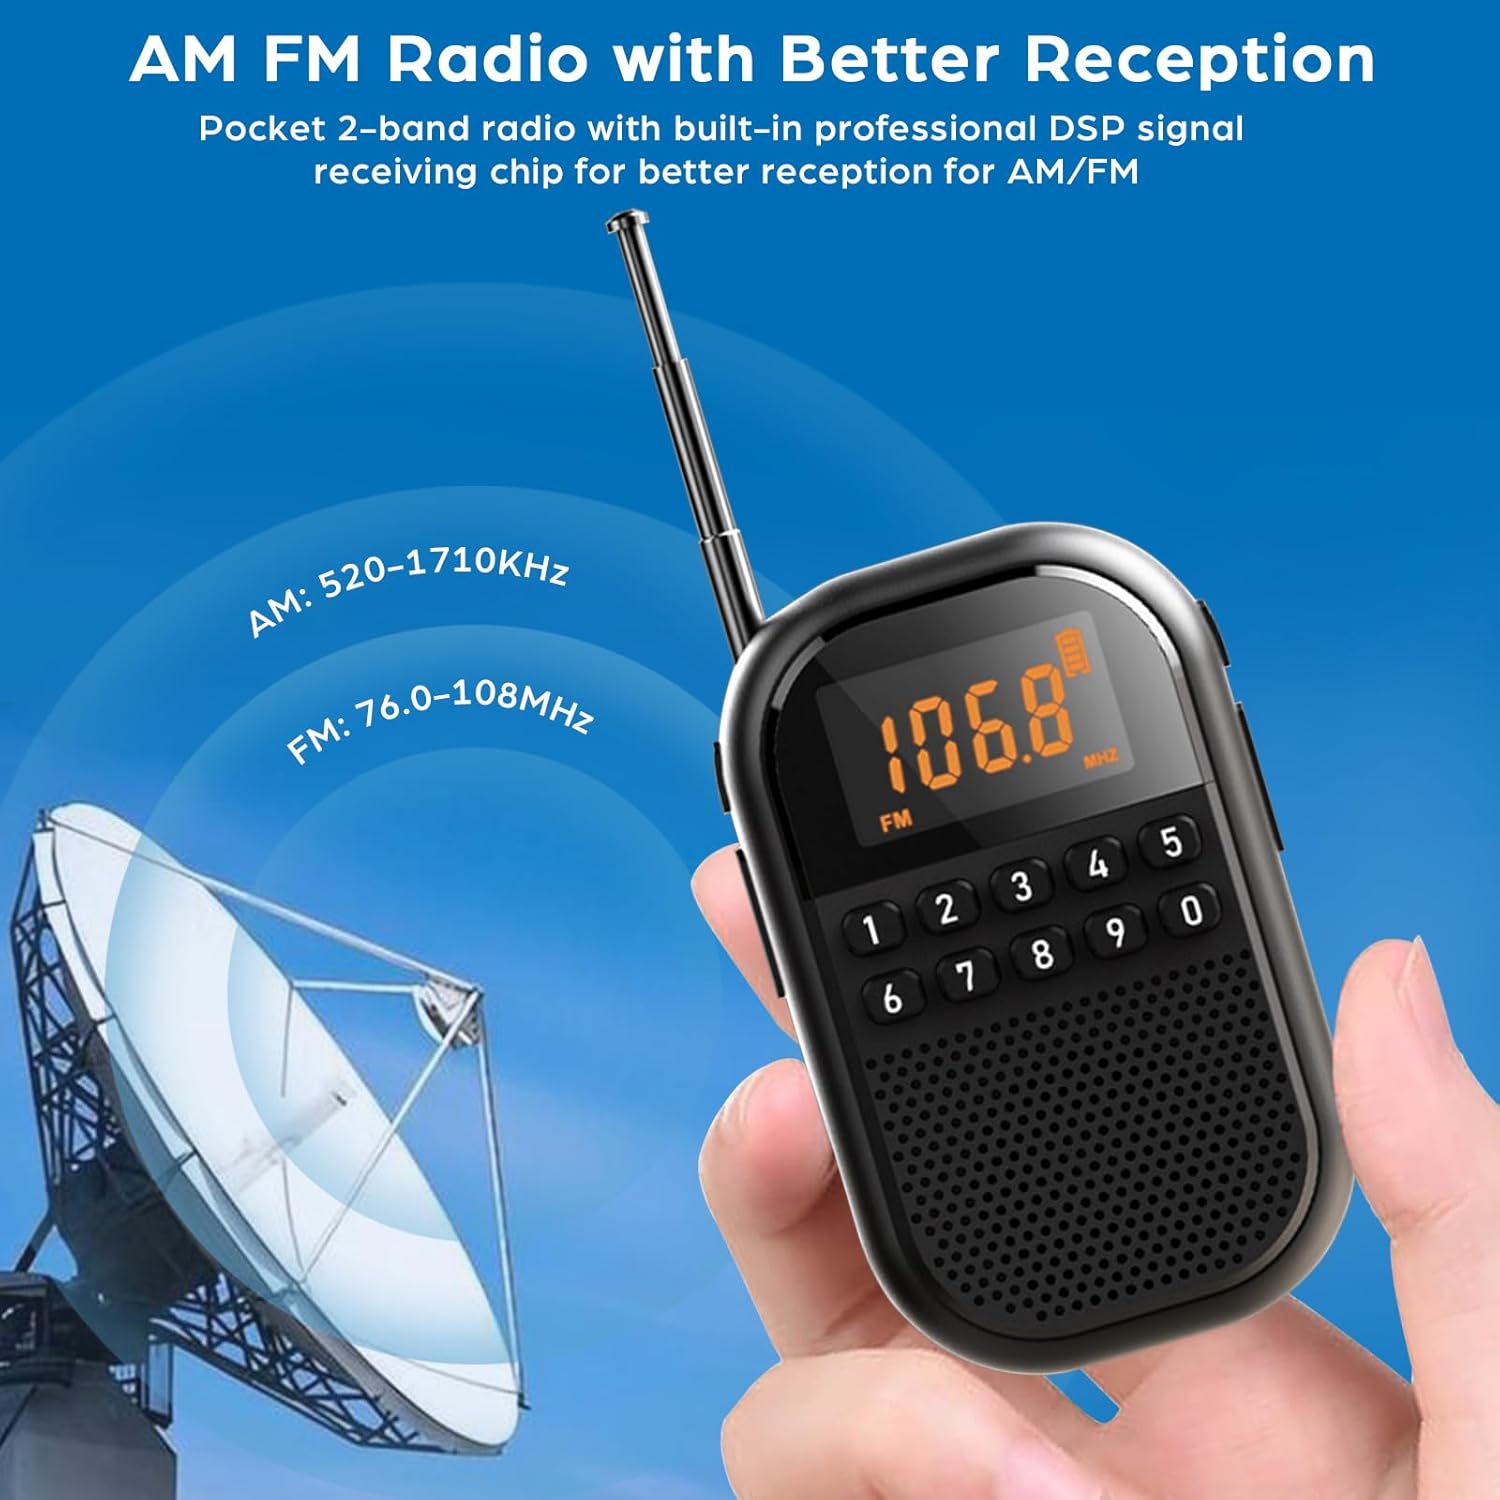
Image: The radio with its antenna fully extended, indicating the FM reception range of 76.0-108MHz and AM reception range of 520-1710KHz, suggesting improved signal reception.
- Switching Bands: Press the "M" or "Mode" button to switch between FM and AM bands.
- Automatic Scan: Press and hold the "Play/Pause" button (or a dedicated scan button) to initiate an automatic scan. The radio will search for available stations and store them as presets (up to 30 channels).
- Manual Tuning: Use the "Previous/Next" buttons to fine-tune frequencies.
- Numeral Keyboard Selection: Directly enter the desired frequency using the numeric keypad (0-9) and press "Enter" or "OK" (if available) to tune to that station.
- Accessing Presets: Use the "Previous/Next" buttons to cycle through stored preset stations.
2. Bluetooth Mode
The radio can function as a Bluetooth speaker, allowing you to stream audio from your smartphone or other Bluetooth-enabled devices.

Image: The radio's LED display shows "bt" indicating Bluetooth mode, positioned next to a smartphone screen displaying a music player interface, signifying wireless audio streaming.
- Entering Bluetooth Mode: Press the "M" or "Mode" button until "bt" appears on the LED display. The radio will enter pairing mode.
- Pairing: On your Bluetooth device, search for "MI04" (or similar device name) in the Bluetooth settings and select it to pair. A confirmation sound will indicate successful pairing.
- Playback Control: Use the radio's buttons (Play/Pause, Previous/Next) or your connected device to control music playback.
3. TF Card Playback
Insert a TF (microSD) card containing MP3/WMA/WAV/APE/FLAC audio files into the designated TF card slot on the radio.
- The radio will automatically switch to TF card playback mode or you may need to select it using the "M" or "Mode" button.
- Use the Play/Pause and Previous/Next buttons to navigate and control playback.
4. Earphone Use
For private listening, plug any standard 3.5mm stereo earphones into the earphone jack located on the radio.
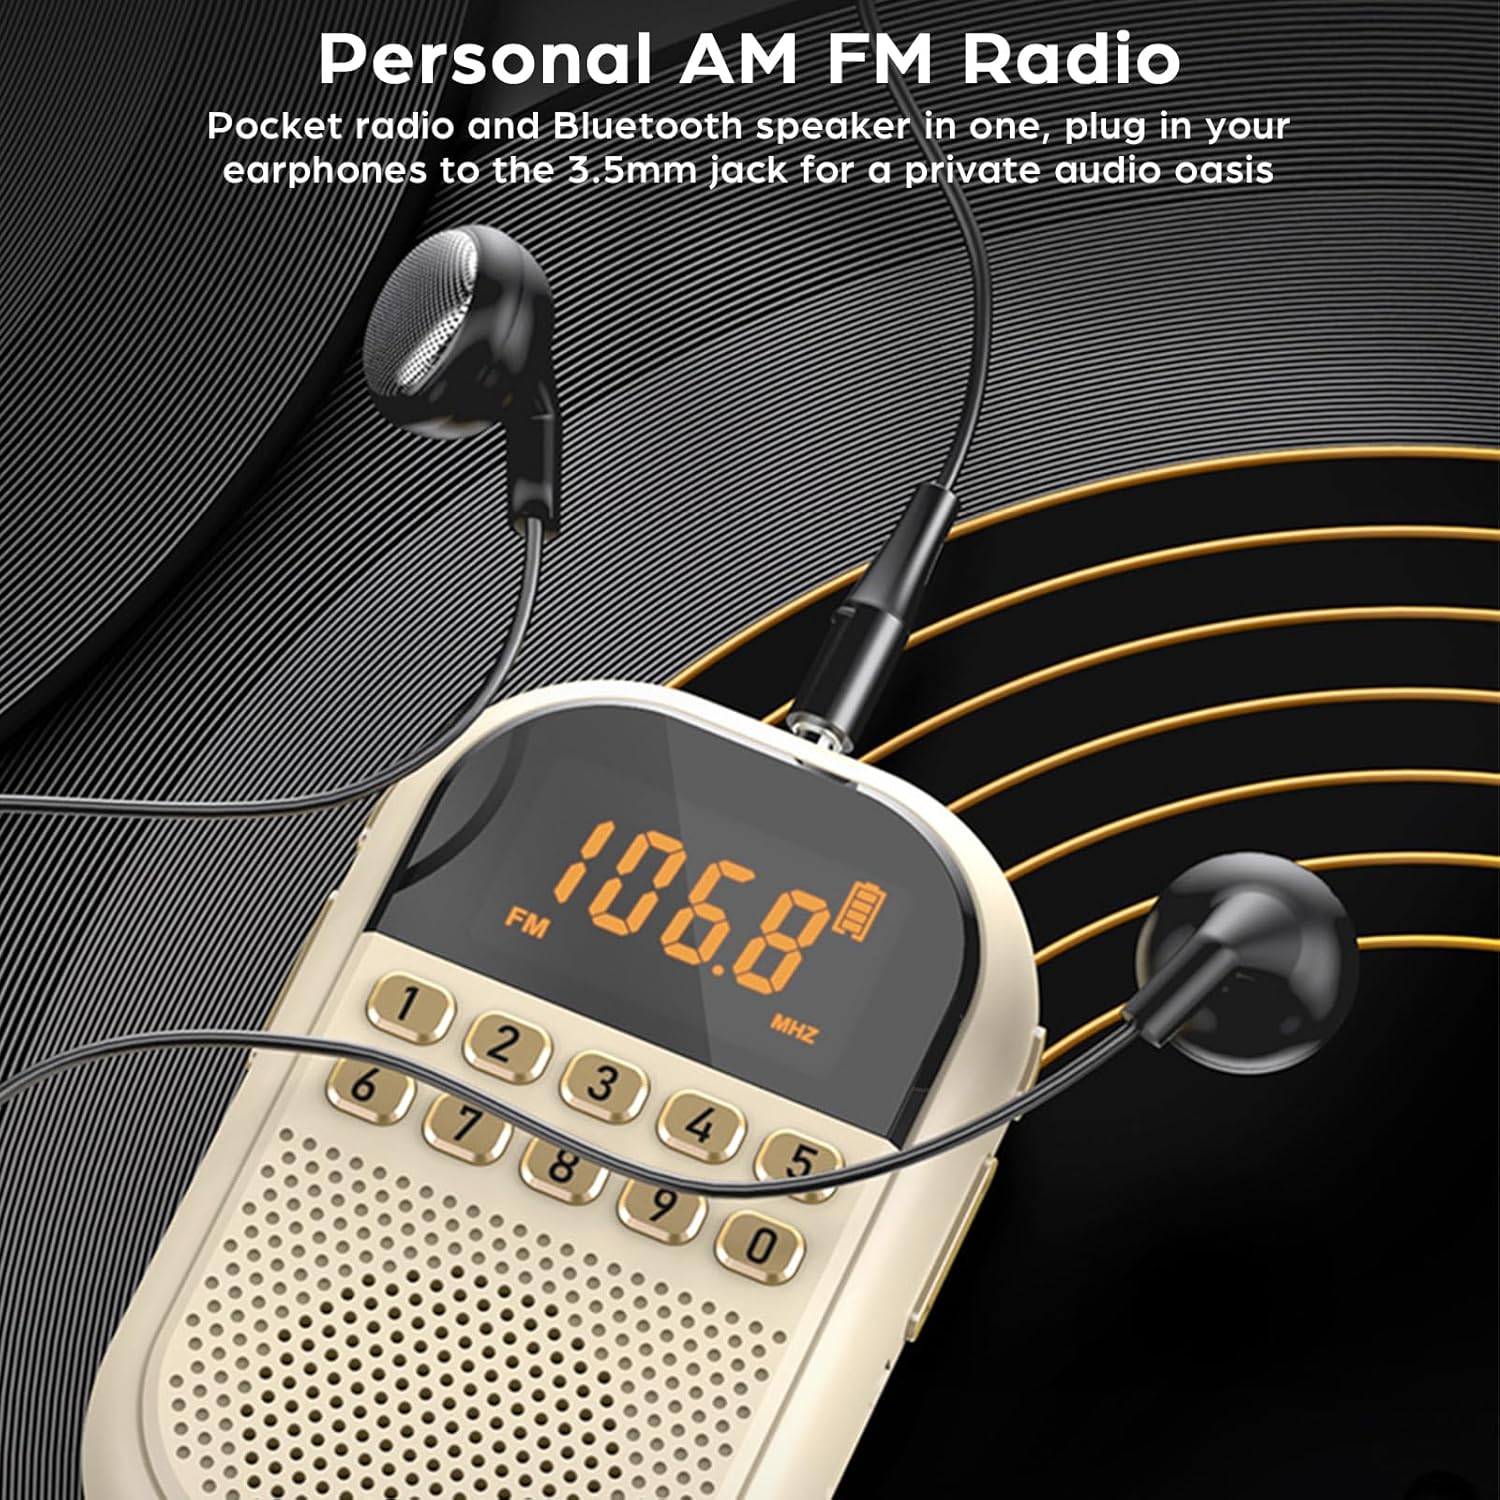
Image: The radio with a pair of wired earphones plugged into its 3.5mm jack, demonstrating the private listening feature.
- The radio's speaker will mute automatically when earphones are connected.
- Adjust volume using the radio's volume controls.
5. Sleep Timer
The sleep timer allows the radio to automatically power off after a set period.
- Press and hold the "0" key (or a dedicated sleep timer button) to enter sleep mode settings.
- Use the numeric keypad or navigation buttons to select a shutdown time between 10 and 90 minutes.
- Confirm your selection to activate the sleep timer.
6. LED Display Information
The large LED screen provides real-time information about the radio's status.

Image: A close-up of the radio's large LED display, clearly showing the frequency (106.8 MHz), FM band indicator, and battery level icon, highlighting its real-time information display capability.
- Frequency: Displays the current radio frequency.
- Playback Mode: Indicates the current mode (FM, AM, BT, TF).
- Battery Level: Shows the remaining battery charge.
- Other indicators may include volume level or sleep timer status.
Maintenance
- Cleaning: Use a soft, dry cloth to clean the exterior of the radio. Do not use liquid cleaners or abrasive materials.
- Storage: Store the radio in a cool, dry place away from direct sunlight and extreme temperatures when not in use for extended periods.
- Battery Care: To prolong battery life, avoid fully discharging the battery frequently. Charge the device regularly, even if not in constant use.
- Antenna: Handle the telescopic antenna with care to prevent bending or breaking. Retract it when not in use.
- Water Exposure: This device is not waterproof. Avoid exposure to water or high humidity.
Troubleshooting
| Problem | Possible Cause | Solution |
|---|---|---|
| No power | Battery is depleted. | Charge the radio using the Type-C cable. |
| Poor radio reception | Antenna not extended; weak signal area; interference. | Fully extend the antenna. Move to an area with better signal. Avoid sources of electronic interference. |
| Bluetooth not pairing | Radio not in pairing mode; device too far; Bluetooth disabled on source device. | Ensure radio is in Bluetooth mode ("bt" displayed). Bring devices closer. Enable Bluetooth on your source device. |
| No sound from speaker | Volume too low; earphones plugged in; speaker damaged. | Increase volume. Unplug earphones. If still no sound, contact support. |
| TF card not recognized | Card inserted incorrectly; unsupported format; card corrupted. | Reinsert TF card correctly. Ensure files are in supported formats (MP3/WMA/WAV/APE/FLAC). Try a different TF card. |
Specifications
| Feature | Detail |
|---|---|
| Model Number | MI04 |
| Reception Range FM | 76.0-108MHz |
| Reception Range AM | 522-1710KHz (9KHZ) / 520-1710KHz (10KHZ) |
| Receiving Sensitivity FM | ≤2.5UV |
| Receiving Sensitivity AM | ≤20mV |
| Preset Radio Stations | Up to 30 channels |
| Speaker | Φ31mm 4Ω 3W |
| Signal-to-noise ratio FM | ≥45dB |
| Signal-to-noise ratio AM | ≥30dB |
| Rechargeable Battery | 3.7V/1100mAh Lithium Polymer |
| Charging Port | Type-C |
| Minimum Operating Voltage | 3.3V |
| Input Voltage | DC5V/1A |
| Earphone Output | Φ3.5mm/32Ω*2 |
| Product Dimensions | 91.2 x 56.3 x 24mm (3.59 x 2.21 x 0.94 inches) |
| Item Weight | 96.2g (3.39 ounces) |
| Supported Audio Formats (TF Card) | MP3/WMA/WAV/APE/FLAC |
Package Contents
The following items are included in your product package:
- 1 x AM FM Pocket Radio
- 1 x User Manual (this document)
- 1 x Type-C Charging Cable
Warranty and Support
For any questions, technical support, or warranty inquiries, please refer to the contact information provided by your retailer or the manufacturer. Keep your purchase receipt for warranty claims.