1. Introduction
This manual provides detailed instructions for the assembly, operation, and maintenance of your AutoFull G7 Ergonomic Office Chair. Please read this manual thoroughly before assembly and use to ensure proper function and safety.
2. Product Overview
The AutoFull G7 Ergonomic Office Chair is designed for optimal comfort and support during long periods of sitting. It features a 3-Zone Dynamic Lumbar system, 720° Dual-Axis Armrests, a T-Lock Support System with 4D Headrest, CloudTech Mesh for breathability, and a 140° Zero-Gravity Recline with a retractable footrest.

Figure 2.1: AutoFull G7 Ergonomic Office Chair (White variant).
3. Assembly Instructions
For a visual guide, please refer to the official installation video below. It is recommended to have two people for assembly.
Video 3.1: AutoFull G7 Installation Guide. This video demonstrates the step-by-step assembly process for the AutoFull G7 chair, including attaching the base, armrests, and backrest.
3.1. Components Overview
Ensure all components are present before beginning assembly. Refer to the accessories diagram in the installation video for a complete list.
- Backrest
- Seat Cushion
- Backrest Decorative Cover
- Headrest
- Armrests (Left and Right)
- Armrest Brackets
- Gas Lift
- Casters (x5)
- 5-Star Base
- Chair Legs (x5)
- Screws (Type-1, Type-2, Type-3, Type-4)
- L-shaped Hexagon Wrench
- Screwdriver
3.2. Step-by-Step Assembly
- Assemble the 5-Star Base:
- Insert each chair leg into the 5-star base.
- Flip the 5-star base upside down.
- Secure chair legs to the 5-star base using five Type-4 screws.
- Insert each caster into the mounting hole of the chair legs.
- Flip the 5-star base upright (casters touching the ground).
- Align and insert the gas lift into the central hole of the 5-star base.
- Attach Armrests:
- Place the backrest flat on the floor.
- Identify left/right armrests and align with backrest mounting holes.
- Secure one armrest bracket to the backrest using two Type-1 screws.
- Repeat the same process for the other armrest bracket.
- Position armrests with side buttons facing outward.
- Secure one armrest to the bracket with one Type-2 screw.
- Repeat the same process for the other armrest.
- Install Wire Controller:
- Remove pre-installed wire controller screws located on the side of the seat cushion.
- Align and position the wire controller over the mounting holes.
- Secure the wire controller using the screws removed earlier.
- Attach Backrest to Chassis:
- Align the backrest with the chassis mounting holes.
- Secure the backrest to the chassis using three Type-2 screws.
- Insert the assembled 5-star base and gas lift into the chassis mounting holes.
- Set the chair upright.
- Install Headrest:
- Align the headrest with the top backrest mounting holes.
- Secure the headrest to the backrest using two Type-3 screws.
- Attach Back Armor:
- Align the bottom buckle of the back armor with the corresponding buckle slot on the backrest.
- Engage two mounting posts on the split part of the back armor into the upper backrest holes.
4. Operating Instructions and Adjustments
Your AutoFull G7 chair offers multiple adjustment points for personalized comfort. Refer to the user guide video and instructions below.
Video 4.1: AutoFull G7 User Guide. This video demonstrates how to use the various adjustment features of the AutoFull G7 chair.
4.1. Seat Height Adjustment
- To raise the seat height: Stand up from the chair and lift the control lever on the right side of the seat cushion. The seat will rise automatically.
- To lower the seat height: Sit on the chair and lift the control lever on the right side of the seat cushion. The seat will lower.
- Release the lever to lock the seat at the desired height.
4.2. Armrest Adjustments
The 720° Dual-Axis Armrests offer extensive customization:
- Height Adjustment: Flip the outer armrest paddle upward to lift, or press the armrest for height adjustment.
- Position Adjustment (Forward/Backward): Press and hold the armrest while pushing it forward or backward.
- Angle Adjustment: Lift the front edge of the armrest surface.
- Rotation (360° Swivel): Rotate the armrest handle for 360° rotation. Rotate the armrest surface for 360° swivel.
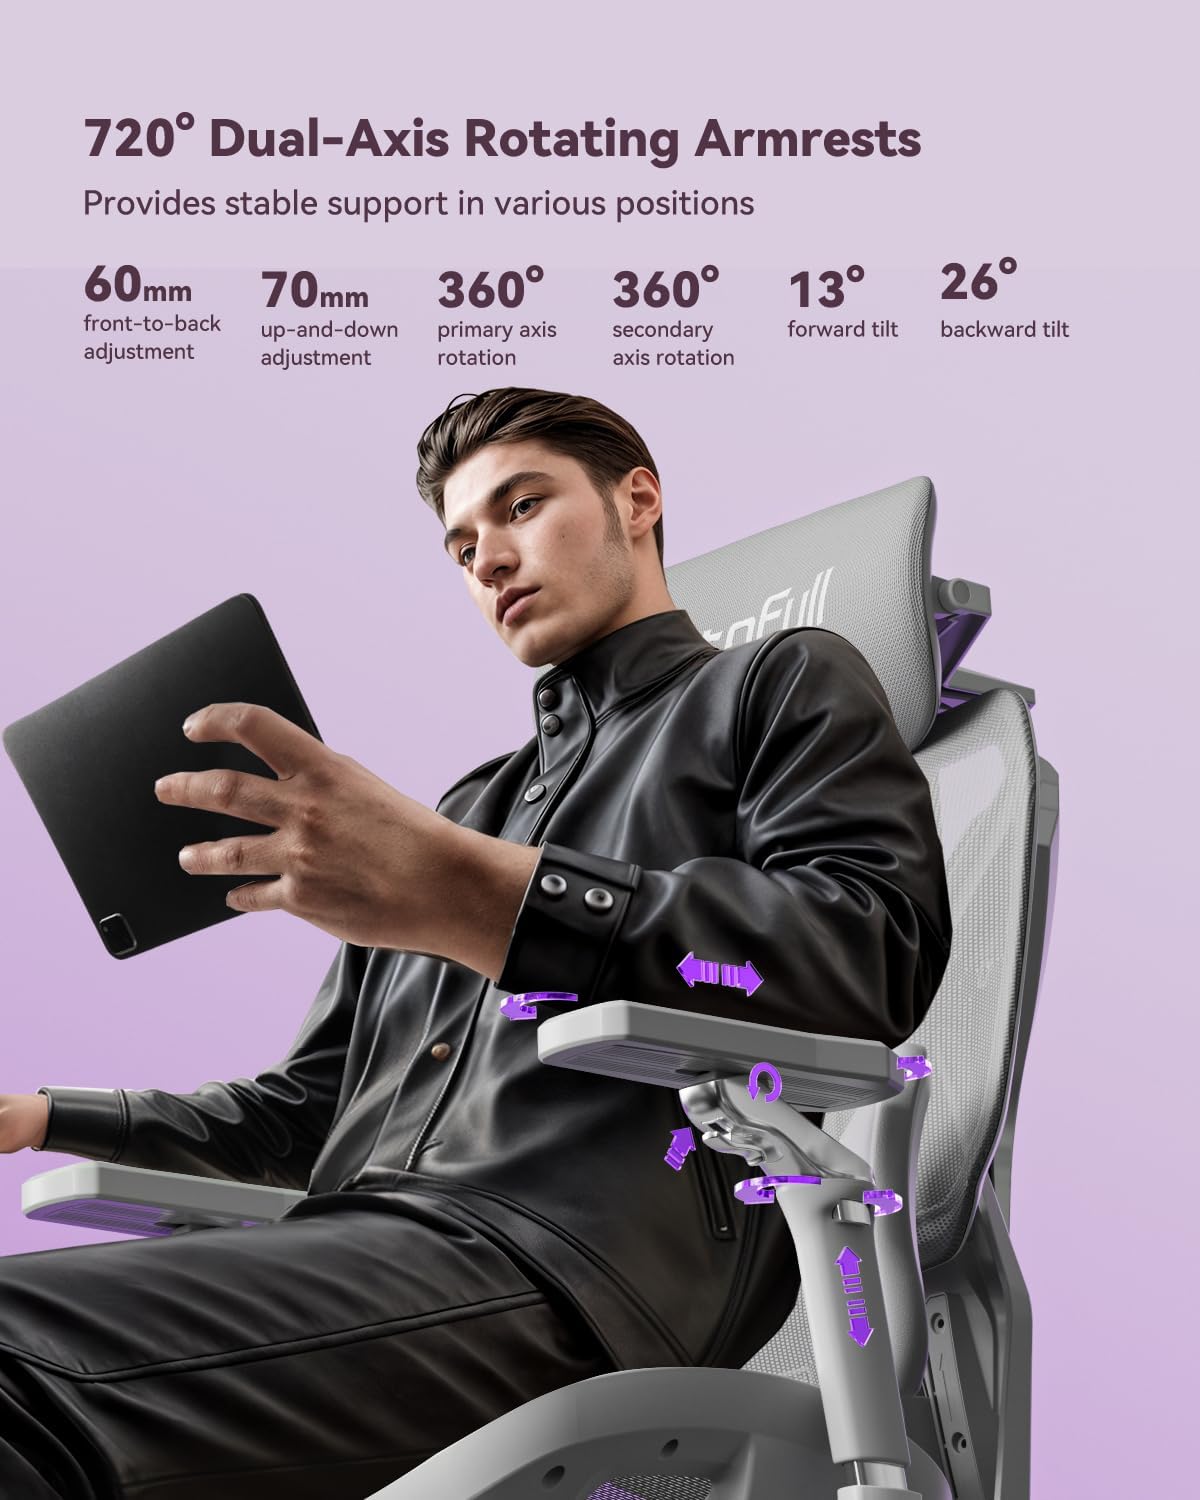
Figure 4.2: Illustration of 720° Dual-Axis Rotating Armrests.
4.3. Headrest Adjustments
The 4D Dual-Axis Headrest provides comprehensive neck support:
- Height Adjustment: Pull the headrest up/down.
- Front-Back Position Control: Pull the headrest forward for front-back position control.
- Tilt Adjustment: Rotate the primary axis at the headrest base.
- Rotation Angle Adjustment: Grip the upper part of the headrest mesh on both sides and move it up/down.
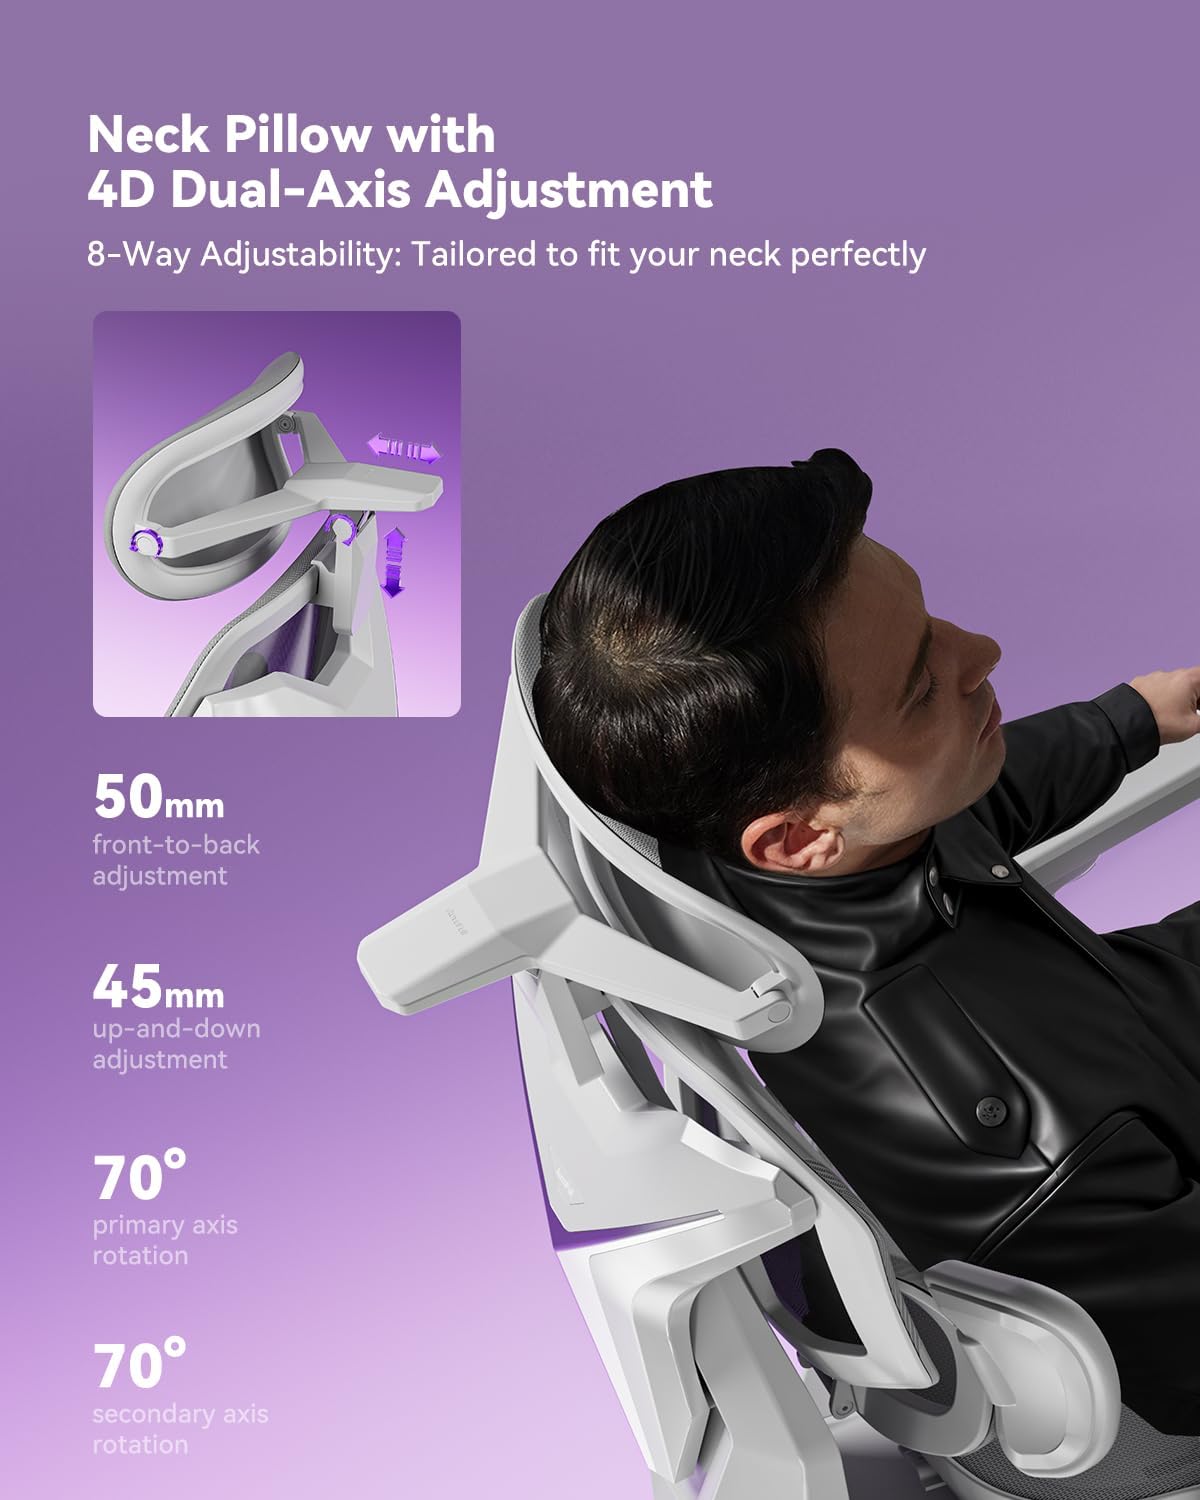
Figure 4.3: Illustration of 4D Dual-Axis Headrest Adjustment.
4.4. Lumbar Support Adjustments
The 3-Zone Dynamic Lumbar support adapts to your body:
- Vertical Positioning: Grip both sides of the lumbar support bracket and press to adjust its vertical position.
- Side Wing Tilt: The side cushioning offers 40° side wing tilt.
- Side Cushioning: The side cushioning provides 14° side cushioning that actively wraps around your lower back.
- Lumbar Rotation: The lumbar support allows for 12° rotation.
- Recline Tracking: Features stepless 0.8" recline tracking.
- Locking Lumbar Support: Lift the control lever to lock the lumbar support in place. When the control lever is in the lower position, the lumbar support will automatically adjust forward/backward to follow your waist.

Figure 4.4: Illustration of Auto Dynamic Lumbar Support.
4.5. Seat Depth Adjustment
- Push the adjustment lever forward to adjust the seat depth. The seat can be adjusted by 2 inches.

Figure 4.5: Illustration of 50mm Seat Depth Adjustment.
4.6. Recline Function and Footrest
- Recline: Pull the adjustment lever backward and lean back to activate the recline function. The chair reclines up to 140°.
- Lock Recline: Return the adjustment lever to its original position to lock the reclining angle.
- Footrest: Pull out the footrest and flip it outward to activate the footrest function. Retract the footrest when not in use.
5. Maintenance
To ensure the longevity and optimal performance of your AutoFull G7 chair, follow these maintenance guidelines:
- Cleaning: Wipe clean with a damp cloth. Avoid harsh chemicals that may damage the mesh or frame.
- Regular Checks: Periodically check all screws and bolts to ensure they are tight. Re-tighten if necessary.
- Mesh Care: The CloudTech mesh is designed for durability and breathability. Avoid sharp objects that could tear the mesh.
- Gas Lift: The TUV/SGS Class-4 gas lift is designed for long-term use. Do not attempt to disassemble or repair it yourself.
6. Troubleshooting
If you encounter any issues with your AutoFull G7 chair, please refer to the following common solutions:
| Problem | Possible Cause | Solution |
|---|---|---|
| Chair does not adjust height | Gas lift not engaged or faulty. | Ensure the control lever is fully lifted. If the issue persists, contact customer support. |
| Chair is wobbly | Loose screws or improper assembly. | Check and tighten all assembly screws, especially those connecting the base, chassis, and backrest. |
| Armrests are loose or difficult to adjust | Locking mechanism not engaged or debris. | Ensure adjustment paddles/buttons are fully engaged. Clean any debris from the mechanism. |
| Backrest does not recline or lock | Recline lever not properly engaged. | Ensure the recline adjustment lever is pulled backward to recline and returned to its original position to lock. |
If these solutions do not resolve the issue, please contact AutoFull customer support.
7. Specifications
| Feature | Detail |
|---|---|
| Brand | AutoFull |
| Model Name | AFG701 |
| Color | White |
| Material | Metal, Polyester |
| Product Dimensions (D x W x H) | 28"D x 25"W x 43"H |
| Item Weight | 66 Pounds |
| Maximum Weight Recommendation | 330 Pounds (150kg) |
| Gas Lift Class | TUV/SGS Class-4 |
| Recline Angle | Up to 140° |
| Recommended Height | 155-195 cm (61-76.8 inches) |
| Certifications | IGR ergonomic certified, Bifma certified (120,000+ cycle tested) |
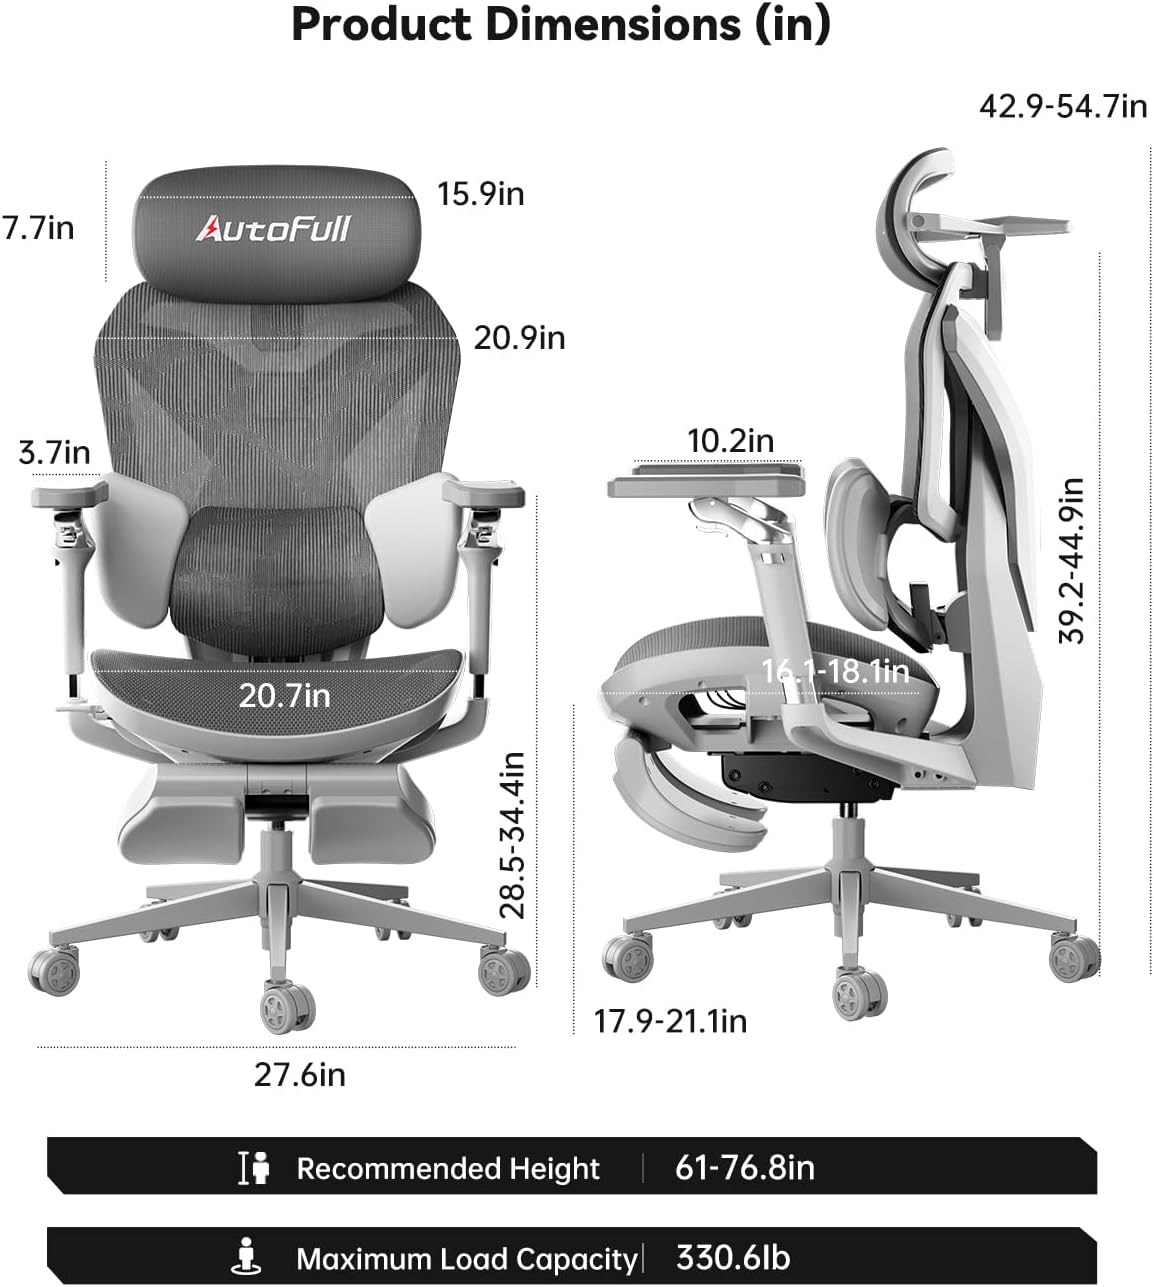
Figure 7.1: Product Dimensions (in inches) and Recommended Height/Load Capacity.

Figure 7.2: AutoFull G7 Certifications.
8. Warranty and Support
- Warranty: The AutoFull G7 chair comes with a 3-year warranty and a lifetime warranty on the frame.
- Returns: Enjoy 30-day easy returns.
- Customer Support: 24/7 support is available. For assistance, please visit the AutoFull Store on Amazon or contact their customer service directly.

Figure 8.1: AutoFull After-Sales Service Information.