1. Introduction
Thank you for choosing the AutoFull G7 Ergonomic Gaming Chair. This manual provides detailed instructions for assembly, operation, maintenance, and troubleshooting to ensure optimal performance and longevity of your chair. Please read this manual thoroughly before use and retain it for future reference.
2. Safety Information
Please observe the following safety guidelines:
- Always assemble the chair according to the provided instructions.
- The chair weighs approximately 66 pounds (30 kg). Assistance may be required for moving or lifting.
- Keep the chair on a stable, level surface to prevent tipping.
- Do not stand on the chair or use it as a step stool.
- Do not sit on the armrests.
- Ensure all bolts and screws are tightened before use. Periodically check and re-tighten as necessary.
- Maximum weight recommendation: 300 pounds (136 kg).
3. Product Overview
The AutoFull G7 Ergonomic Gaming Chair is designed for comfort and adjustability, featuring a 3-zone dynamic lumbar support system, 720° dual-axis armrests, and a 140° zero-gravity recline. It incorporates breathable CloudTech mesh for enhanced airflow and an innovative T-Lock structure for comprehensive support.
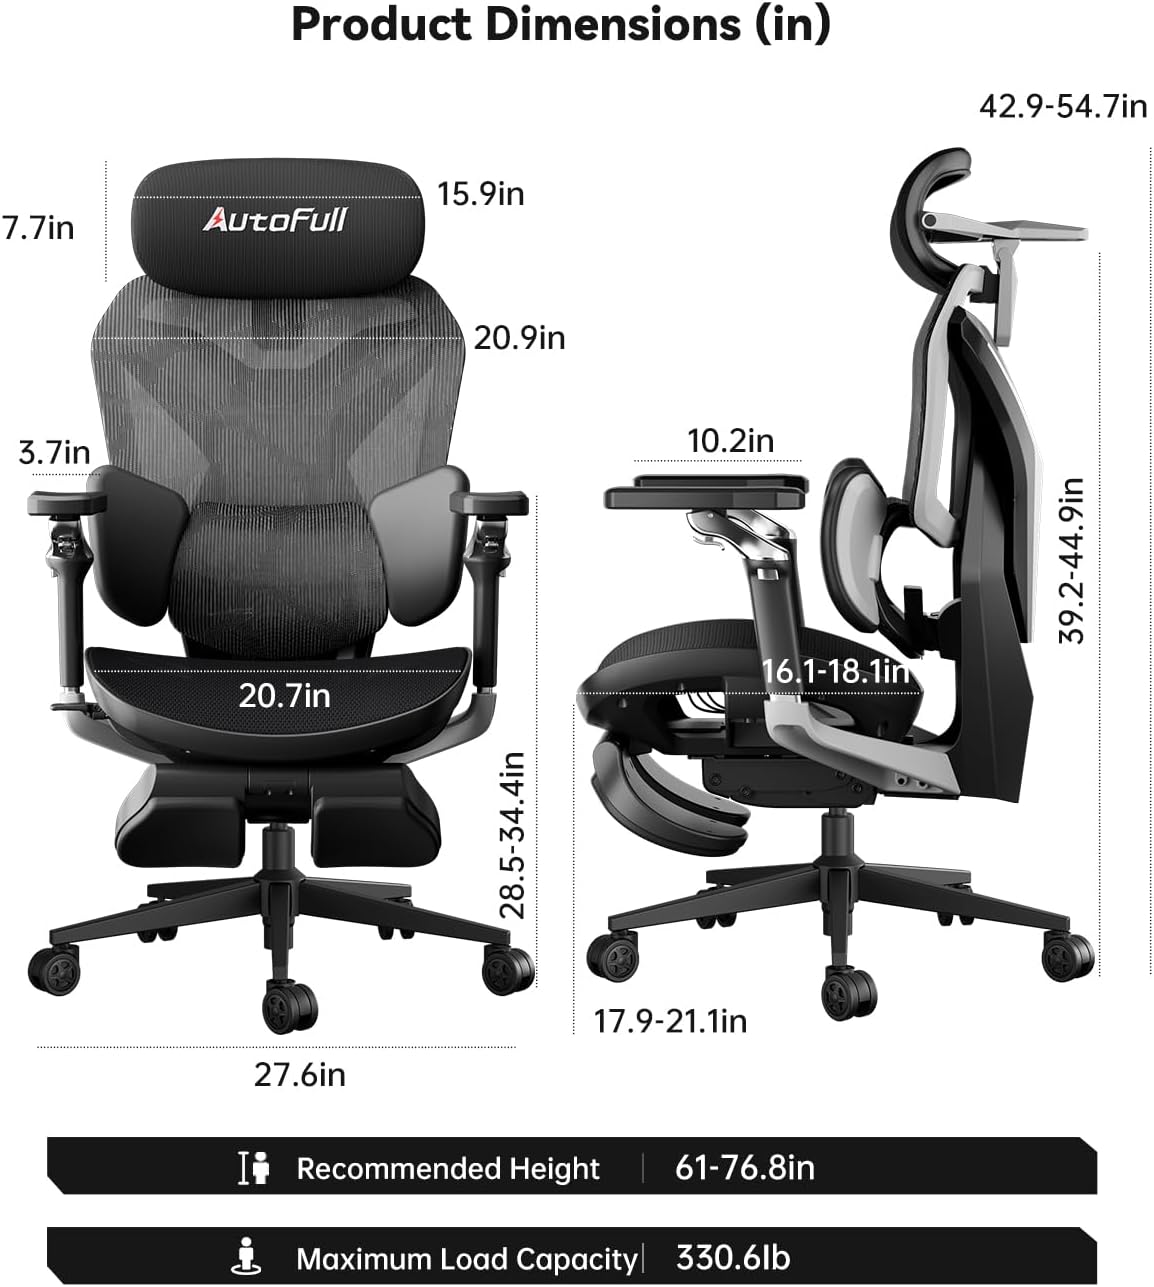
Figure 1: Product Dimensions. This image displays the chair from a side and front view, detailing various dimensions in inches, including seat height, backrest height, armrest height, and overall chair dimensions. Recommended height is 61-76.8 inches, and maximum load capacity is 330.6 lbs.
4. Assembly Instructions
For a visual guide on assembling your AutoFull G7 chair, please refer to the official user guide video below. The video demonstrates the step-by-step assembly process.
Video 1: AutoFull G7 User Guide Video. This video provides a comprehensive visual guide for assembling and adjusting the AutoFull G7 Ergonomic Gaming Chair.
5. Adjustment & Operation
The AutoFull G7 chair offers extensive adjustability to customize your seating experience. Refer to the user guide video in Section 4 for visual demonstrations of these adjustments.
5.1. Seat Height Adjustment
To adjust the seat height:
- Stand up from the chair.
- Lift the control lever located on the right side of the seat cushion to raise the chair height.
- Sit on the chair.
- Lift the control lever again to lower the chair to your desired height. Release the lever to lock the height.
5.2. Armrest Adjustment (720° Dual-Axis)
The armrests offer multi-directional adjustment:
- Height Adjustment: Flip the outer armrest paddle upward or press the armrest for height adjustment.
- Forward/Backward Position: Press and hold the armrest while pushing it forward or backward.
- Angle Adjustment: Lift the front edge of the armrest surface. Lift to the highest position to reset.
- 360° Rotation: Rotate the armrest handle for 360° rotation.
- 360° Swivel: Rotate the armrest surface for 360° swivel.

Figure 2: 720° Dual-Axis Rotating Armrests. This image illustrates the various adjustment points of the armrests, including height, forward/backward slide, and rotational capabilities.
5.3. Headrest Adjustment (4D Dual-Axis)
Adjust the headrest for optimal neck support:
- Height Adjustment: Pull the headrest up or down.
- Front-to-Back Position: Pull the headrest forward or backward.
- Tilt Adjustment: Rotate the primary axis at the headrest base.
- Rotation Angle: Grip the upper part of the headrest mesh on both sides and move it up/down to adjust the rotation angle.

Figure 3: Neck Pillow with 4D Dual-Axis Adjustment. This image highlights the headrest's adjustability for height, front-to-back position, and dual-axis rotation to tailor cervical support.
5.4. Lumbar Support Adjustment (3-Zone Dynamic)
The 3-zone dynamic lumbar support adapts to your lower back:
- Vertical Positioning: Lift up/down both sides of the backrest for height adjustment. Grip both sides of the lumbar support bracket to lift or press for vertical positioning.
- Dynamic Movement: The lumbar support can slide up and down slightly to follow and support the movement of your waist.
- Side Support: The two sides of the lumbar support can be folded inward to provide lateral support.
- Locking Lumbar Support: Lift the control lever to lock the lumbar support in place. When the control lever is in the lower position, the lumbar support will automatically adjust forward/backward to follow your waist.

Figure 4: Auto Dynamic Lumbar Support. This image shows the lumbar support system, illustrating its ability to adjust vertically, and dynamically move with the user's waist for continuous support.
5.5. Seat Depth Adjustment
Adjust the seat depth to fit your leg length:
- Push the adjustment lever forward to adjust the seat depth.

Figure 5: 50mm Seat Depth Adjustment. This image details the mechanism for adjusting the seat depth, allowing users to find a comfortable position for their legs.
5.6. Recline Function (140° Zero-Gravity)
To recline the chair:
- Pull the adjustment lever backward to activate the recline function.
- Lean back to your desired angle (up to 140°).
- Return the adjustment lever to its original position to lock the reclining angle.
- To return to an upright position, pull the adjustment lever backward again and lean forward.
5.7. Footrest Operation
The integrated footrest provides additional comfort during recline:
- Pull out the footrest from underneath the seat.
- Flip it outward to activate the footrest function.
- When not in use, retract the footrest back under the seat.

Figure 6: Recline and Footrest in use. This image shows a user comfortably reclined in the chair with the footrest extended, demonstrating the zero-gravity recline feature.
5.8. Backrest Height Adjustment
The backrest height can be adjusted to suit different user heights:
- Lift up/down both sides of the backrest for height adjustment.

Figure 7: Adjustable Backrest Height. This image shows the backrest with numerical indicators, demonstrating its vertical adjustability to accommodate users of various heights.
5.9. Customizable Backplate
The chair features a tool-free customizable backplate, allowing for quick design changes.

Figure 8: Customizable Back Armor. This image displays the chair's back with a customizable panel, highlighting the design flexibility.
6. Maintenance
To maintain the quality and appearance of your AutoFull G7 chair:
- Cleaning: Wipe clean with a damp cloth. Avoid harsh chemicals or abrasive cleaners.
- Mesh Care: The CloudTech mesh is designed for durability and breathability. Regularly dust the mesh to prevent accumulation.
- Inspection: Periodically check all screws and bolts to ensure they are tight. Re-tighten if necessary.
7. Troubleshooting
If you encounter any issues with your AutoFull G7 chair, please refer to the following common solutions:
- Chair not adjusting height: Ensure the control lever is fully engaged. Check for any obstructions under the seat.
- Squeaking noises: Check and tighten all assembly screws. Lubricate moving parts if necessary.
- Lumbar support not moving: Ensure the lumbar lock lever is in the unlocked position for dynamic adjustment.
- Armrests are loose: Check the screws securing the armrests and tighten them.
For further assistance, please contact AutoFull customer support.
8. Specifications
| Feature | Detail |
|---|---|
| Brand | AutoFull |
| Model Name | AFG701 |
| Color | Black |
| Material | Metal (Frame), Polyester (Fill) |
| Product Dimensions (D x W x H) | 28"D x 25"W x 43"H |
| Item Weight | 66 Pounds |
| Maximum Weight Recommendation | 300 Pounds |
| Reclining Position Count | 4 |
| Required Assembly | Yes |
| Certifications | IGR ergonomic certified, BIFMA certified (120,000+ cycle tested), TUV/SGS Class-4 gas lift |
9. Warranty & Support
The AutoFull G7 Ergonomic Gaming Chair comes with a 3-year warranty and a frame lifetime warranty. AutoFull also provides 24/7 customer support for any inquiries or issues you may have.
For warranty claims or technical support, please visit the official AutoFull website or contact their customer service team directly. Contact information can typically be found on the product packaging or the AutoFull brand store on Amazon: AutoFull Store.