LASE JA4201, JA4207, JA4208, S4115, NB074960
LASE Replacement Diaphragm Instruction Manual
For Yamaha Models: JA4201, JA4207, JA4208, S4115, NB074960 (8 Ohms)
1. Introduction
This manual provides instructions for the proper installation and care of your LASE replacement diaphragm. This component is designed to restore the performance of compatible Yamaha speaker drivers. Please read this manual thoroughly before proceeding with installation to ensure correct procedure and optimal results.
2. Safety Information
- Always disconnect power to the speaker system and amplifier before beginning any installation or repair work.
- Handle the diaphragm by its edges to avoid damaging the delicate dome or voice coil.
- Use appropriate tools and wear protective eyewear if necessary during the installation process.
- If you are unsure about any step or lack experience with speaker repair, consult a qualified audio technician.
3. Compatibility
This LASE replacement diaphragm is compatible with the following Yamaha speaker driver models:
- Yamaha NB074960
- Yamaha JA-4201 (also known as JAY-4201, JA4201)
- Yamaha JA-4207 (also known as JAY-4207, JA4207)
- Yamaha JA-4208 (also known as JAY-4208, JA4208)
- Yamaha S-4115 (also known as S4115)
- Yamaha S-4115H (also known as S4115H)
This diaphragm is specifically designed for 8-ohm impedance speaker systems.
4. Product Specifications
The LASE replacement diaphragm features the following technical specifications:
| Feature | Specification |
|---|---|
| Overall Diameter | 2.75" (70.42mm) |
| Voice Coil Diameter | 1.65" (42.04mm) |
| Impedance | 8 Ω |

Figure 1: Front view of the LASE replacement diaphragm, showing the metallic dome and voice coil assembly within its black mounting ring. This image illustrates the overall design and connection terminals.
5. Installation Guide
Follow these steps carefully to replace the diaphragm in your compatible Yamaha speaker driver. Precision is key for optimal performance.
- Preparation: Ensure the speaker system is completely disconnected from power. Place the speaker driver on a clean, stable, and well-lit surface.
- Access the Diaphragm: Carefully remove any screws or clips securing the driver's rear cover or horn assembly to expose the existing diaphragm. Pay attention to the orientation of any wires.
- Disconnect Old Diaphragm: Gently desolder or unclip the wires connected to the terminals of the old diaphragm. Exercise caution to avoid damaging the driver's magnet assembly or existing wiring.
- Remove Old Diaphragm: Carefully lift out the old diaphragm. It may be held in place by a gasket or light adhesive. Inspect the magnet gap for any debris and clean it thoroughly using compressed air or a soft brush if necessary.
- Install New Diaphragm: Position the new LASE replacement diaphragm into the driver assembly, ensuring it sits flush and is correctly aligned. The terminals should align with the existing wiring points.

Figure 2: Top-down view of the LASE replacement diaphragm, featuring a metallic outer ring and the central dome. This perspective highlights the precision engineering of the component.
- Connect New Diaphragm: Carefully solder or clip the speaker wires to the terminals of the new diaphragm. Ensure correct polarity (positive to positive, negative to negative) if marked, as incorrect polarity can affect sound quality.
- Test (Optional but Recommended): Before fully reassembling, you may perform a low-volume audio test to ensure the diaphragm is functioning correctly and there are no buzzing or distortion sounds.
- Reassembly: Securely reattach the driver's rear cover or horn assembly. Ensure all screws are tightened appropriately, but do not overtighten, which could warp components.
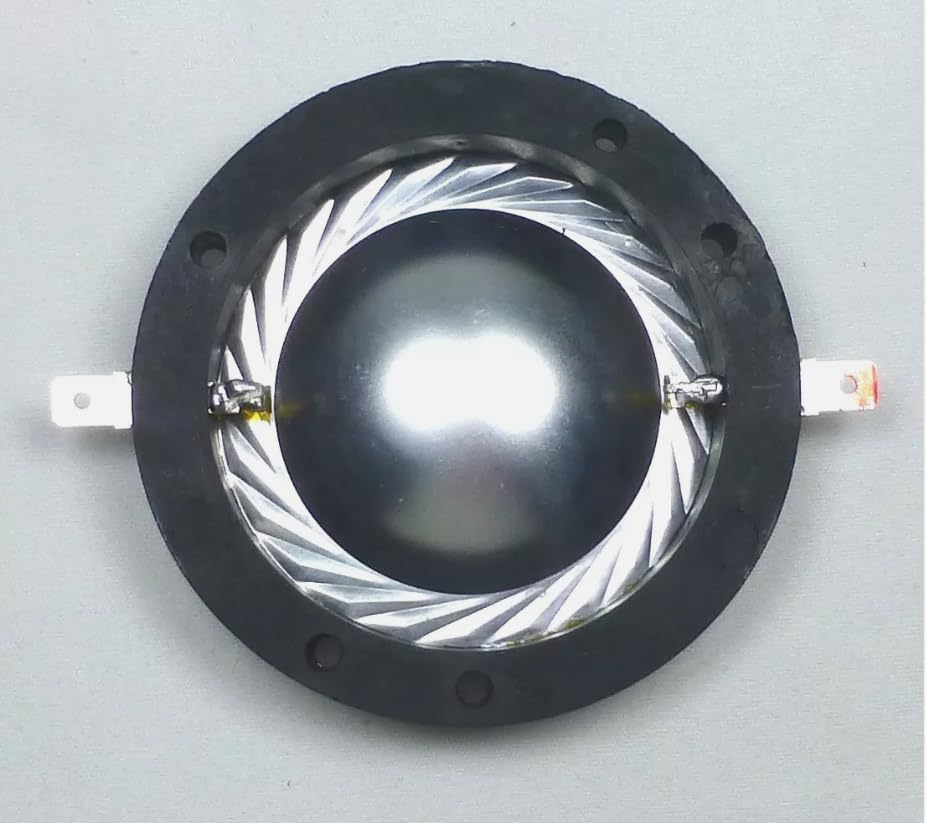
Figure 3: Angled view of the LASE replacement diaphragm, showing the black mounting ring and the reflective dome. This image provides a clearer look at the connection points and the voice coil's edge.
6. Operation
Once the LASE replacement diaphragm is correctly installed, the speaker driver will function as intended. No special operating procedures are required beyond the normal use of your speaker system. Ensure your amplifier's power output does not exceed the speaker's rated capacity to prevent damage to the diaphragm or other speaker components.
7. Maintenance
The LASE replacement diaphragm requires minimal maintenance to ensure its longevity and performance.
- Keep the speaker system in a clean, dry environment, away from excessive dust or moisture.
- Avoid exposing the speaker to extreme temperatures or direct sunlight for prolonged periods.
- Do not attempt to clean the diaphragm dome directly, as this can cause irreparable damage.
- If the speaker is stored for extended periods, ensure it is protected from physical impact and environmental elements.
8. Troubleshooting
If you encounter issues after installing the replacement diaphragm, consider the following common problems and solutions:
- No Sound:
- Check all wiring connections for proper soldering or secure clips.
- Verify correct polarity of the diaphragm connections.
- Ensure the speaker cable is securely connected to the amplifier.
- Test the amplifier with another speaker to rule out amplifier issues.
- Distorted Sound / Buzzing:
- Ensure the diaphragm is seated correctly and flush within the driver assembly.
- Check for any debris in the magnet gap that might be interfering with the voice coil.
- Verify that the screws holding the driver assembly are tightened evenly and not overtightened.
- Ensure the amplifier is not overdriving the speaker, leading to clipping.
- Low Volume:
- Recheck wiring and polarity. Incorrect polarity can cause phase cancellation, leading to reduced output.
- Ensure the amplifier's output level is appropriate for the speaker.
If problems persist after attempting these troubleshooting steps, it is recommended to consult a professional audio technician for further assistance.
9. Warranty and Support
For information regarding warranty coverage or technical support for your LASE replacement diaphragm, please refer to the purchase documentation provided at the time of sale or contact your retailer directly. Always retain your proof of purchase for any warranty claims or support inquiries.