
1. Introduction
This manual provides essential information for the safe and efficient operation of your PLPFUDVDZZ TDGC2-5KVA 0-300V AC Regulator. Please read these instructions carefully before installation and use to ensure proper function and to prevent damage or injury. This device is a single-phase contact autocoupler designed to provide an adjustable AC output voltage from 0 to 300V, with a maximum power output of 5000W (5KVA).
2. Safety Instructions
- Electrical Hazard: This device operates with high voltage. Always disconnect power before making any connections or performing maintenance.
- Grounding: Ensure the unit is properly grounded to prevent electric shock. Refer to the wiring diagram for correct grounding procedures.
- Ventilation: Do not obstruct the ventilation openings. Ensure adequate airflow around the unit to prevent overheating.
- Environment: Operate the regulator in a dry, well-ventilated area, away from flammable materials, moisture, and corrosive gases.
- Overload Protection: Do not exceed the rated power (5000W / 5KVA) or current (20A) of the device. Overloading can cause damage to the unit and connected equipment.
- Professional Installation: If you are unfamiliar with electrical wiring, seek assistance from a qualified electrician.
3. Product Overview
The PLPFUDVDZZ TDGC2-5KVA AC Regulator features a robust design with a digital display for precise voltage monitoring and an adjustment knob for output control.

Figure 3.1: Front view of the PLPFUDVDZZ TDGC2-5KVA AC Regulator, showing the adjustment knob and ventilation slots.
3.1 Components
- Digital Display: Shows the output voltage in real-time.
- Voltage Adjustment Knob: Used to precisely set the desired output voltage.
- Input Terminals: For connecting the 220V AC power source.
- Output Terminals: For connecting the load requiring adjustable AC voltage.
- Grounding Terminal: For safety grounding connection.
4. Specifications

Figure 4.1: Technical specifications and approximate dimensions of the TDGC2-5KVA AC Regulator.
| Parameter | Value |
|---|---|
| Model | TDGC2-5KVA |
| Rated Power | 5000W (5KVA) |
| Input Voltage | 220V AC, Single-Phase |
| Output Voltage | 0-300V AC, Adjustable |
| Rated Current | 20A |
| Weight | 37.5 lbs (approx. 17 kg) |
| Dimensions (L x W x H) | Approx. 235mm x 255mm x [Height not specified in image, but typical for this form factor] |
5. Setup
5.1 Placement
Place the AC regulator on a stable, level surface. Ensure there is sufficient space around the unit for proper ventilation. Avoid placing it near heat sources or in direct sunlight.
5.2 Wiring Connections
Before making any connections, ensure the regulator is switched off and disconnected from the main power supply. Refer to the wiring diagram below for correct connections.
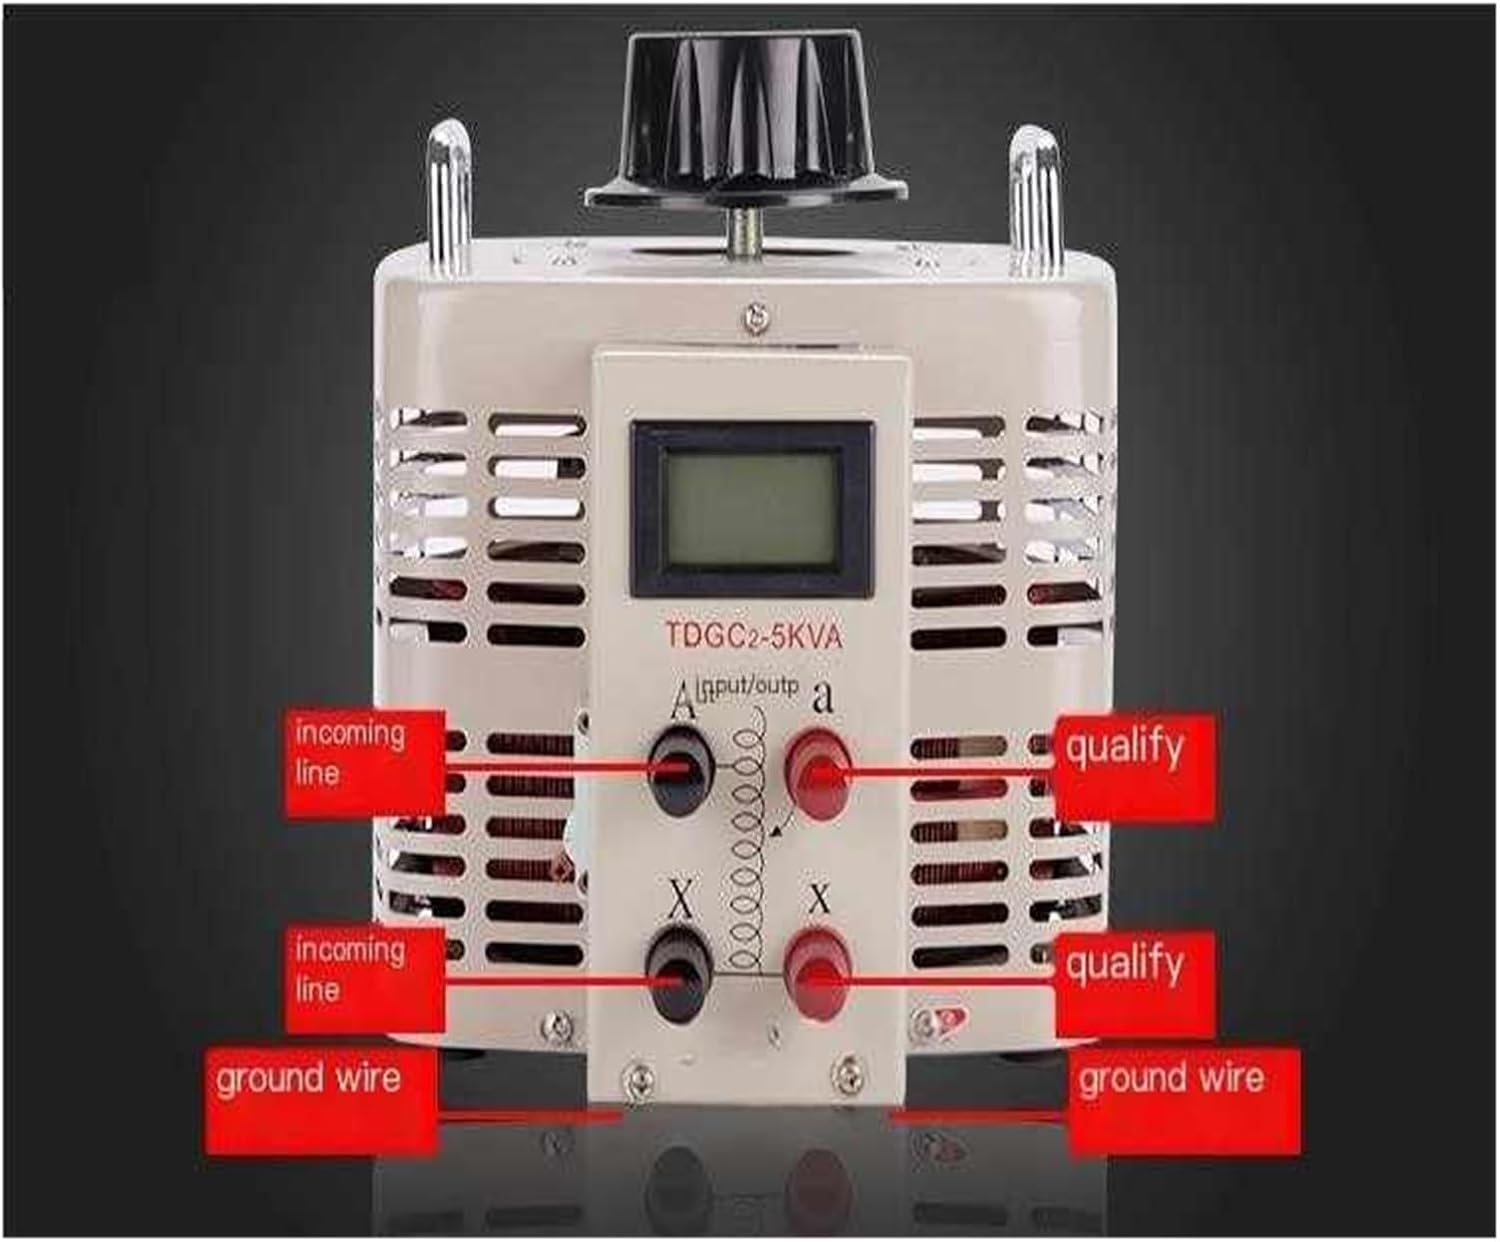
Figure 5.1: Wiring diagram for the TDGC2-5KVA AC Regulator, showing input, output, and ground connections.
- Input Connection: Connect the 220V AC incoming line to the designated input terminals. The diagram labels these as 'incoming line'.
- Output Connection: Connect your load (device requiring adjustable voltage) to the output terminals. The diagram labels these as 'qualify'.
- Grounding: Connect a reliable ground wire to the grounding terminal on the regulator. This is crucial for safety. The diagram labels this as 'ground wire'.
Ensure all connections are secure and properly insulated to prevent short circuits or accidental contact.
6. Operating Instructions
6.1 Power On
- Before powering on, ensure the voltage adjustment knob is set to its minimum output position (fully counter-clockwise).
- Connect the regulator to the 220V AC main power supply.
- Turn on the power switch (if present) or connect the main power. The digital display should illuminate.
6.2 Adjusting Output Voltage
- Slowly rotate the voltage adjustment knob clockwise to increase the output voltage.
- Observe the digital display to monitor the output voltage in real-time.
- Adjust the knob until the desired output voltage is reached. Do not exceed the maximum rated output voltage of 300V.
6.3 Power Off
- Before disconnecting power, rotate the voltage adjustment knob fully counter-clockwise to the minimum output voltage.
- Disconnect the regulator from the main power supply.
7. Maintenance
- Cleaning: Regularly clean the exterior of the unit with a dry, soft cloth. Do not use liquid cleaners or solvents. Ensure ventilation openings are free from dust and debris.
- Inspection: Periodically inspect all wiring connections for tightness and signs of wear or damage. Replace any damaged cables immediately.
- Storage: When not in use for extended periods, store the regulator in a dry, cool, and dust-free environment.
No user-serviceable parts are inside. For internal repairs, contact qualified service personnel.
8. Troubleshooting
| Problem | Possible Cause | Solution |
|---|---|---|
| No output voltage / Digital display off | No input power; Loose connections; Internal fuse blown. | Check main power supply; Verify all wiring connections; If fuse is suspected, contact service personnel. |
| Output voltage unstable or incorrect | Loose connections; Overload; Faulty load. | Check all connections; Ensure load does not exceed 5000W/20A; Test with a different load. |
| Unit overheats | Poor ventilation; Overload. | Ensure adequate airflow around the unit; Reduce load to within specifications. |
If the problem persists after attempting these solutions, discontinue use and contact customer support.
9. Warranty and Support
This product is typically covered by a standard manufacturer's warranty against defects in materials and workmanship. Please refer to your purchase documentation or contact your retailer for specific warranty terms and conditions. For technical support or service inquiries, please contact the vendor or manufacturer directly using the contact information provided at the time of purchase.