1. Important Safety Information
Please read all instructions carefully before using your ICEVOKE water cooler dispenser. Retain this manual for future reference.
- Always ensure the unit is placed on a flat, stable surface.
- Do not operate the dispenser without a water bottle installed and properly primed.
- Keep children away from the hot water dispenser area due to the risk of scalding. The child safety lock feature should always be engaged.
- Do not immerse the appliance, cord, or plug in water or other liquids.
- Unplug the dispenser before cleaning or performing any maintenance.
- Ensure proper ventilation around the unit.
2. Product Overview
The ICEVOKE BY605-A is a bottom-loading water cooler dispenser designed for convenience and safety, offering hot, room temperature, and cold water options.
Key Features:
- Three Temperature Settings: Hot, Room, and Cold water spouts.
- Bottom Loading Design: Accommodates 3 or 5-gallon water bottles (not included) for easy replacement.
- Child Safety Lock: Prevents accidental hot water dispensing.
- LED Display: Indicates heating, cooling, and empty bottle status.
- Self-Cleaning Function: UV sterilization helps maintain water purity.
- Stainless Steel Design: Durable and aesthetically pleasing.
Product Dimensions:
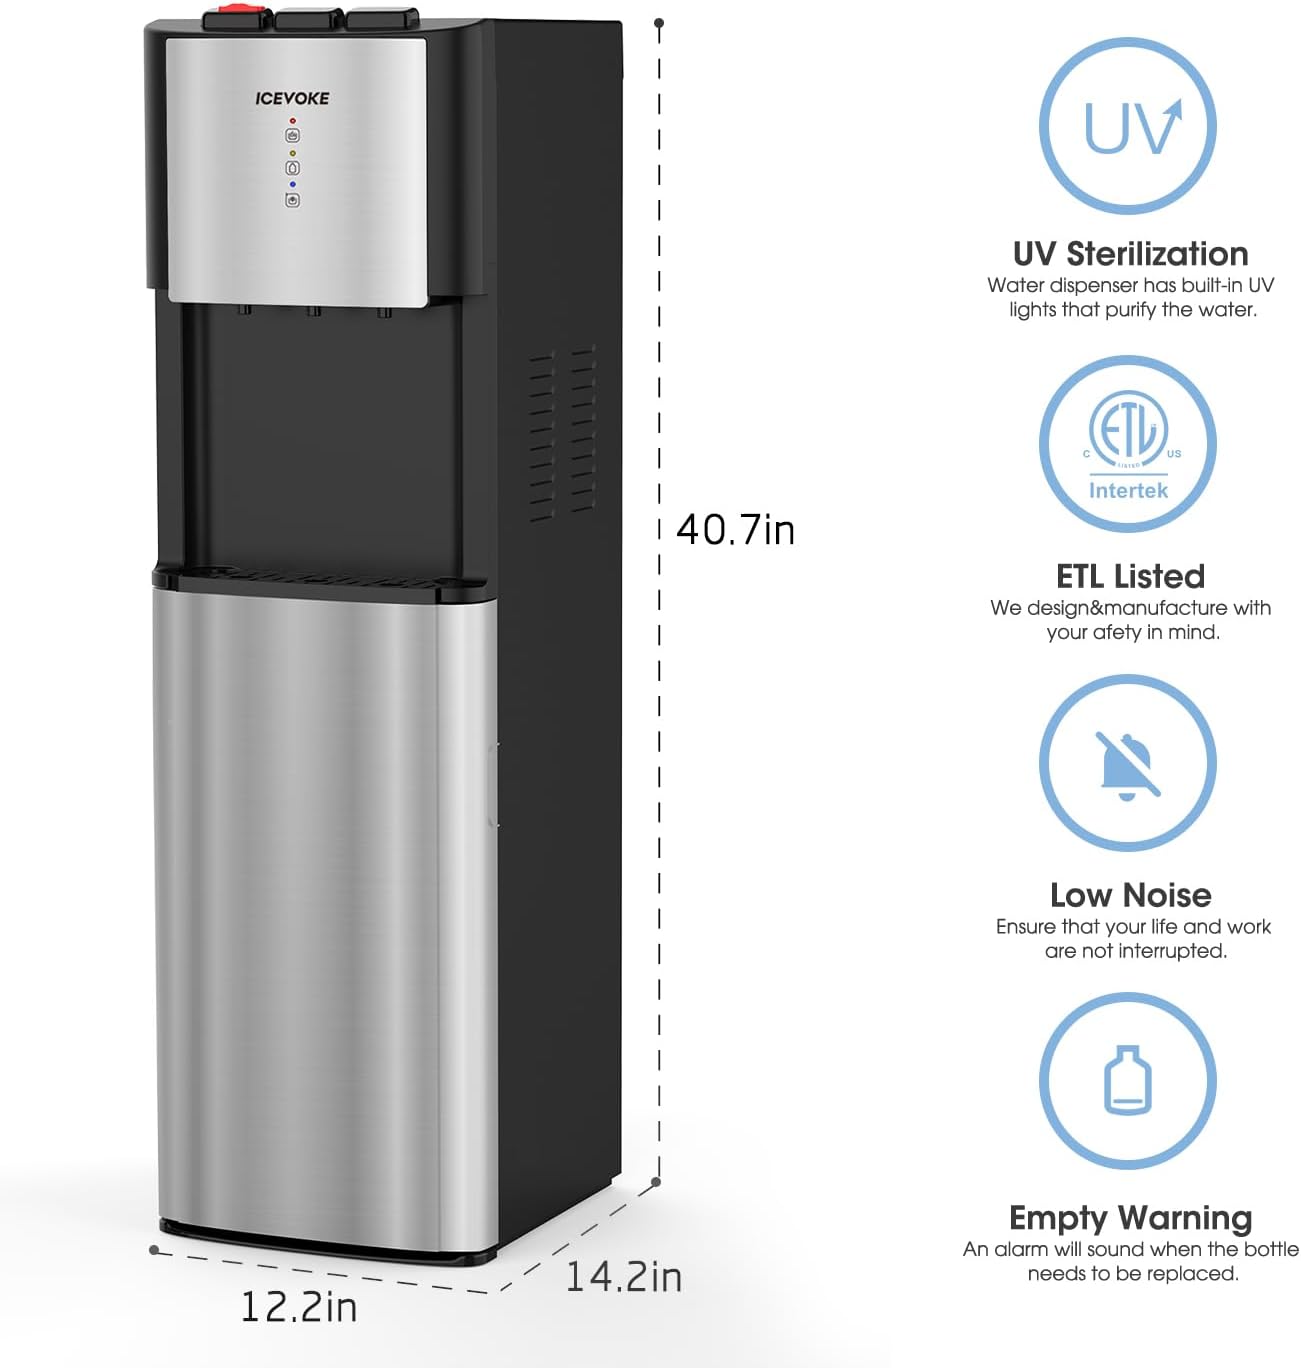
Image: Front view of the ICEVOKE water cooler dispenser with key dimensions: 12.2 inches width, 14.2 inches depth, and 40.7 inches height.
The unit measures approximately 14 inches (D) x 12 inches (W) x 40 inches (H).
3. Setup Instructions
3.1 Unpacking and Placement
- Carefully remove the dispenser from its packaging.
- Place the dispenser upright on a hard, level surface. Ensure there is at least 4 inches of clearance from the wall for proper ventilation.
- Clean the exterior of the unit with a soft, damp cloth.
3.2 Water Bottle Installation
This dispenser uses a bottom-loading design, eliminating the need to lift heavy bottles.
- Open the lower cabinet door.
- Remove the cap from a new 3 or 5-gallon water bottle.
- Insert the probe from the dispenser into the opening of the water bottle. Ensure the probe is securely seated.
- Slide the water bottle into the cabinet and close the door. The dispenser will not operate if the door is open.
3.3 Initial Priming and Power-On
Before plugging in the unit, ensure water has filled the internal tanks.
- After installing the water bottle, wait approximately 5 minutes for the internal tanks to fill.
- Place a cup under each spout (hot, room, cold) and press the dispensing lever until water flows steadily from each. This purges air from the system.
- Plug the power cord into a grounded electrical outlet.
- Locate the hot and cold power switches on the back of the unit. Turn both switches to the 'ON' position.
- The heating and cooling indicator lights on the front panel will illuminate.
Video: This video demonstrates the process of installing the water jug and performing initial water dispensing to prime the unit before turning on heating and cooling functions.
4. Operating Instructions
4.1 Dispensing Water
The dispenser offers three temperature options:

Image: A detailed view of the dispenser's control panel, highlighting the three temperature options: Hot (red icon), Room (yellow icon), and Cold (blue icon).
- Cold Water: Place your cup under the cold water spout and press the blue lever.
- Room Temperature Water: Place your cup under the room temperature water spout and press the yellow lever.
- Hot Water: This spout features a child safety lock. To dispense hot water, slide the red safety lock button to the left and then press the red lever.

Image: A close-up showing the red child safety lock button on the hot water dispenser, with an arrow indicating to slide it left before pressing.
4.2 LED Indicators
- Red Light: Indicates the hot water is heating. It will turn off when the desired temperature is reached.
- Blue Light: Indicates the cold water is cooling. It will turn off when the desired temperature is reached.
- Empty Bottle Alert: A dedicated LED light will illuminate when the water bottle in the lower cabinet is empty and needs replacement.
5. Maintenance
5.1 Self-Cleaning Function (UV Sterilization)
The ICEVOKE BY605-A features a UV sterilization system to help keep the water tanks clean. This function operates periodically to reduce biofilm and other contaminants.

Image: A graphic depicting the UV-infused cleaning process, illustrating how UV light reduces microorganisms in the water and tank over time.
5.2 Drip Tray Cleaning
The removable drip tray collects spills and drips. It should be cleaned regularly to prevent overflow and maintain hygiene.

Image: A close-up view of the removable drip tray, showing its design for easy collection and cleaning of spilled water.
- Gently pull the drip tray forward to remove it from the dispenser.
- Empty any collected water and wash the tray with mild soap and warm water.
- Rinse thoroughly and dry before reinserting into the dispenser.
5.3 General Cleaning
For external cleaning, wipe the surfaces with a soft, damp cloth. Do not use abrasive cleaners or solvents.
6. Troubleshooting
If you encounter issues, please refer to the following common problems and solutions:
| Problem | Possible Cause | Solution |
|---|---|---|
| No water dispenses | Empty water bottle; probe not properly inserted; lower cabinet door open; unit not plugged in. | Replace water bottle; re-insert probe securely; close cabinet door; check power connection. |
| Water not hot/cold enough | Hot/cold switch off; insufficient time for heating/cooling; unit unplugged. | Ensure hot/cold switches on back are ON; allow 15-30 minutes for temperatures to stabilize; check power. |
| Empty Bottle Alert LED is on | Water bottle is empty. | Replace the 3 or 5-gallon water bottle. |
| Water leakage | Drip tray full; water bottle cap not sealed properly; damaged water bottle. | Empty and clean drip tray; ensure bottle cap is secure; replace damaged bottle. |
7. Specifications
| Feature | Detail |
|---|---|
| Model Number | BY605-A |
| Brand | ICEVOKE |
| Color | Black |
| Material | Acrylonitrile Butadiene Styrene (ABS), Stainless Steel |
| Capacity | Supports 3 or 5 Gallon Bottles |
| Product Dimensions | 14"D x 12"W x 40"H |
| Installation Type | Freestanding |
| Access Location | Bottom |
| Item Weight | 37.3 pounds |
8. Warranty and Support
For warranty information, technical support, or service inquiries, please refer to the documentation included with your product or visit the official ICEVOKE website. Keep your purchase receipt as proof of purchase.