Important Safety Instructions
Please read and understand all instructions before beginning installation. Failure to do so may result in electric shock, fire, or personal injury.
- Ensure the power is turned off at the circuit breaker before installation or maintenance.
- All wiring must be in accordance with national and local electrical codes. If you are unsure, consult a qualified electrician.
- The mounting structure must be capable of supporting the weight of the fan (approximately 13.44 lbs).
- Do not bend the fan blades or cage during installation or cleaning.
- Keep children and pets away from the fan during operation.
- Use only E12 base bulbs, maximum 40 watts per bulb. Bulbs are not included.
Product Overview
The SHLUCE FLA004 is a 19-inch farmhouse-style caged ceiling fan with integrated lighting, designed for various indoor spaces such as kitchens, living rooms, and bedrooms. It features a quiet DC motor and a remote control for convenient operation.

Image: Front view of the 19-inch Farmhouse Caged Ceiling Fan with Light, showcasing its rustic design and integrated fan blades within the cage.
Key Features
- Remote Control: Offers 6-speed control, 2/4-hour timing, and independent light/fan operation.
- Quiet DC Motor: Engineered for powerful airflow with noise levels below 30 decibels.
- Reversible Motor: Provides downdraft mode for cooling in summer and updraft mode for air circulation in winter.
- Caged Design: Blades are safely enclosed within a metal cage, preventing accidental contact.
- Easy Installation: Most functional components are pre-assembled for quick setup.
- 6 x E12 Light Sockets: Accommodates six E12 base bulbs (not included) for ample illumination.
What's in the Box
Verify that all components are present and undamaged before beginning installation.
- Farmhouse Caged Ceiling Fan with Light fixture
- Remote Control
- Mounting Hardware (screws, wire nuts, etc.)
- Instruction Manual
Specifications
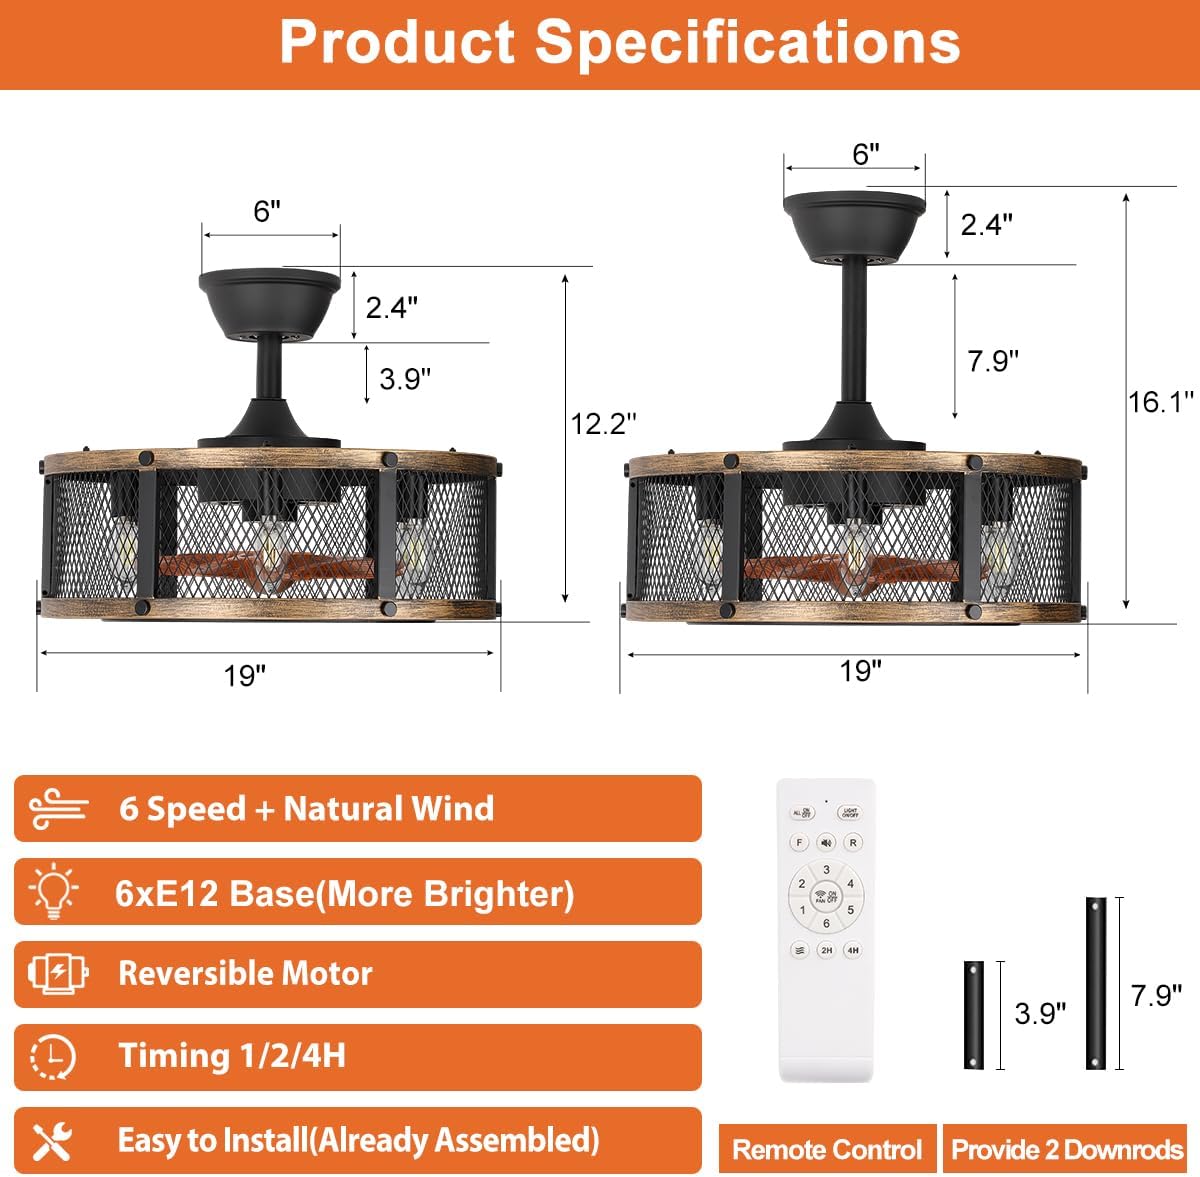
Image: Diagram illustrating the product dimensions (19"L x 19"W x 16.1"H) and key features like 6-speed, E12 base, reversible motor, timing, and easy installation.
| Attribute | Detail |
|---|---|
| Brand | SHLUCE |
| Model Name | FLA004 |
| Product Dimensions | 19"L x 19"W x 16.1"H |
| Item Weight | 13.44 pounds |
| Material | Metal |
| Color | Black Gold |
| Light Source Type | Incandescent (Bulbs not included) |
| Bulb Base | E12 |
| Number of Light Sources | 6 |
| Max Wattage per Bulb | 40 watts |
| Voltage | 110 Volts |
| Control Method | Remote Control |
| Installation Type | Semi Flush Mount |
| Indoor/Outdoor Usage | Indoor |
Setup and Installation
This ceiling fan is designed for semi-flush mount installation. Most functional components are pre-assembled to simplify the process. It is recommended to have two people for installation due to the weight of the fixture.
Pre-Installation Steps
- Turn off Power: Locate the circuit breaker that supplies power to the ceiling fan location and turn it off. Verify power is off using a voltage tester.
- Prepare Mounting Location: Ensure the existing electrical box is securely mounted and rated for ceiling fan support. If not, install a fan-rated electrical box.
- Unpack Components: Carefully remove all parts from the packaging and lay them out. Refer to the 'What's in the Box' section to confirm all parts are present.
Mounting the Fan
Follow the detailed instructions provided in the included 'Instruction Manual' for mounting the bracket and securing the fan fixture to the ceiling electrical box. Ensure all screws are tightened securely.
Wiring Connections
Connect the fan's electrical wires to the household wiring according to the wiring diagram in the instruction manual. Typically, this involves connecting live, neutral, and ground wires using wire nuts. Ensure all connections are secure and insulated.
Bulb Installation
Once the fan is securely mounted and wired, install six E12 base bulbs (not included) into the light sockets. Do not exceed 40 watts per bulb.
Operating Instructions
The SHLUCE FLA004 ceiling fan is operated using the included remote control. Ensure 2*AAA batteries (not included) are installed in the remote.
Remote Control Functions

Image: Diagram of the remote control, labeling buttons for ALL ON/OFF, Light On/Off, Fan Reverse, Fan Forward, Mute, Fan On/Off, Fan Speed Control (1-6), Natural Wind, and Timer (2H/4H).
- ALL ON/OFF: Turns the fan and lights on/off simultaneously.
- Light On/Off: Controls the light independently.
- Fan On/Off: Controls the fan independently.
- Fan Speed Control (1-6): Adjusts fan speed from gentle (1-2) to strong (5-6) wind.
- Fan Reverse/Forward: Changes the direction of fan rotation.
- Mute: Silences remote control beeping.
- Natural Wind: Simulates natural breeze by varying fan speed.
- Timer (2H/4H): Sets the fan and light to turn off automatically after 2 or 4 hours.
Fan Speed Control

Image: Visual representation of the 6 fan speed settings, categorized into Gentle Wind (1-2), Comfortable Wind (3-4), and Strong Wind (5-6).
The fan offers 6 distinct speed settings. Use the speed buttons on the remote to select your desired airflow:
- Speeds 1-2: Gentle wind, ideal for quiet environments or light air circulation.
- Speeds 3-4: Comfortable wind, suitable for general use.
- Speeds 5-6: Strong wind, for maximum airflow and cooling.
Reversible Motor Function
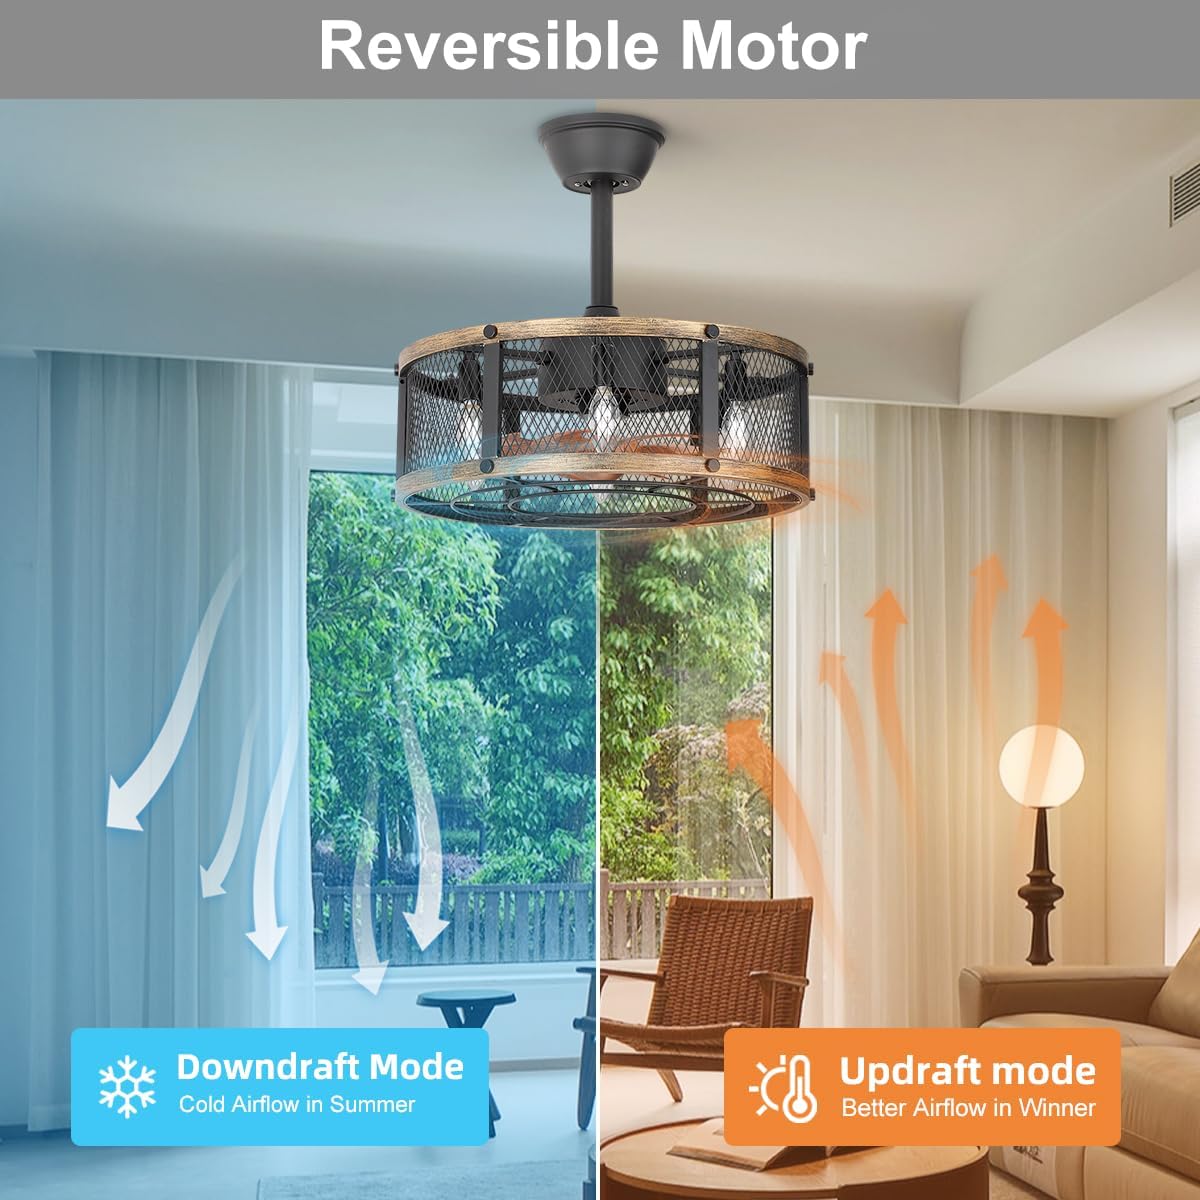
Image: Diagram showing the reversible motor function, with arrows indicating downdraft mode (cold airflow in summer) and updraft mode (better airflow in winter).
The fan features a reversible motor to optimize comfort throughout the year:
- Downdraft Mode (Summer): Press the 'Fan Forward' button. The fan rotates counter-clockwise, pushing cool air downwards to create a cooling effect.
- Updraft Mode (Winter): Press the 'Fan Reverse' button. The fan rotates clockwise, drawing air upwards to circulate warm air trapped near the ceiling, improving heat distribution.
Maintenance
Regular maintenance ensures optimal performance and longevity of your ceiling fan.
- Cleaning: To clean the fan, wipe with a soft, damp cloth. Do not use abrasive cleaners or solvents. Ensure power is off before cleaning.
- Bulb Replacement: Turn off power at the circuit breaker before replacing bulbs. Allow bulbs to cool before touching. Replace with E12 base bulbs, maximum 40 watts.
- Tighten Screws: Periodically check and tighten all screws on the fan and mounting hardware to ensure secure operation.
Troubleshooting
Refer to the table below for common issues and their solutions.
| Problem | Possible Cause | Solution |
|---|---|---|
| Fan does not operate | No power supply Loose wiring connections Remote control batteries dead | Check circuit breaker Verify all wiring connections are secure Replace remote control batteries (2*AAA) |
| Lights do not turn on | Bulbs are faulty or loose Wiring issue Light switch on remote is off | Check and tighten bulbs; replace if necessary Inspect light wiring connections Press the light button on the remote |
| Fan makes excessive noise | Loose screws Fan not properly balanced Obstruction in fan cage | Tighten all mounting and assembly screws Ensure fan is securely mounted and balanced Check for any foreign objects inside the cage |
| Remote control not working | Dead batteries Remote not paired (if applicable) Obstruction between remote and receiver | Replace batteries Refer to manual for remote pairing instructions Ensure clear line of sight to fan receiver |
Warranty and Support
SHLUCE offers a 2-year warranty and a 30-day refund policy for this product. We also provide free spare parts support.
If you encounter any lost, defective, or missing parts (e.g., remote control), or have any questions or concerns regarding your SHLUCE ceiling fan, please contact us through your Amazon orders for assistance.
For further support, you may visit the official SHLUCE store on Amazon: SHLUCE Lighting Store