1. Introduction
This manual provides comprehensive instructions for the installation, setup, operation, and maintenance of your Blusafe Contour V Smart Lock. Please read this manual thoroughly before installation and use to ensure proper function and security.
The Blusafe Contour V Smart Lock offers multiple unlocking methods including biometric fingerprint recognition, passcodes, RFID keycards, mechanical keys, and app control. It features an auto-lock function, anti-prying alarm, and a doorbell camera for enhanced security and convenience.
2. Package Contents
Verify that all components are present before beginning installation:
- 1 x External Panel
- 1 x Internal Panel
- 1 x Mounting Plate
- 1 x Latch
- 1 x Strike Plate
- 1 x Strike Box
- 3 x Mechanical Keys
- 2 x RFID Keycards
- 1 x Screwdriver
- 1 x USB Power Cable
- 1 x Gateway
- 1 x Instruction Manual
- Various Screws (ST 3.9 x 20mm, M4 x 35mm, M4 x 50mm, M4 x 10mm)
- 1 x Screw Pillar

3. Specifications
| Feature | Detail |
|---|---|
| Brand | Blusafe |
| Model Name | CT01 |
| Item Model Number | CT001 |
| Lock Type | Contour V |
| Material | Zinc Alloy |
| Dimensions (L x W x H) | 7.64 x 6.65 x 9.33 inches |
| Item Weight | 6.78 pounds (3.08 Kilograms) |
| Special Features | Auto-Lock, Biometric Fingerprint Sensor, Doorbell Camera, Keyless Entry |
| Control Method | Remote (App), Touch (Keypad), Fingerprint, Keycard, Mechanical Key |
| Fingerprint Capacity | Up to 100 |
| Power Source | 8 AA Batteries (not included) |
| Emergency Power | Micro-USB (5V power bank) |
| Door Thickness Compatibility | 1-2/5 inch to 2-1/8 inch (35-54 mm) |
| Backset Compatibility | 2-3/8 inch or 2-3/4 inch (60 mm or 70 mm) |
| Weather Protection | IP65 Waterproof, -4 to 140°F Operating Temperatures |
4. Installation
The Blusafe Contour V Smart Lock is designed for easy installation on both right-hand and left-hand doors. A screwdriver is the primary tool required. Ensure to check your door's orientation and dimensions before starting.
4.1 Door Compatibility
This lock fits most standard residential doors with a thickness between 1-2/5 inches and 2-1/8 inches (35-54 mm). The backset should be 2-3/8 inches or 2-3/4 inches (60 mm or 70 mm). The minimum width of the installable area is 98mm.

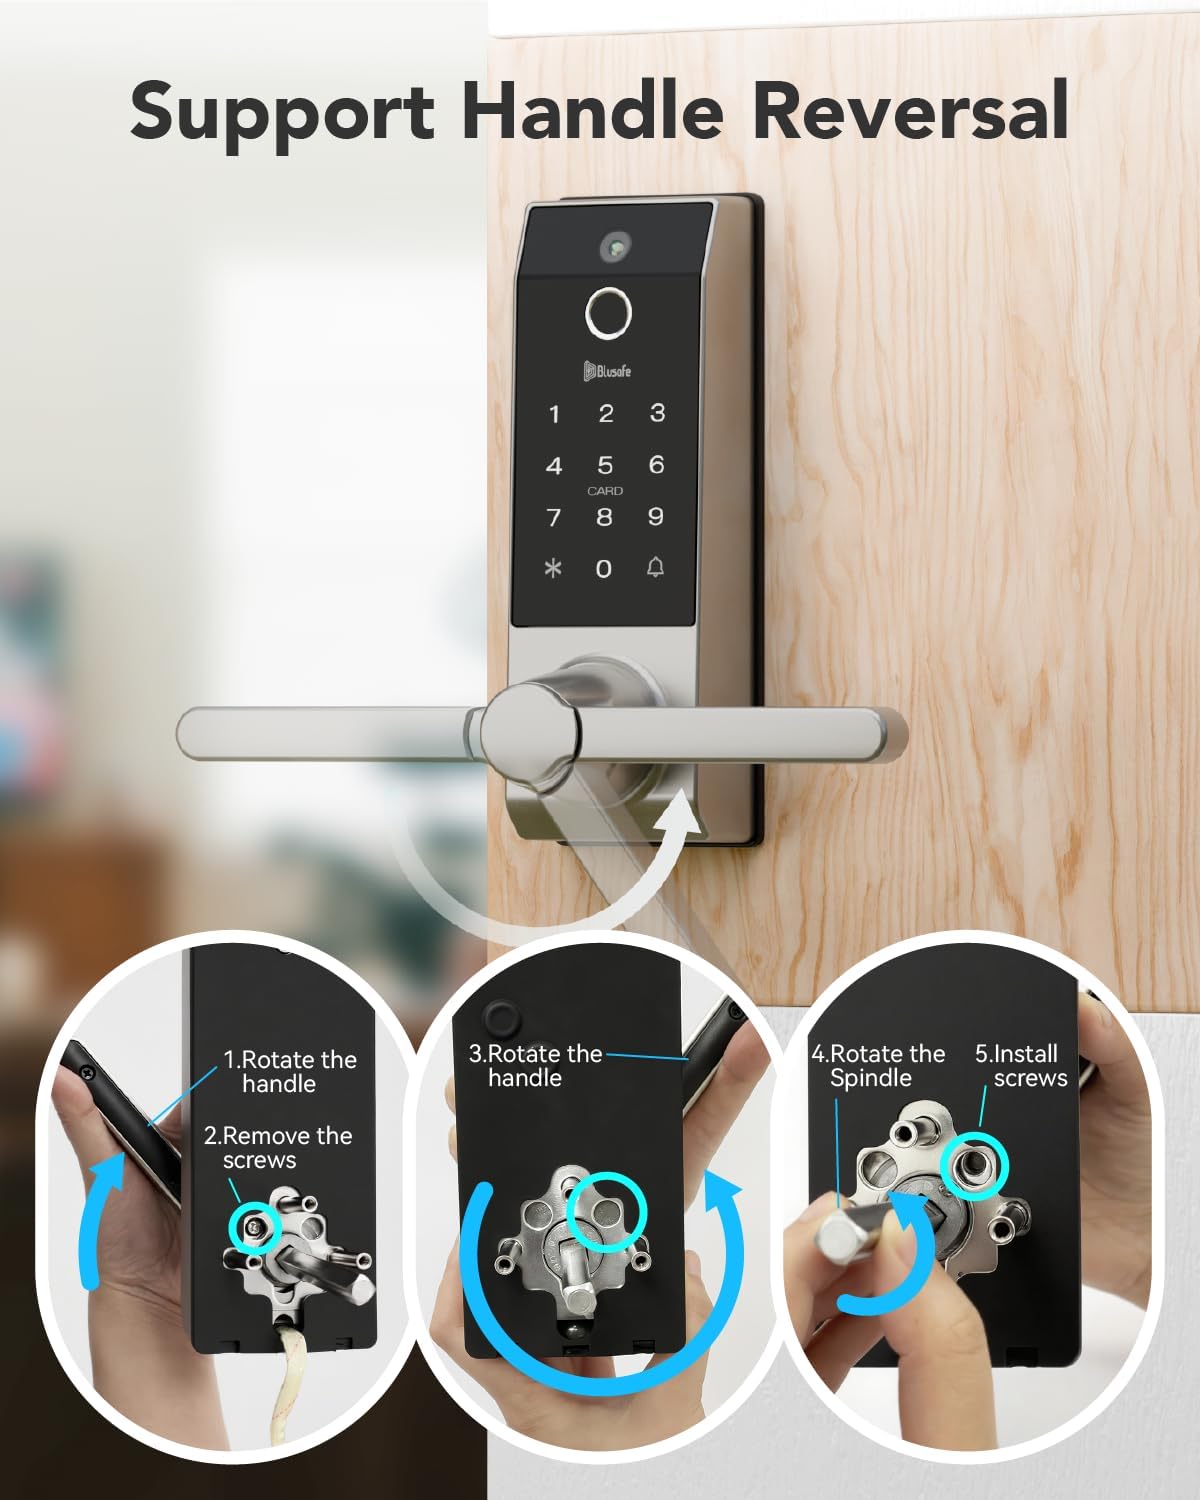
4.2 Handle Reversal (if needed)
The handle can be reversed to accommodate your door's opening direction. Follow the steps below if your handle orientation needs adjustment:
- Rotate the handle.
- Remove the screws.
- Rotate the spindle.
- Install the screws.
4.3 General Installation Steps
For detailed, step-by-step visual guidance on installation, please refer to the official setup video provided by Blusafe. It is highly recommended to follow the instructions carefully to avoid any issues.
5. Initial Setup and User Management
After physical installation, you will need to configure the lock's settings and add users. The lock supports up to 100 fingerprints and 300 users.
5.1 Function Keys
- *: Cancel
- 🔔: Confirm
5.2 Sleep Mode and Wakeup
- Wake Up: Touch the 🔔 (bell icon) or swipe your hand across the front of the lock to activate the keypad.
- Sleep Mode: Press * twice.
5.3 Initializing the Lock (First Time Use)
For initial setup, any fingerprint, keycard, or passcode can be used to set up the first administrator. This process is crucial for establishing the primary access credentials.
5.4 Adding an Administrator
To add an administrator (fingerprint, keycard, or passcode):
- Wake up the keypad.
- Press * + 🔔 + registered admin fingerprint/keycard/passcode + 🔔.
- Press 1.
- Press 1 again.
- Add the new fingerprint, keycard, or passcode as instructed by the lock's voice prompts.
5.5 Removing an Administrator
To remove an administrator:
- Wake up the keypad.
- Press * + 🔔 + registered admin fingerprint/keycard/passcode + 🔔.
- Press 1.
- Press 2.
- Enter the user ID (e.g., 001) + 🔔.
5.6 Adding a User
To add a regular user (fingerprint, keycard, or passcode):
- Wake up the keypad.
- Press * + 🔔 + registered admin fingerprint/keycard/passcode + 🔔.
- Press 2.
- Press 1.
- Add the new fingerprint, keycard, or passcode as instructed by the lock's voice prompts.
5.7 Removing a User
To remove a user:
- Wake up the keypad.
- Press * + 🔔 + registered admin fingerprint/keycard/passcode + 🔔.
- Press 2.
- Press 2 again.
- Enter the user ID + 🔔.
For a visual guide on adding/removing users and initial fingerprint settings, please watch the following video:
6. Operating Instructions
The Blusafe Contour V Smart Lock offers multiple convenient ways to unlock your door.
6.1 Unlocking Methods
- Fingerprint: Place your registered finger on the sensor. The lock will unlock in approximately 0.5 seconds.
- Passcode: Enter your registered 6-8 digit passcode on the keypad followed by 🔔.
- Keycard: Swipe your registered RFID keycard across the card reader area.
- Mechanical Key: Insert the mechanical key into the hidden keyhole and turn to unlock. This is a backup method for emergencies.
- Mobile App: Use the dedicated Blusafe app to remotely unlock the door. This function is passively triggered by someone pressing the doorbell on the smart lock.

6.2 Auto-Lock Function
The smart lock automatically locks when the door is closed, eliminating the need for manual operation or setup. This feature provides continuous security.
6.3 Anti-Peeking Passcode
As a security feature, you can add random numbers before or after your valid passcode. The lock will still unlock as long as the correct passcode sequence is embedded within the entered numbers. For example, if your passcode is "909090" and you enter "216909090876", the lock will open.
6.4 Passage Mode Setup
To set up Passage Mode:
- Wake up the keypad.
- Press * + 🔔 + registered admin fingerprint/keycard/passcode + 🔔.
- Press 3.
- Press 3 again.
Once turned on, use a registered fingerprint, passcode, or card to unlock the lock, and Passage Mode will remain turned on. The lock will remain unlocked until Passage Mode is manually deactivated.
7. Maintenance
7.1 Battery Replacement and Low Power Warning
The Blusafe Smart Lock requires 8 AA batteries (not included) which can provide at least 6 months of run time, depending on usage frequency and battery quality. A low power voice alert is activated when the battery level falls below 20%. Please change all batteries immediately when you hear this warning.
7.2 Emergency Charging (Backup Power)
In the event of a power failure or completely drained batteries, the lock remains locked. You can use a 5V power bank to connect to the Micro-USB port located at the bottom of the external panel for emergency power. After unlocking the lock, replace the batteries immediately.
7.3 Weather Protection
The lock is designed with IP65 waterproof rating and can operate in temperatures ranging from -4°F to 140°F, ensuring durability in various weather conditions.
8. Troubleshooting
8.1 System Lockout
To prevent unauthorized access, the system will lock for 90 seconds if:
- An incorrect fingerprint is used 15 times within any 5-minute period.
- An incorrect passcode is input 5 times within any 5-minute period.
- An incorrect keycard is used 5 times within any 5-minute period.
8.2 System Recovery
Using a mobile power bank to power the lock will automatically trigger a system recovery. The lock system will be recovered to a previous workable version once triggered.
8.3 Factory Reset
Performing a factory reset will clear all user data and return the lock to its default settings. There are two methods:
- Method 1 (via Keypad):
Wake up keypad.
Press * + 🔔 + registered admin fingerprint/keycard/passcode + 🔔.
Press 4.
Press 1 + 🔔. - Method 2 (via SET button):
Open the internal panel to access the battery compartment.
Press and hold the "SET" button for 5 seconds.
8.4 Anti-Prying Function
If the anti-prying function is activated ("ON"), the lock will trigger an alarm when a physical attack is detected. To turn off the alarm, use a registered fingerprint/keycard or power off the lock. The anti-prying function is set to "OFF" by default; please activate it after installation if desired.
8.5 Doorbell Function
When someone presses the doorbell on the smart lock, it takes a picture and sends a notification to your phone. You can then send a one-time code or slide to unlock the door via the app. Note that the camera does not have video call or recording functions, and the lock is not compatible with smart home systems like Alexa or Google Assistant.
9. Warranty and Support
The Blusafe Contour V Smart Lock is backed by professional customer support with a 1-year warranty and technical assistance. For any inquiries or issues, please contact our 24/7 expert service to ensure a worry-free experience from installation to long-term use.
10. Important Notes
- Always ensure correct door orientation and dimensions are verified before installation.
- Battery runtime is dependent on the frequency of use and the quality of the batteries.
- The doorbell camera function sends still images and notifications; it does not support live video calls or recording.
- This smart lock is not compatible with smart home systems such as Alexa and Google Assistant.


