1. Important Safety Instructions
Please read and understand all safety instructions before operating the VEVOR FLM-R100-FT Fiber Laser Marking Machine. Failure to follow these instructions may result in serious injury or property damage.
- Laser Radiation: This product contains a Class II laser. Avoid direct exposure to the laser beam. Always wear appropriate laser safety glasses (included) when the machine is in operation.
- Eye Protection: Never look directly into the laser source or at reflections of the laser beam. Permanent eye damage can occur.
- Ventilation: Ensure adequate ventilation in the work area to dissipate fumes and particles generated during marking. Some materials may produce hazardous fumes.
- Fire Hazard: Certain materials can ignite when exposed to a laser. Always supervise the machine during operation and have a fire extinguisher readily available.
- Electrical Safety: Ensure the machine is properly grounded. Do not operate with wet hands or in damp conditions. Disconnect power before performing any maintenance or adjustments.
- Authorized Personnel: Only trained and authorized personnel should operate this equipment.
- Emergency Stop: Familiarize yourself with the location and operation of the emergency stop button.
2. Product Overview
The VEVOR FLM-R100-FT is a 100W fiber laser marking machine designed for high-precision and rapid engraving on various materials. It features a MOPA color fiber laser, a 6.9" x 6.9" working area, and includes a rotary axis for versatile applications.
2.1 Key Features
- 100W Fiber Laser Source: Provides powerful and stable output with a lifespan of up to 100,000 hours. Laser Class II, Output: 0.874mW.
- High Speed & Precision: Achieves a maximum marking speed of 4000 mm/s and a precision of 0.01 mm, with a maximum marking depth of 1 mm.
- Accurate Focusing System: Equipped with a red light auxiliary focusing system and an adjustable-height galvanometer for quick and precise focus adjustments.
- 6.9" x 6.9" Worktable: Features a built-in grid and external laser locator for accurate material positioning.
- Wide Compatibility: Supports macOS and Windows (7/8/10/11) systems and various file formats (BMP, JPG, JPEG, GIF). Compatible with LightBurn and EzCad2 software.
- Rotary Axis Included: Enables marking on cylindrical or irregularly shaped objects.

Image: A diagram illustrating the precision optical components, including the laser galvanometer for fast scanning and high positioning accuracy, and the laser field lens for precise focus and high transmittance.
2.2 Package Contents
Upon unpacking, verify that all items listed below are present and undamaged:

Image: The VEVOR FLM-R100-FT Fiber Laser Marking Machine, including the main control unit, laser head assembly, rotary axis, and various accessories such as safety glasses, USB cable, power cable, and adjustment tools.
- Fiber Laser Marking Machine Unit (Control Box and Laser Head Assembly)
- Rotary Axis
- Power Cable
- USB Cable
- Laser Safety Glasses
- Foot Pedal
- Hex Wrenches / Allen Keys
- Ruler and Positioning Bars
- Keys
- User Manual (this document)
3. Setup Instructions
Follow these steps to set up your VEVOR FLM-R100-FT Fiber Laser Marking Machine.
3.1 Unpacking and Placement
- Carefully remove all components from the packaging.
- Place the main laser head assembly and the control unit on a stable, level, and non-combustible surface. Ensure sufficient space around the machine for ventilation and operation.
- Connect the laser head assembly to the control unit using the provided cable. Ensure the connection is secure.
- If using the rotary axis, connect it to the designated port on the control unit.
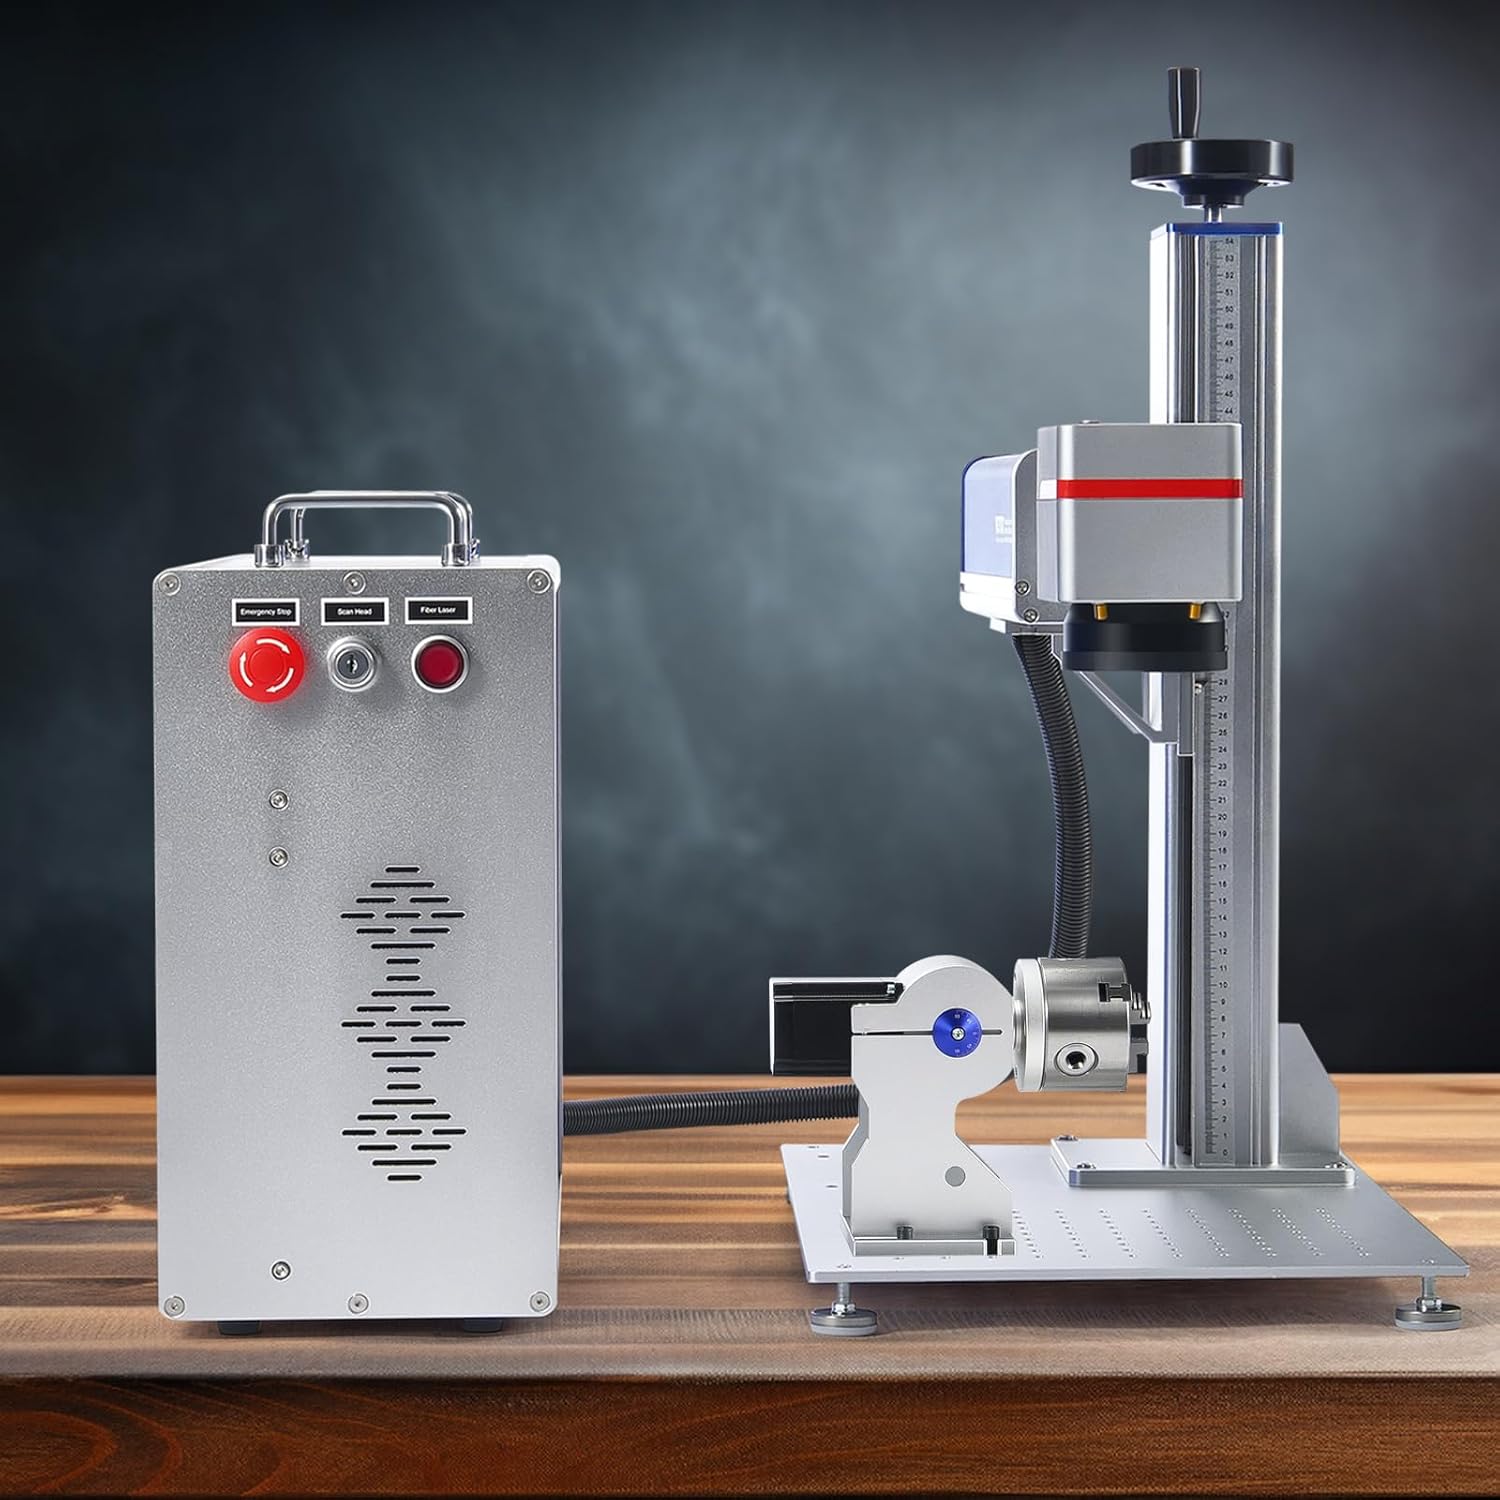
Image: The main laser marking machine unit with the control box and laser head assembly connected, ready for operation.
3.2 Power Connection
- Ensure the machine's power switch is in the "OFF" position.
- Connect the power cable to the control unit and then to a grounded AC 120V 60Hz power outlet.
3.3 Software Installation
- Connect the machine to your computer using the provided USB cable.
- Install the necessary software (e.g., LightBurn or EzCad2) on your computer. Refer to the software's specific installation guide for detailed instructions.
- Ensure drivers are correctly installed for the machine to be recognized by the software.

Image: The laser marking machine connected to a laptop, demonstrating software compatibility with various operating systems like macOS and Windows.
4. Operating Instructions
This section outlines the basic steps for operating your laser marking machine.
4.1 Powering On and Initial Checks
- Ensure all connections are secure and the work area is clear.
- Wear your laser safety glasses.
- Turn on the main power switch on the control unit.
- Open the laser marking software on your computer and ensure it recognizes the machine.
4.2 Focusing the Laser
Accurate focusing is critical for optimal marking quality.
- Place the material to be marked on the worktable.
- Activate the red light auxiliary focusing system in the software or on the machine. Two red dots will appear on the material surface.
- Adjust the height of the laser head using the height adjustment knob until the two red dots converge into a single, sharp point. This indicates the correct focal distance.
- The built-in scale on the vertical column can help record optimal heights for different materials.

Image: A detailed view of the precision focusing system, showing the red light guide, built-in scale for height measurement, and the height adjustment knob.
4.3 Creating and Marking Designs
- In your marking software (e.g., LightBurn, EzCad2), create or import your desired design (BMP, JPG, JPEG, GIF, etc.).
- Adjust laser parameters such as power, speed, frequency, and number of passes according to the material and desired marking effect. Refer to material testing guidelines for optimal settings.
- Use the laser locator to preview the marking area on your material.
- Initiate the marking process from the software. The machine will begin engraving.
- Monitor the marking process closely. Use the emergency stop button if any issues arise.

Image: Illustration demonstrating the high marking speed of up to 4000 mm/s, showing a lion design being marked at different speeds.

Image: A visual comparison highlighting the 0.01 mm high accuracy of the VEVOR laser marking, showing a detailed eagle design.
4.4 Using the Rotary Axis
The included rotary axis allows for marking on curved or cylindrical objects.
- Mount the rotary axis securely on the worktable and connect it to the control unit.
- Secure the cylindrical object (e.g., ring, cup) in the chuck of the rotary axis.
- Enable and configure the rotary axis settings within your marking software. This typically involves inputting the object's diameter and rotation speed.
- Adjust the laser focus to the surface of the object.
- Proceed with marking as usual, ensuring the design is correctly oriented for rotary engraving.

Image: The laser marking machine with the rotary axis in operation, demonstrating its capability to engrave on curved surfaces like bracelets and pipes.
5. Maintenance
Regular maintenance ensures the longevity and optimal performance of your VEVOR Fiber Laser Marking Machine.
- Cleaning the Lens: Periodically inspect and gently clean the laser lens with a specialized lens cleaning solution and lint-free wipes. Avoid touching the lens with bare hands.
- Work Area: Keep the worktable and surrounding area clean from debris and dust.
- Ventilation: Ensure the ventilation openings on the control unit are not obstructed to prevent overheating.
- Cable Connections: Regularly check all cables for wear or damage and ensure they are securely connected.
- Power Off: Always power off and unplug the machine when not in use or before performing any cleaning or maintenance.
6. Troubleshooting
This section addresses common issues you might encounter.
| Problem | Possible Cause | Solution |
|---|---|---|
| Machine does not power on. | Power cable loose; power switch off; no power from outlet. | Check power cable connection; ensure switch is ON; test outlet with another device. |
| Laser not firing. | Emergency stop engaged; software not sending command; laser parameters incorrect. | Disengage emergency stop; verify software connection; check laser power/frequency settings. |
| Poor marking quality (blurry, weak). | Incorrect focus; dirty lens; incorrect laser parameters for material. | Re-focus the laser; clean the lens; adjust power/speed settings. |
| Software does not detect machine. | USB cable loose/faulty; drivers not installed; machine not powered on. | Check USB connection; install/reinstall drivers; ensure machine is powered on. |
| Rotary axis not functioning. | Rotary axis cable loose; not enabled in software; incorrect settings. | Check cable connection; enable rotary axis in software; verify settings. |
If you encounter problems not listed here or require further assistance, please contact VEVOR customer support.
7. Specifications
Detailed technical specifications for the VEVOR FLM-R100-FT Fiber Laser Marking Machine.
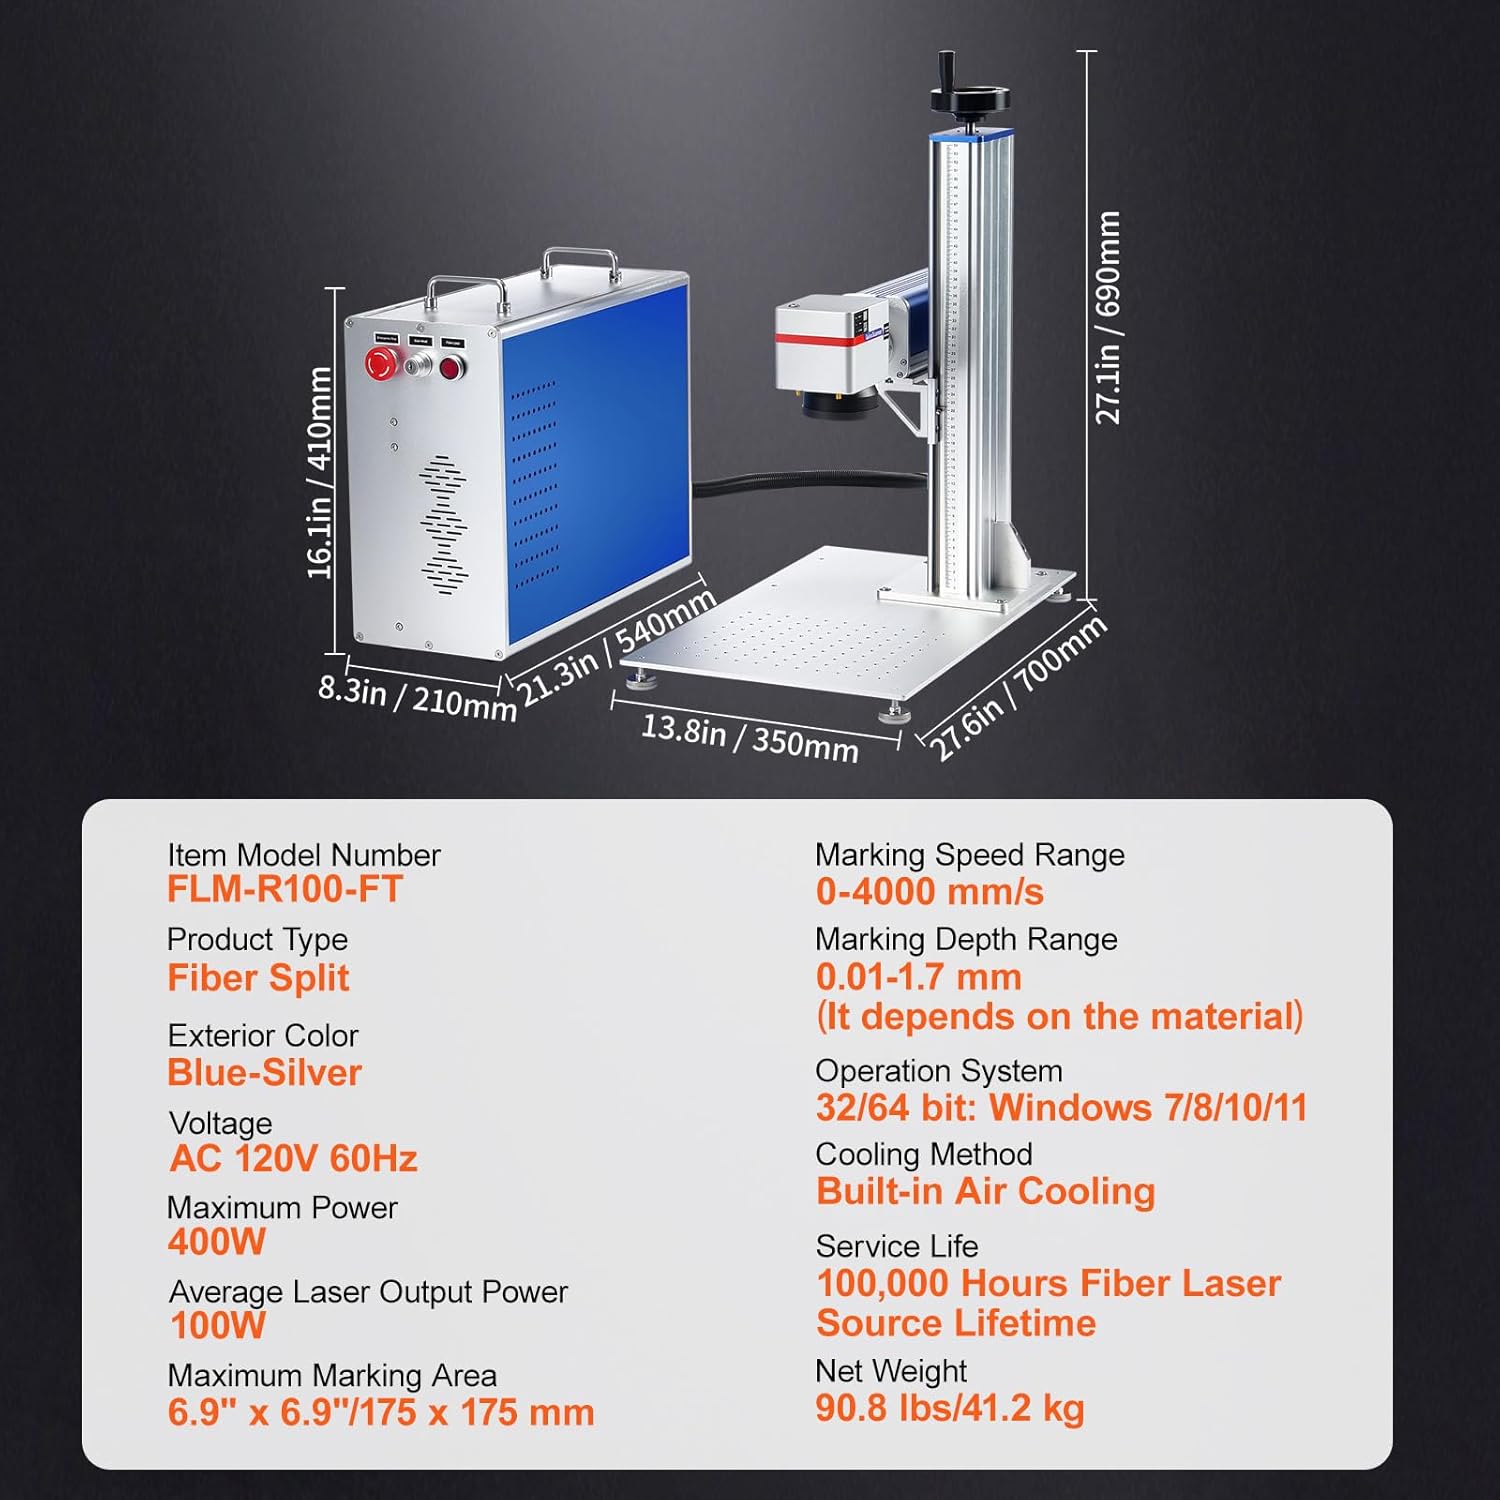
Image: A diagram illustrating the physical dimensions of the machine and a table summarizing its key technical specifications.
| Feature | Specification |
|---|---|
| Item Model Number | FLM-R100-FT |
| Product Type | Fiber Split |
| Exterior Color | Blue-Silver |
| Voltage | AC 120V 60Hz |
| Maximum Power | 400W |
| Average Laser Output Power | 100W |
| Maximum Marking Area | 6.9" x 6.9" / 175 x 175 mm |
| Marking Speed Range | 0-4000 mm/s |
| Marking Depth Range | 0.01-1.7 mm (depends on material) |
| Operation System | 32/64 bit: Windows 7/8/10/11, macOS |
| Cooling Method | Built-in Air Cooling |
| Service Life | 100,000 Hours Fiber Laser Source Lifetime |
| Net Weight | 90.8 lbs / 41.2 kg |
| Product Dimensions | 8.27 x 21.26 x 16.14 inches |
8. Warranty and Support
VEVOR products come with a standard warranty. For specific warranty details, registration, or technical support, please refer to the warranty card included with your product or visit the official VEVOR website. You can also contact VEVOR customer service directly for assistance with troubleshooting or parts replacement.
Contact Information: Please refer to your product packaging or the VEVOR official website for the most current customer support contact details.