1. Introduction
This manual provides essential instructions for the safe and efficient operation, installation, and maintenance of your Generic Milk Separator Machine. This centrifugal device is designed to separate fresh milk into cream and skim milk through high-speed rotation, effectively removing impurities. It is suitable for various dairy processing needs on farms or in home settings.
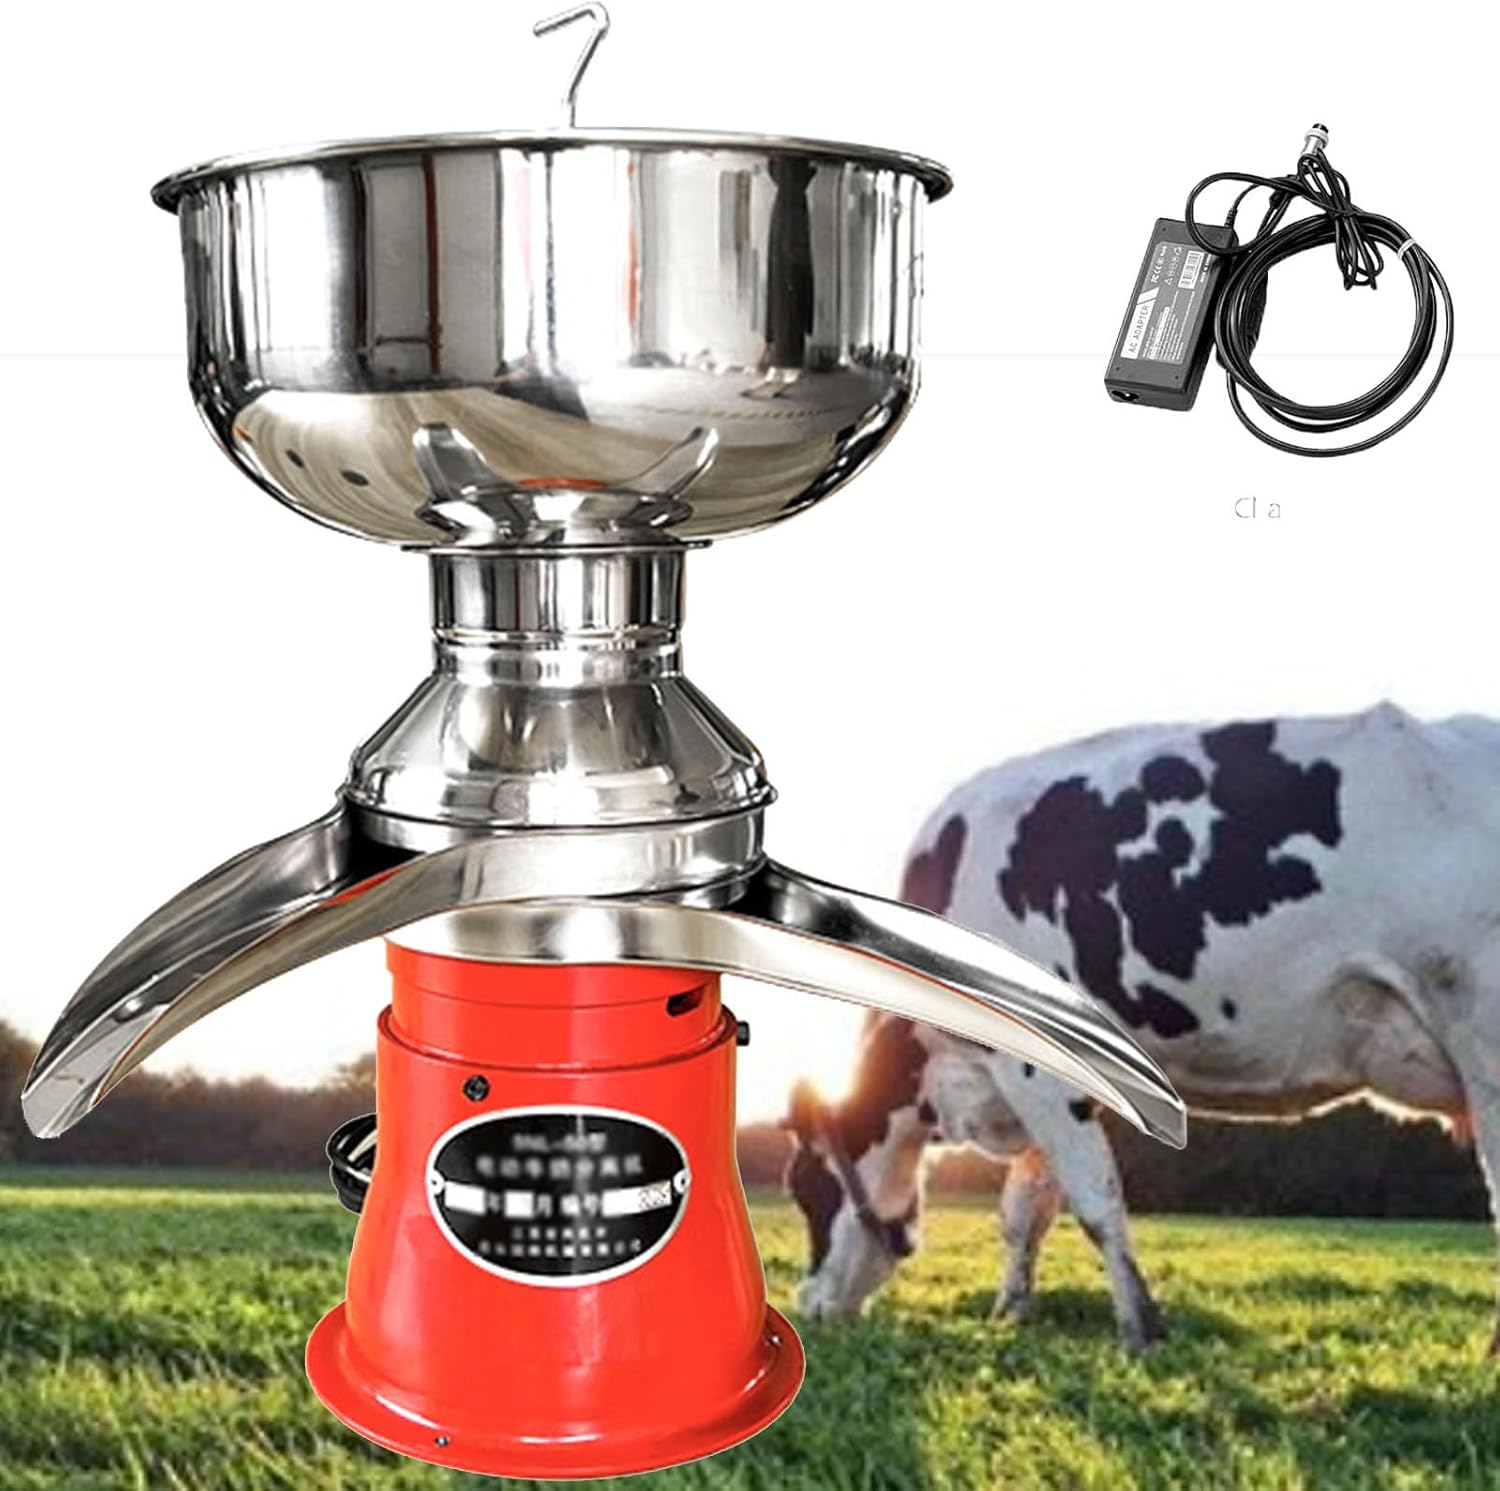
Figure 1: Generic Milk Separator Machine. This image shows the assembled milk separator machine, featuring a stainless steel bowl and a red motor base, with its power cord and adapter. A cow is visible in the background, indicating its use in dairy environments.
2. Safety Instructions and Precautions
To ensure safe operation and prevent damage to the machine, please observe the following precautions:
- Motor Protection: Never allow water or milk to enter the motor housing. This can cause electrical hazards and severe damage to the motor.
- Drum Preheating: Always preheat the separation drum before operation, especially in colder environments. Failure to do so may cause the separated cream to clog the drum.
- Milk Type: This machine is designed exclusively for separating fresh milk. Processed dairy products, such as those commonly sold in supermarkets, cannot be separated by this device.
- Operational Readiness: Before adding fresh milk, ensure the machine is in proper working condition and the white switch lever in the milk pot is in the 'off' (closed) position.
3. Product Components
Familiarize yourself with the various parts of your milk separator machine:

Figure 2: Complete Components. This diagram illustrates the main parts of the milk separator, including the Milk Container Switch (Stainless Steel Rod), Separating Bowl, Buoy, Funnel, Cream Mouth, Separating Piece, Skimmed Milk Mouth, and Motor.
The packing list includes the following items:

Figure 3: Packing List. This image displays all individual components as they are packaged: Plug, Funnel, Skimmed Milk Mouth, Milk Pot, Charger (Power Cord), Separating Bowl, and Motor.
4. Specifications
Key technical specifications of the milk separator machine:

Figure 4: Product Parameters. This image presents a table of product specifications including Product Name (Electric milk separator), Application (milk), Type (disc centrifuge), Motor power (180W), Power supply voltage (AC 110V/220V), Drum speed (9800-11000rpm/min), Loading limit (50L/H), Number of separators (15), Skimmed milk fat content (≤0.03%), Net weight (7.5kg), Gross weight (8.5kg), and Packing size (49cm*32cm*23cm).
- Material: 304 stainless steel (milk bowl, nozzle), Aluminum alloy (drum, disc, motor housing), Brass (core device)
- Motor Voltage: DC12V
- Motor Power: 180W
- Production Capacity: 50L/H (13.2 gallons per hour)
- Milk Tank Capacity: 5L
- Transformer Voltage: 110V/220V
- Skim Milk Fat Content: ≤0.03%
- Separation Bowl Speed: 9800-11000 RPM
- Number of Separation Parts: 15 pieces
- Net Weight: 7.5 kg (16.53 lbs)
- Gross Weight: 8.5 kg (18.74 lbs)
- Packing Size: 50 x 34 x 24 cm (19.68 x 13.38 x 9.44 inches)
5. Setup and Installation
Follow these steps to assemble your milk separator machine:
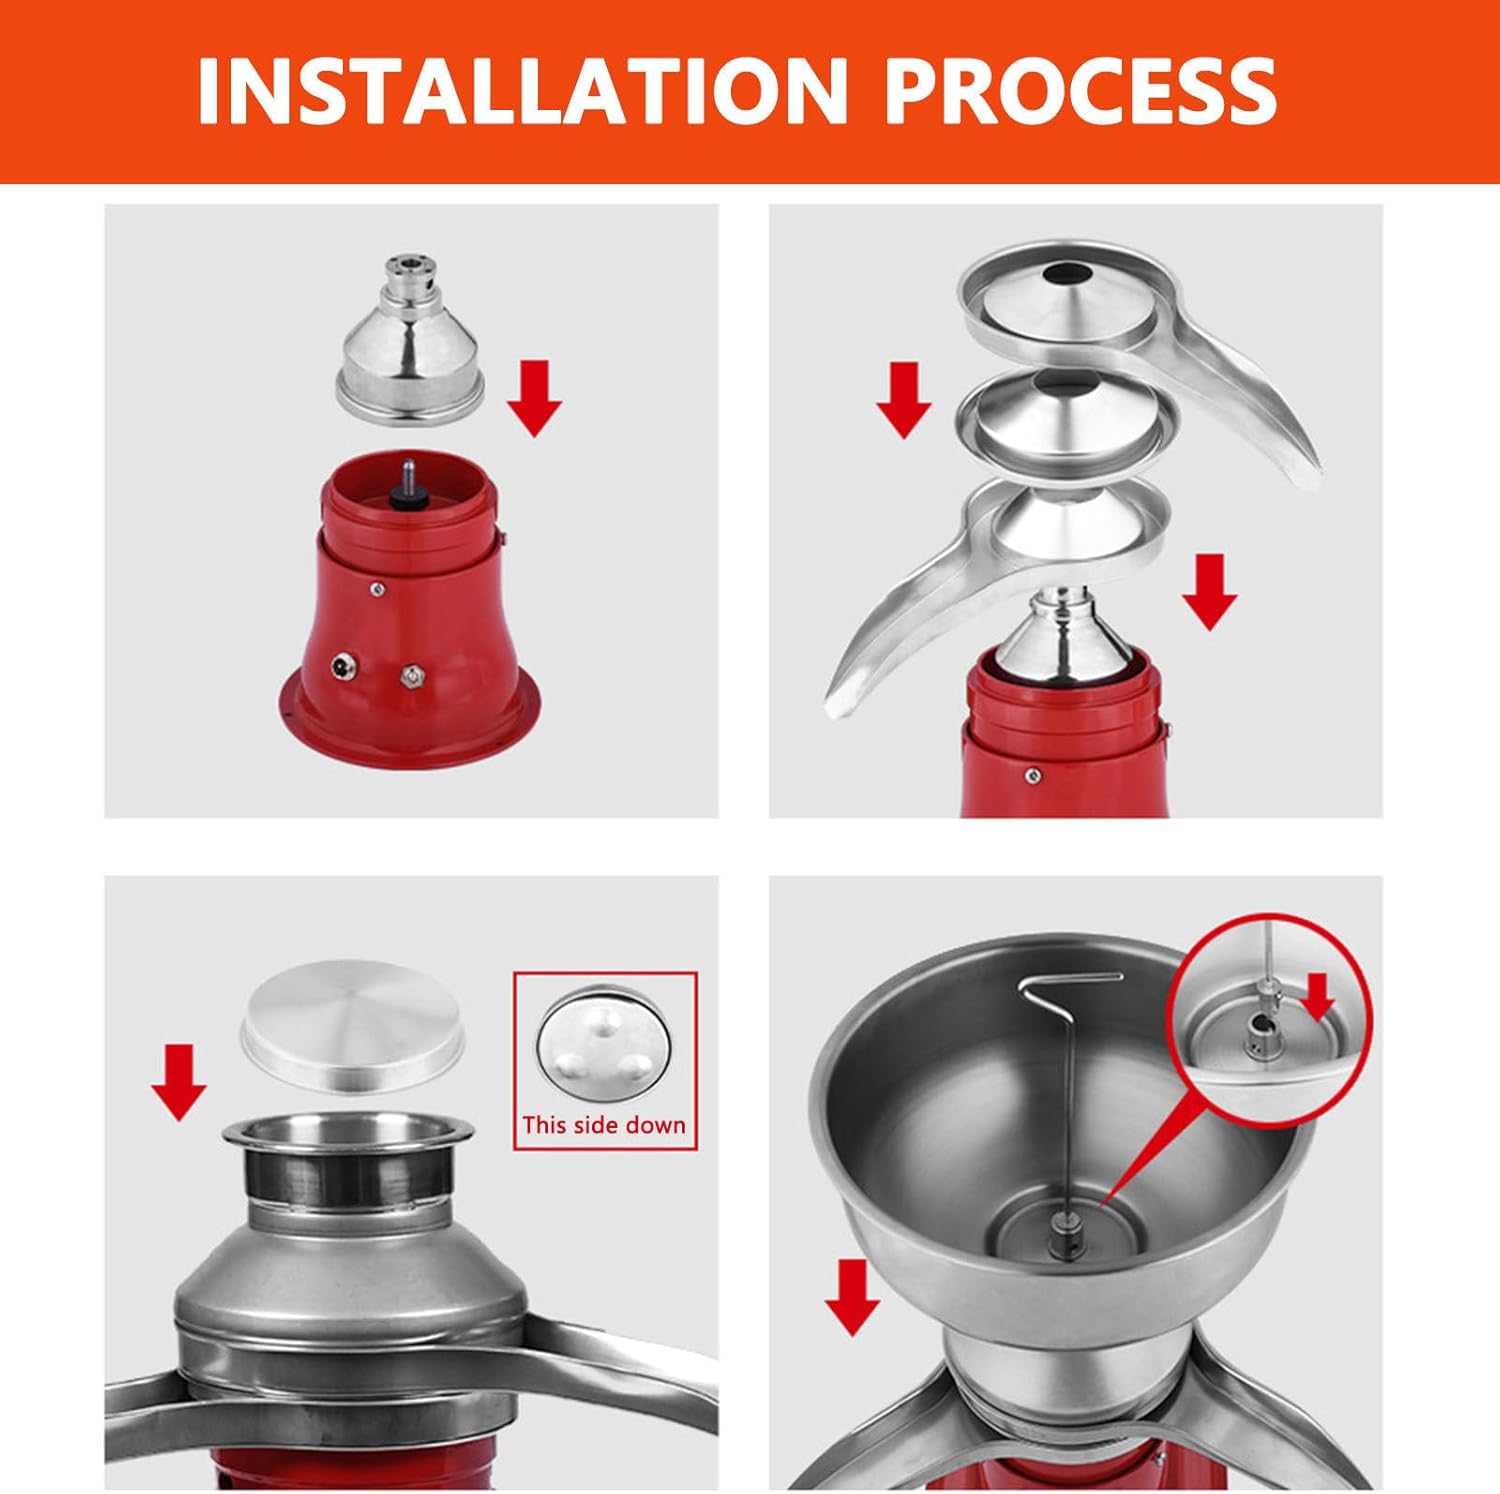
Figure 5: Installation Process. This image shows a four-panel guide for assembling the milk separator. Panel 1: Attaching the funnel to the motor base. Panel 2: Stacking the separating pieces and milk receiver onto the funnel. Panel 3: Placing the buoy with the 'This side down' indicator. Panel 4: Securing the milk pot onto the assembled unit.
- Step 1: Attach Funnel to Motor Base. Carefully place the funnel onto the motor base, ensuring it sits securely.
- Step 2: Assemble Separation Components. Stack the separating pieces and the milk receiver onto the funnel. Ensure they are aligned correctly for proper separation.
- Step 3: Position Buoy. Place the buoy into the assembly, making sure the side marked 'This side down' is facing downwards.
- Step 4: Install Milk Pot. Finally, place the milk pot onto the top of the assembled unit, ensuring it is stable and ready to receive milk.
6. Operating Instructions
Operating your milk separator machine involves a few key steps and features:

Figure 6: Product Details. This image highlights key operational features: the Switch lever (to control milk flow), the 12-layer separation disc (for efficient separation), the Flow rate adjustment mechanism (using a wrench), and the Milk receiver (with unique drainage design).
- Initial Setup: Before starting, ensure the switch lever (located in the milk pot) is in the closed position.
- Power On: Turn on the machine. Allow it to reach its operating speed (9800-11000 RPM) before introducing milk.
- Pouring Milk: Once the machine is running at full speed, pour fresh milk into the milk pot.
- Starting Separation: Open the switch lever to allow milk to flow into the separation drum.
- Cream Thickness Adjustment: The thickness of the separated cream can be adjusted by tightening or loosening a specific screw. Use the included wrench for this adjustment to achieve your desired cream consistency.
- Milk Receiver: The machine features a unique drainage design with inclined streamlined nozzles for smooth flow of cream and skim milk into separate containers.
7. Maintenance
Regular cleaning and maintenance are crucial for the longevity and performance of your milk separator machine:
- Cleaning the Separation Bowl: After each use, loosen the nut on the separation bowl. Carefully remove all individual parts.
- Washing: Wash all removed parts thoroughly several times with hot water.
- Drying: Wipe all parts dry completely before reassembly.
- Reassembly: Reinstall all parts in their original order, ensuring proper fit and alignment.
8. Troubleshooting
If you encounter issues with your milk separator, consider the following general troubleshooting steps:
- Machine Not Starting: Ensure the power cord is securely plugged into a functional outlet and the machine's power switch is in the 'on' position. Check the transformer connection.
- Poor Separation/Clogging: Verify that the drum was preheated before operation. Ensure only fresh milk is being used. Disassemble and thoroughly clean all separation parts, as described in the Maintenance section.
- Unusual Noise: Turn off the machine immediately. Check for any loose parts or obstructions within the separation bowl or motor area. Reassemble carefully.
- Milk Not Flowing: Ensure the switch lever in the milk pot is fully open after the machine has reached operating speed. Check for any blockages in the milk inlet or outlets.
If problems persist after performing these checks, please contact customer support.
9. Warranty and Support
Specific warranty details for this Generic Milk Separator Machine are not provided in the product information. For warranty claims, technical support, or replacement parts, please refer to your purchase documentation or contact the seller directly. Ensure you have your purchase date and product details available when contacting support.