Introduction
Thank you for choosing the Lamomo COB LED Strip Light. This manual provides essential information for the safe and efficient installation, operation, and maintenance of your new LED strip light. Please read these instructions carefully before use and retain them for future reference.

Image: The complete Lamomo COB LED Strip Light kit, showcasing the flexible 5-meter warm white strip, remote control, power adapter, and various connectors.
Safety Instructions
- Ensure the power supply is disconnected before installation or maintenance.
- Use only the provided 24V power adapter. Using an incorrect voltage may damage the product and pose a safety risk.
- The LED strip is IP65 waterproof, suitable for outdoor use and protection against splashes. However, the power plug and controller are not waterproof and must be protected from water immersion or direct exposure to heavy rain.
- Do not bend the LED strip sharply or apply excessive force, as this may damage the internal circuitry.
- Keep the product away from heat sources and flammable materials.
- Do not stare directly into the illuminated LEDs for extended periods, as this may cause eye strain.
- This product is designed for decorative and accent lighting. Do not use it as a primary light source where high illumination is required.
Package Contents
Verify that all components are present and undamaged:
- 1 x Lamomo COB LED Strip Light (5 meters, Warm White)
- 1 x 24V 2A Power Transformer
- 1 x LED Controller
- 1 x Remote Control
- 10 x Mounting Clips
- 10 x Screws for Mounting Clips
- 1 x Quick Connector
Product Features
- Ultra-Bright COB LED: Features 320 LEDs per meter, 10mm width, providing a 180-degree beam angle for uniform, dot-free illumination. High Color Rendering Index (CRI > 90) ensures accurate color representation.
- Dimmable with Remote Control: Adjust brightness from 0% to 100%. Includes a memory function to retain the last setting.
- Timer Function: Program precise turn-off times.
- Dynamic Modes: Three built-in dynamic modes (fade, jump, flicker) for varied ambiance.
- Flexible and Cuttable: The silicone casing allows bending up to 180°. Can be cut every 5 cm (1.96 inches) at designated marks for custom lengths.
- IP65 Waterproof: Silicone shell provides protection against water splashes, suitable for indoor and outdoor use (excluding power plug and controller).
- Safe and Durable: Operates on a low 24V voltage, reducing electrical shock risks. CE and UKCA certified for quality and safety.

Image: Demonstration of the remote control dimming feature, illustrating brightness levels from 100% down to 10% in a room with the LED strip installed.

Image: The timer function in use, showing a bedroom with warm LED lighting and the remote control displaying options for 10, 30, and 60-minute timers.
Setup
1. Planning the Installation
- Measure the desired length for your LED strip.
- Identify suitable cutting points on the strip, marked every 5 cm (1.96 inches).
- Ensure the installation surface is clean, dry, and smooth for optimal adhesion of mounting clips.
- Plan the placement of the power adapter and controller, ensuring they are in a dry location if installing outdoors.
2. Cutting the LED Strip (Optional)
- If a shorter length is required, carefully cut the LED strip only at the designated black marked lines using sharp scissors.
- Cutting at any other point will damage the strip and prevent it from working.

Image: Visual guide on how to cut the LED strip at 5cm intervals and examples of how the flexible strip can be installed around corners.
3. Connecting Components
- Connect the LED strip to the quick connector.
- Connect the quick connector to the LED controller.
- Connect the LED controller to the 24V power transformer.
- Ensure all connections are secure before plugging the power transformer into a wall outlet.

Image: A detailed view of the quick connect cord, highlighting its 7-inch length for easy connection between LED strip segments or to the controller.
4. Mounting the LED Strip
- Position the mounting clips along the planned installation path.
- Securely fasten the clips to the surface using the provided screws.
- Carefully slide the COB LED strip into the plastic clips, ensuring it is held firmly in place.
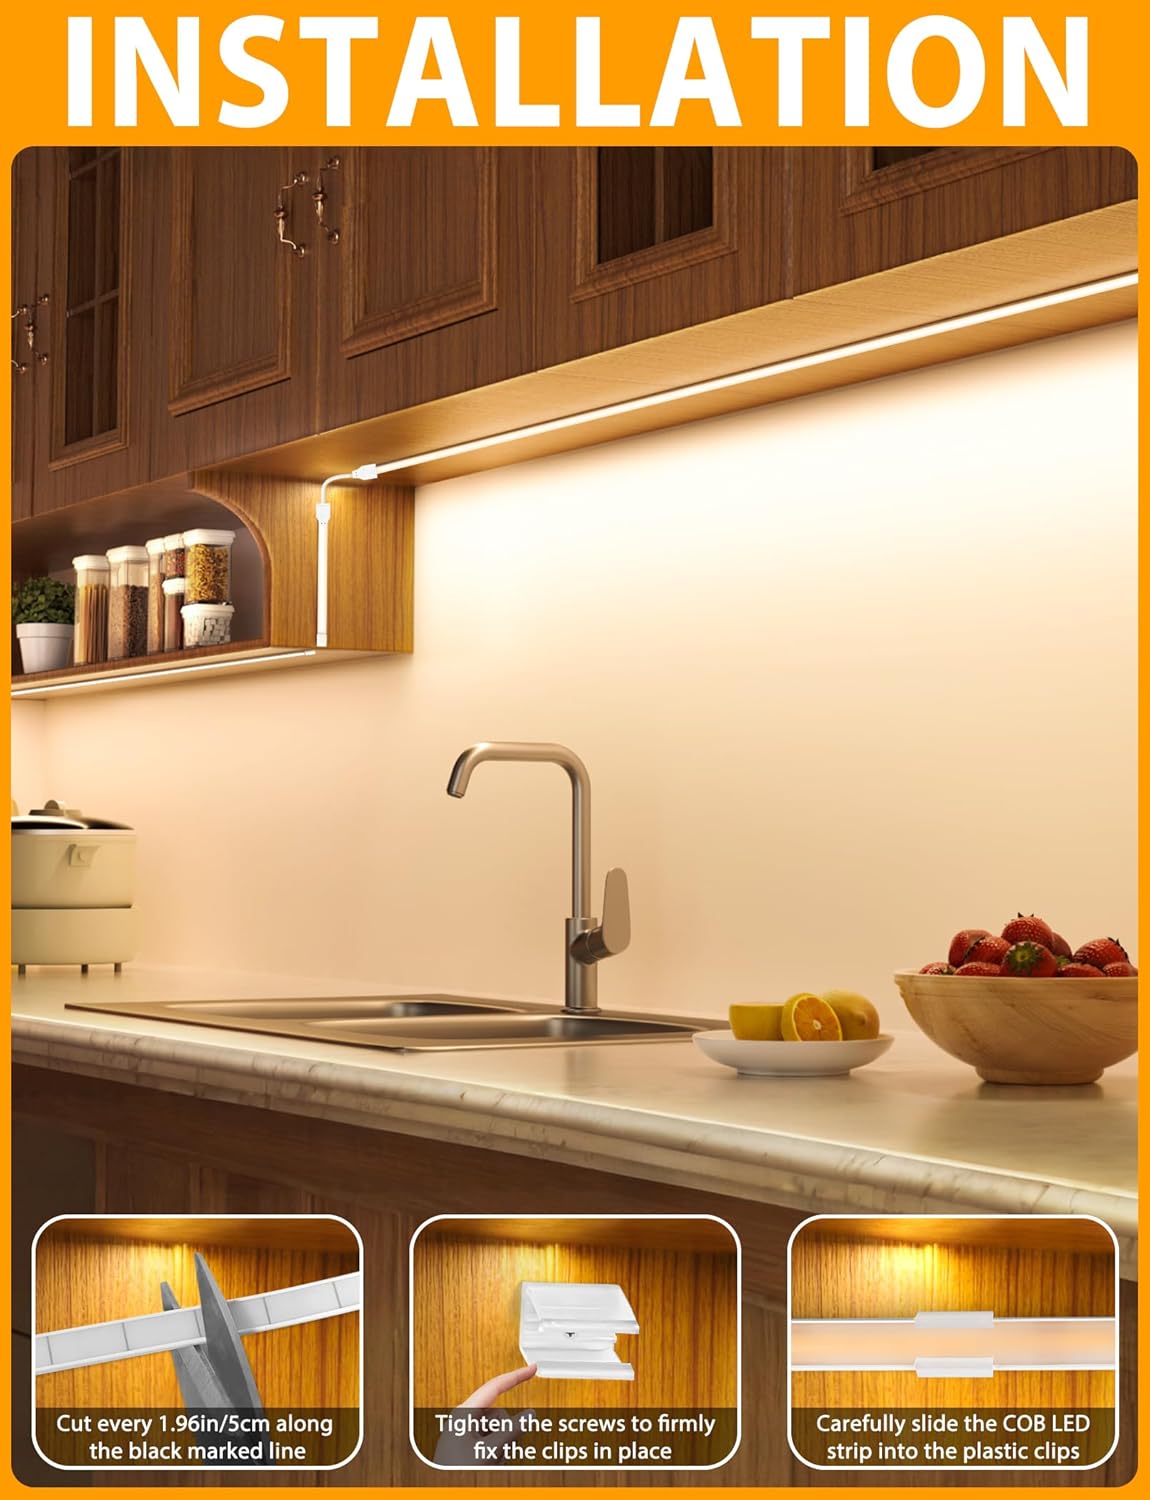
Image: A visual guide demonstrating the installation process, including cutting the strip, fastening mounting clips with screws, and inserting the LED strip into the clips.
Operating Instructions
Using the Remote Control
The included remote control allows full command over your LED strip light.
- Power On/Off: Press the 'ON' or 'OFF' button to turn the lights on or off.
- Brightness Adjustment: Use the '+' and '-' buttons to increase or decrease the brightness (0% to 100%). The memory function will recall the last brightness setting when turned back on.
- Dynamic Modes: Select from 'Fade', 'Jump', or 'Flicker' buttons for different lighting effects.
- Timer Function: Press the '10M', '30M', or '60M' buttons to set the strip to automatically turn off after the selected duration.

Image: The dimmable function illustrated in a kitchen, with a slider indicating brightness adjustment from 0% to 100%.
Remote Control Synchronization (if needed)
If the remote control loses synchronization with the LED strip, follow these steps:
- Ensure the LED strip is powered off.
- Simultaneously press and hold the 'Flash' and 'Fade' buttons on the remote control for 5-10 seconds.
- The LED strip should flash or respond, indicating successful synchronization.
Maintenance
- Cleaning: Gently wipe the silicone surface of the LED strip with a soft, damp cloth. Do not use harsh chemicals or abrasive cleaners. Ensure the strip is powered off and unplugged before cleaning.
- Inspection: Periodically check the LED strip and connections for any signs of damage, wear, or loose connections.
- Storage: If storing the LED strip for an extended period, ensure it is clean, dry, and coiled loosely to prevent damage. Store in a cool, dry place.
Troubleshooting
| Problem | Possible Cause | Solution |
|---|---|---|
| LED strip does not light up. | No power, loose connection, faulty power adapter/controller. | Check if the power adapter is plugged in and the outlet is working. Ensure all connections (strip to connector, connector to controller, controller to adapter) are secure. Test with another compatible 24V adapter if available. |
| Remote control not working. | Battery depleted, remote not synchronized, obstruction. | Replace the remote control battery. Re-synchronize the remote control (refer to 'Operating Instructions'). Ensure no obstructions between the remote and the controller. |
| Only part of the strip lights up. | Damage from incorrect cutting, internal circuit damage. | If the strip was cut, ensure it was cut only at the designated marks. If not, the strip may be damaged. Contact customer support if the issue persists. |
| Light flickers or is unstable. | Loose connection, insufficient power, faulty component. | Check all connections for tightness. Ensure the power adapter is providing stable 24V output. |
Specifications
| Feature | Detail |
|---|---|
| Model Number | 300D-WW-5M-DE |
| Brand | Lamomo |
| Length | 5 Meters (500 Centimeters) |
| Color Temperature | 3000K (Warm White) |
| LED Type | COB (Chip-on-Board) |
| LED Density | 320 LEDs/meter (Total 1600 LEDs for 5M) |
| Strip Width | 10mm |
| Voltage | 24V DC |
| Wattage | 48 Watts |
| Waterproof Rating | IP65 (Strip only; power plug and controller are not waterproof) |
| Control Method | Remote Control |
| Cuttable Interval | Every 5 cm (1.96 inches) |
| Material | Silicone |
Warranty & Support
Lamomo products are designed for quality and reliability. For warranty information, technical support, or any questions regarding your product, please refer to the contact information provided at the point of purchase or visit the official Lamomo website.
Please retain your proof of purchase for warranty claims.