Introduction
Thank you for choosing the Sttoraboks Vertical Bike Stand. This freestanding indoor bike storage rack is designed to provide a stable and space-saving solution for organizing your bicycle in various indoor environments such as garages, apartments, and sheds. Its adjustable height and rolling wheels offer convenience and versatility. Please read this manual carefully before assembly and use to ensure proper installation and safe operation.

Image: The Sttoraboks Vertical Bike Stand, demonstrating its ability to hold a bicycle upright, saving floor space.
Safety Guidelines
- Ensure all components are securely fastened before placing a bicycle on the stand.
- Do not exceed the maximum load capacity of 55 lb (25 kg).
- Place the stand on a flat, stable, and level surface to prevent tipping.
- Keep hands and fingers clear of moving parts during adjustment.
- This stand is not suitable for bikes equipped with fenders, baskets, or integrated kickstands, as these attachments may interfere with proper seating and stability.
- Always lock the casters when the stand is in its desired position to prevent unintended movement.

Image: Important compatibility notes, highlighting that the stand is not suitable for bikes with fenders, baskets, or integrated stands, along with key dimensions.
Package Contents
Please verify that all components are present before beginning assembly:
- Main Base Frame with Casters (x1)
- Vertical Support Pole (x1)
- Adjustable V-shaped Brackets (x2)
- Seatpost Support Arm (x1)
- Velcro Straps (for front wheel and seatpost stabilization)
- Assembly Hardware (bolts, nuts, washers)
- Assembly Tools (wrench, Allen key - typically included)
Assembly Instructions
Follow these steps to assemble your Sttoraboks Vertical Bike Stand:

Image: A visual representation of the four key installation steps for the bike stand.
- Step 1: Assemble the Base. Attach the vertical support pole to the main base frame. Ensure all bolts are tightened securely. Adjust the V-shaped brackets on the base to accommodate your bike's rear wheel width, ensuring stable support.
- Step 2: Place Rear Wheel. Carefully roll the rear wheel of your bicycle into the adjusted V-shaped brackets on the base. Ensure the wheel is seated firmly.
- Step 3: Lift Front Wheel. While holding the bike's frame, lift the front wheel of the bicycle upwards, pivoting on the rear wheel. Guide the front wheel into the upper V-shaped bracket on the vertical support pole. Adjust the height of the vertical support pole as needed to securely hold the front wheel.
- Step 4: Secure Bike. Use the provided Velcro straps to further stabilize the front wheel and the bike's seatpost to their respective support points. This ensures the bike remains firmly in place and prevents accidental movement.
The freestanding design means no drilling or wall damage is required, making setup quick and easy.

Image: Illustrates the advantage of a freestanding design, eliminating the need for drilling and potential wall damage associated with wall-mounted racks.
Operation
Placing and Removing Your Bicycle
To place your bike, ensure the stand is stable and casters are locked. Roll the rear wheel into the lower V-shaped bracket. Lift the front wheel and guide it into the upper V-shaped bracket. Secure both the front wheel and seatpost with the Velcro straps. To remove, unfasten the straps, gently lower the front wheel, and roll the bike away from the stand.
Adjusting Height and Width
The vertical support pole's height can be freely adjusted to accommodate different bike sizes (24"-29" wheels). Loosen the adjustment knob on the pole, slide it to the desired height, and tighten the knob firmly. The V-shaped brackets on the base can also be adjusted to fit tire widths up to 4 inches.

Image: Demonstrates the adjustable height feature of the vertical pole and the adjustable width of the V-shaped wheel holders.
Using Lockable Rolling Wheels
The stand is equipped with four 360° lockable rolling wheels, allowing for easy repositioning. To move the stand, unlock the casters. Once the stand is in its desired location, press down on the caster locks to secure the stand and prevent unwanted sliding.

Image: Highlights the stable triangular structure, the functionality of the 360° lockable casters, and the use of Velcro straps for secure bike placement.

Image: Demonstrates the ease of moving the bike stand using its integrated casters, providing flexibility in placement.
Compatibility
The Sttoraboks Vertical Bike Stand is designed for a wide range of bicycles:
- Wheel Sizes: Compatible with 24-inch to 29-inch wheels, including kids' bikes, mountain bikes, and road bikes.
- Tire Width: Accommodates tire widths up to a maximum of 4 inches.
- Weight Capacity: Supports bikes weighing up to 55 lb (25 kg).
Note: This stand is not compatible with bikes that have fenders, baskets, or integrated kickstands, as these accessories can prevent proper seating and stability within the rack.
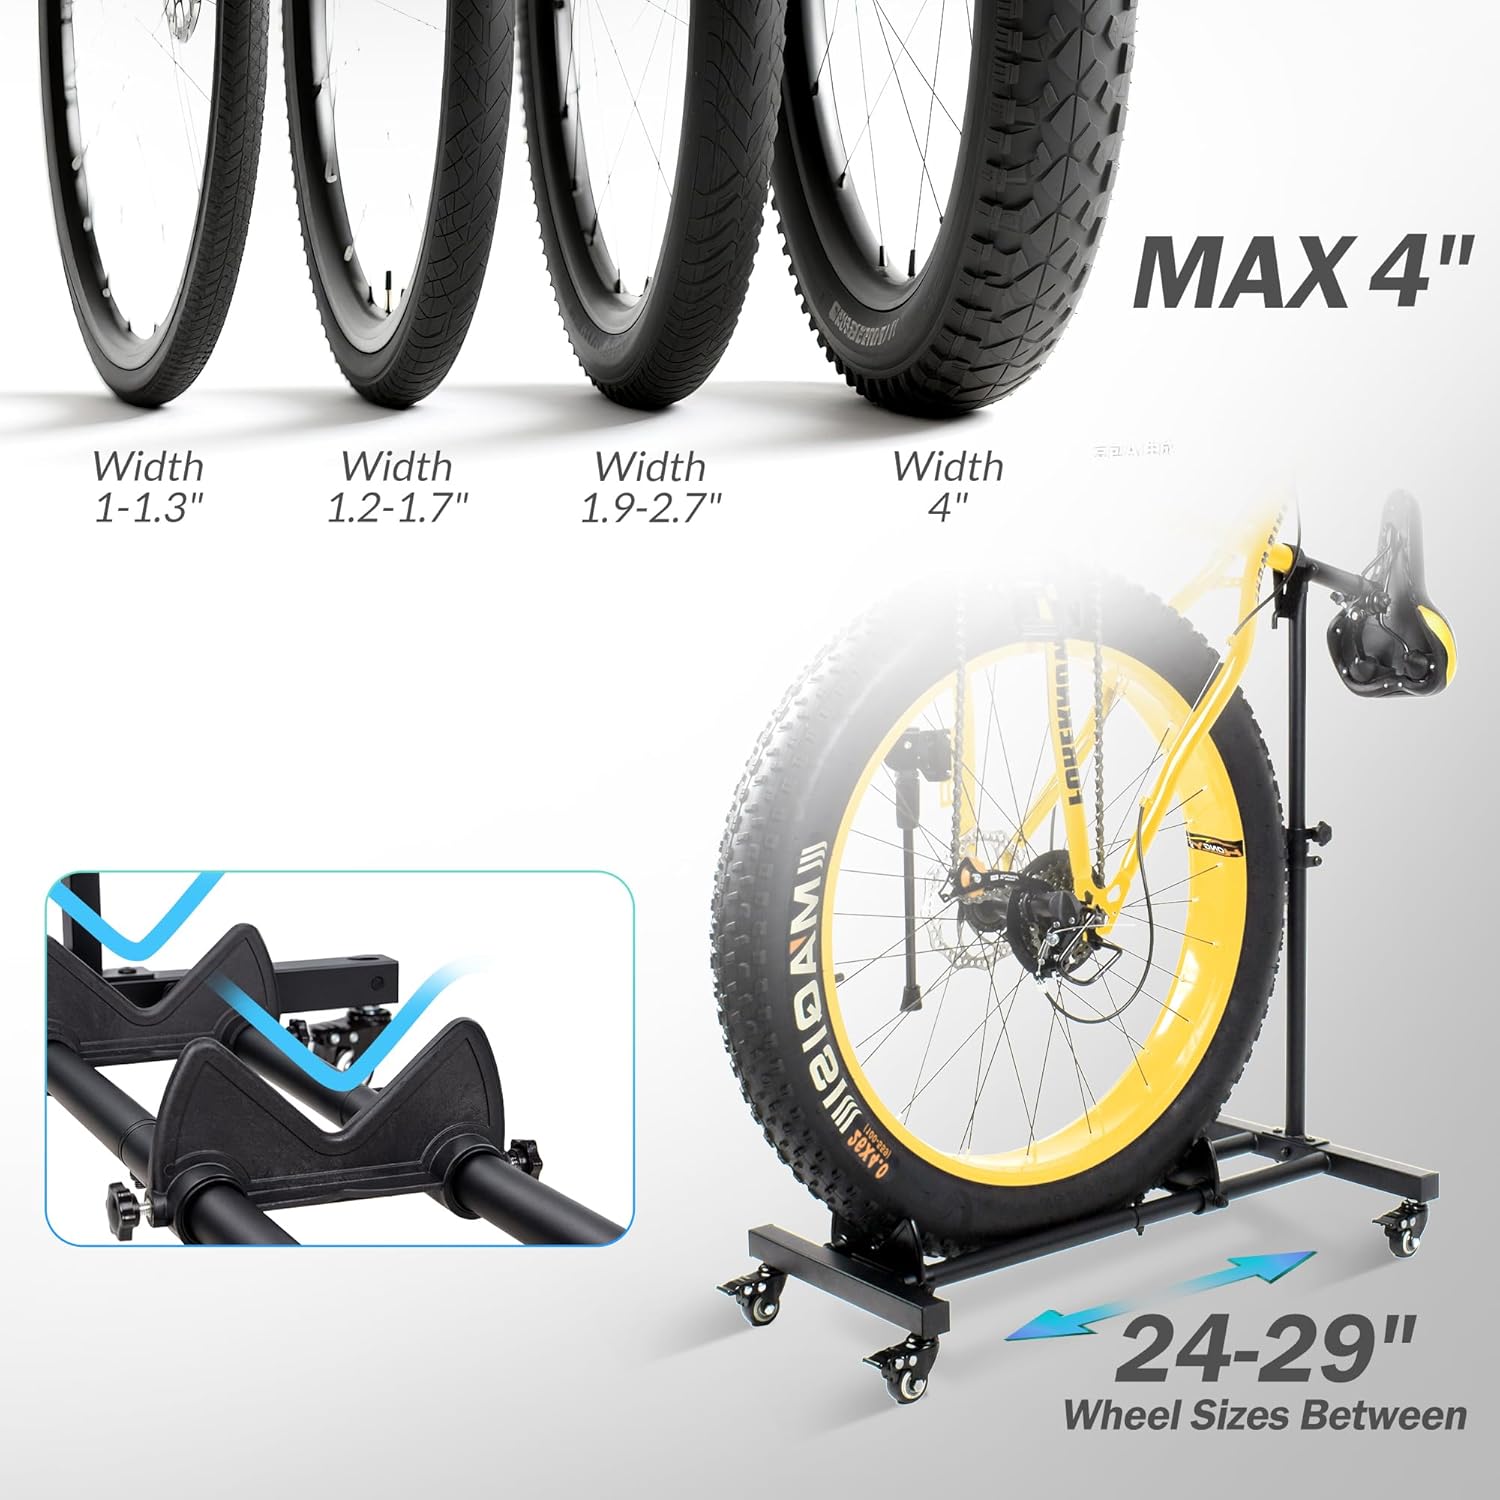
Image: Details the stand's compatibility with various tire widths (up to 4 inches) and wheel sizes (24-29 inches).
Care and Maintenance
- Cleaning: Wipe the stand with a soft, damp cloth to remove dust and dirt. Avoid abrasive cleaners or solvents that could damage the powder-coated finish.
- Inspection: Periodically check all bolts and connections to ensure they remain tight. Re-tighten if necessary.
- Storage: Store the stand in a dry environment to prevent rust, especially if used in a garage or shed where humidity may fluctuate.
- Casters: Keep the caster wheels free of debris to ensure smooth rolling.
Troubleshooting
| Issue | Possible Cause | Solution |
|---|---|---|
| Stand feels unstable or wobbly. | Loose connections; uneven surface; bike not properly seated. | Ensure all bolts are tightened. Move stand to a level surface. Re-seat the bike, ensuring wheels are fully in brackets and straps are secure. |
| Bike does not fit in the stand. | Incorrect height/width adjustment; incompatible bike type. | Adjust the vertical pole height and V-shaped bracket width. Verify bike wheel size and tire width are within specifications (24-29" wheels, max 4" tire width). Confirm bike does not have fenders, baskets, or integrated stands. |
| Casters not rolling smoothly or locking. | Debris in wheels; lock mechanism obstructed. | Clean any debris from the caster wheels. Ensure the lock mechanism is clear and engaging fully. |
Product Specifications
| Model Number | IBS-005 |
| Dimensions (L x W x H) | 26.81 x 16.81 x 33.58 inches |
| Item Weight | 8.18 pounds |
| Load Capacity | 55.1 Pounds (25 kg) |
| Material | Powder Coated Steel |
| Color | Black |
| Assembly Required | Yes |
| Special Feature | Portable, Freestanding |
Customer Support
For any questions, concerns, or assistance with your Sttoraboks Vertical Bike Stand, please contact our professional customer service team. We are committed to ensuring your satisfaction.
Please refer to your purchase documentation or the retailer's website for specific contact information.