for OKIN Box 258-4 78344 (CU258-4)
User Manual
Replacement Remote Control for Adjustable Bed Base
Product Overview
This manual provides instructions for the replacement remote control designed specifically for adjustable bed bases using the OKIN Box 258-4 78344 (CU258-4) control box. This remote is not universal and is intended only for the specified control box model. Please ensure your existing control box matches this model before use.

Image 1: Front view of the replacement remote control. This image displays the sleek black remote with clearly visible buttons for bed adjustments, including head and foot articulation, and a 'ZERO G' button for a zero-gravity preset.
Important Compatibility Information
This remote control is specifically designed for use with the OKIN Box 258-4 78344 (CU258-4) control box. It is crucial to verify that your existing control box matches this model number. Using this remote with an incompatible control box may result in non-functionality.
Before purchasing or attempting to pair, it is highly recommended to send clear pictures of your control box and old remote control (front and back) to the supplier for verification. The model number of your control box can often be found on a label on the unit itself, and sometimes within the battery compartment of your old remote.

Image 2: This image illustrates the importance of compatibility, showing examples of control box labels and the interior of a remote's battery compartment where model numbers are typically located. It emphasizes the need to match your specific control box and old remote to ensure proper functionality with the replacement.
Setup and Pairing Instructions
This remote control requires pairing with your adjustable bed base's control box before first use. The pairing process ensures secure communication between the remote and the bed base. Ensure the distance between the remote and the control box is less than 2 meters during pairing.
Battery Installation
The remote control requires 2 AAA batteries (not included). To install:
- Locate the battery compartment cover on the back of the remote control.
- Slide the cover off to open the compartment.
- Insert 2 AAA batteries, ensuring correct polarity (+/-) as indicated inside the compartment.
- Replace the battery compartment cover, sliding it firmly until it clicks into place.
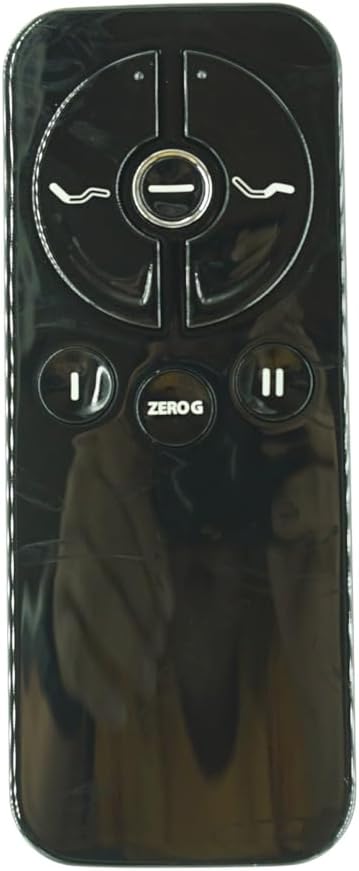
Image 3: This image shows the open battery compartment of the remote control, illustrating where the AAA batteries should be inserted and the 'Pair/Paire' button located within the compartment.
Pairing Method
Follow these steps to pair your new remote control with the adjustable bed base:
- Step 1: Power Cycle the Bed Base. Unplug the power cord of your adjustable bed base from the electrical outlet. Wait approximately 5 seconds, then plug it back into the outlet.
- Step 2: Initiate Pairing on Remote. Within 10 seconds of plugging in the bed base, locate the PAIR button on the back of the remote control (often inside the battery compartment). Press and hold this PAIR button.
- Step 3: Observe Pairing Indicator. The PAIR button on the remote will illuminate blue and begin flashing. Simultaneously, observe the LED light on the control box of your bed base. When the PAIR button on the remote stops flashing, the LED light on the control box should go out.
- Step 4: Complete Pairing. Release the PAIR button on the remote. The remote is now paired to the adjustable base.
- Step 5: Test Functions. Test all remote functions to ensure successful pairing and operation.

Image 4: This diagram provides a visual guide for the pairing process, highlighting the location of the reset button on the control box and the LED indicator that confirms pairing status. It shows the remote's internal pairing button and the control box's LED.
Operating Instructions
Once paired, your remote control allows you to adjust your adjustable bed base to various positions for optimal comfort.
Remote Button Functions

Image 5: A close-up view of the remote control's face, clearly showing the symbols and layout of each button for easy identification and operation.
| Button Symbol | Function | Description |
|---|---|---|
| Head Up/Down | Adjusts Head Section | Press and hold to raise or lower the head section of the bed. Release to stop at desired position. |
| Foot Up/Down | Adjusts Foot Section | Press and hold to raise or lower the foot section of the bed. Release to stop at desired position. |
| ZERO G | Zero Gravity Preset | Press to move the bed to a pre-programmed zero-gravity position, which elevates the head and foot to relieve pressure. |
| Flat | Return to Flat | Press to return the bed to a completely flat position. |
Maintenance and Care
Proper care and maintenance will extend the life of your remote control.
- Cleaning: Wipe the remote control with a soft, dry cloth. Do not use liquid cleaners, aerosols, or abrasive cleaners.
- Battery Replacement: Replace batteries when the remote's response becomes sluggish or it stops functioning. Always replace both batteries at the same time with new AAA batteries.
- Storage: Store the remote in a dry place, away from direct sunlight and extreme temperatures.
- Avoid Drops: Protect the remote from physical impact, as drops can damage internal components.
Troubleshooting
If you experience issues with your remote control, refer to the following common problems and solutions:
| Problem | Possible Cause | Solution |
|---|---|---|
| Remote not responding. | Dead batteries, remote not paired, or out of range. |
|
| Bed base moves erratically or not as expected. | Interference or pairing issue. |
|
| Remote LED not lighting up during pairing. | Batteries incorrectly installed or dead. |
|
If these steps do not resolve the issue, please contact customer support with details of your control box model and the problem encountered.
Specifications
- Model Number: for OKIN Box 258-4 78344 (CU258-4)
- Compatible Control Box: OKIN Box 258-4 78344 (CU258-4)
- Power Source: 2 x AAA Batteries (not included)
- Color: Black
- Max Number of Supported Devices: 1
- Manufacturer: Easytry
- Special Feature: Not Universal, specific to listed control box.
Warranty and Support
For any questions, concerns, or support regarding your replacement remote control, please contact the seller directly. It is recommended to provide your control box model number and any relevant details to assist in quicker resolution.
As this is a replacement part, specific warranty details may vary. Please refer to the purchase agreement or contact the seller for warranty information.
Contact Information: Please refer to your purchase receipt or the seller's information on the platform where the product was acquired.
Ask a question about this manual
Ask about setup, troubleshooting, compatibility, parts, safety, or missing instructions. Manuals+ will review the question and use this page’s manual context to help answer it.