Replacement Remote Control User Manual
Model: for Keeson MC120PR (JLDP 15.020.035)
Brand: Generic
Introduction
This manual provides essential information for the proper use, setup, and maintenance of your new replacement remote control for adjustable bed bases. This remote is specifically designed for compatibility with the Keeson MC120PR (JLDP 15.020.035) control box. Please read this manual thoroughly before attempting to use the remote control.
Important Compatibility Information
This remote control is NOT universal.
It is crucial to verify compatibility with your existing adjustable bed base control box. This remote is only compatible with control boxes manufactured by Keeson with the model number MC120PR (JLDP 15.020.035).
Before attempting to use this remote, ensure your control box model number matches exactly. If you are unsure, it is recommended to provide clear photos of your control box and old remote control (front and back), including any product numbers found in the battery compartment, to the supplier for verification.

Figure 1: Example of control box label and remote control for compatibility verification.
Setup
1. Battery Installation
The remote control requires 2 AAA batteries (not included). To install:
- Locate the battery compartment cover on the back of the remote control.
- Slide the cover downwards to open the compartment.
- Insert 2 AAA batteries, ensuring the correct polarity (+/-) as indicated inside the compartment.
- Replace the battery compartment cover by sliding it upwards until it clicks into place.
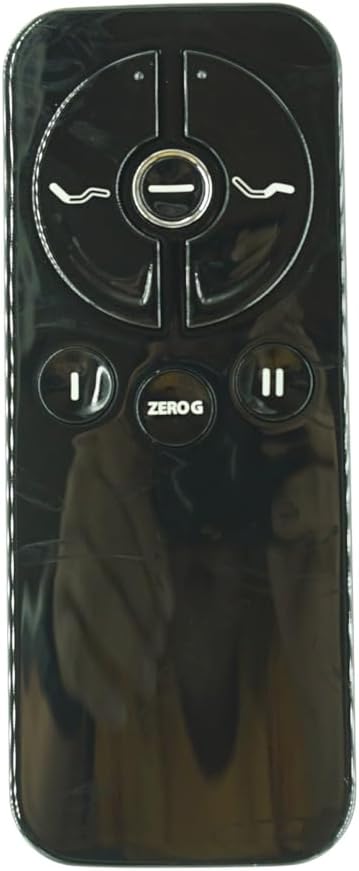
Figure 2: Remote control battery compartment.
2. Pairing the Remote Control
The remote control must be paired with your adjustable bed base's control box before first use. The pairing distance between the remote and control box should be less than 2 meters (approximately 6.5 feet).
- Unplug the power cord from the wall outlet.
- Wait approximately 5 seconds.
- Plug the power cord back into the outlet.
- Within 10 seconds of plugging in the power cord, locate the PAIR button on the back of the remote control.
- Press and hold the PAIR button on the remote. The PAIR button will illuminate blue and begin flashing.
- Continue holding the PAIR button until the LED light on the control box goes out, indicating successful pairing.
- Release the PAIR button. The remote is now paired with the adjustable base.
- Test all remote functions to confirm successful pairing.

Figure 3: Visual guide for pairing process, showing remote and control box LED.
Operating Instructions
The remote control features intuitive buttons for adjusting your bed base. Familiarize yourself with the button layout:

Figure 4: Remote Control Front View.
- Head Up/Down Buttons: Control the elevation of the head section of the bed.
- Foot Up/Down Buttons: Control the elevation of the foot section of the bed.
- ZERO G Button: Activates the "Zero Gravity" preset position, which elevates the head and foot to a position that may relieve pressure on the back.
- Flat Button (if applicable): Returns the bed to a flat position. (Note: This specific remote image does not clearly show a dedicated flat button, but it's a common feature. Refer to your bed base manual for specific functions.)
Press and hold the desired button to move the bed section. Release the button when the desired position is reached.
Maintenance
To ensure the longevity and proper functioning of your remote control:
- Keep the remote clean by wiping it with a soft, dry cloth. Avoid using liquid cleaners or abrasive materials.
- Do not expose the remote to excessive moisture, heat, or direct sunlight.
- If the remote will not be used for an extended period, remove the batteries to prevent leakage.
- Handle the remote with care to avoid dropping it or subjecting it to strong impacts.
Troubleshooting
Remote Not Responding:
- Check Batteries: Ensure batteries are correctly installed and not depleted. Replace with fresh AAA batteries if necessary.
- Re-Pair Remote: Follow the "Pairing the Remote Control" steps in the Setup section to re-establish connection with the control box.
- Power Cycle Bed Base: Unplug the bed base from the power outlet for 30 seconds, then plug it back in. This can reset the control box.
- Obstructions: Ensure there are no objects blocking the signal path between the remote and the control box.
Bed Base Not Moving:
- Check Power: Verify the bed base is properly plugged into a working electrical outlet.
- Control Box Status: Check the LED indicator on the control box (if present) for any error codes or status lights. Refer to your bed base's original manual for control box specific troubleshooting.
- Overload Protection: Some bed bases have overload protection. If the motor has been running continuously for an extended period, it may temporarily shut off. Allow it to cool down before attempting to operate again.
If problems persist after following these steps, contact the product supplier or a qualified technician for assistance.
Specifications
| Feature | Detail |
|---|---|
| Model Number | for Keeson MC120PR (JLDP 15.020.035) |
| Brand | Generic |
| Compatible Devices | Adjustable bed base with Keeson MC120PR (JLDP 15.020.035) control box |
| Power Source | 2 x AAA Batteries (not included) |
| Color | Black |
| Special Feature | Not Universal, specific compatibility required |
Warranty and Support
For warranty information or technical support, please refer to the documentation provided with your original adjustable bed base or contact the seller directly. It is recommended to have your product model number and purchase details ready when seeking support.