Introduction
This manual provides essential information for the setup, operation, and maintenance of your replacement remote control for adjustable bed bases. Please read this manual thoroughly before use to ensure proper functionality and compatibility.
Important Compatibility Note:
This remote control is NOT universal. It is specifically designed to work with certain control box models. Before use, ensure your control box model (e.g., JLDP.15.005.102 CU358-2-L) matches the remote's compatibility. Refer to the images provided for visual verification of compatible control boxes and remotes. If your control box or old remote is not identical to those shown, this remote may not function correctly.

Image: Front view of the black replacement remote control, showing the power button, head and foot adjustment buttons, and Zero G button.
Setup
1. Battery Installation
The remote control requires two (2) AAA batteries for operation. Batteries are not included with this product. To install:
- Locate the battery compartment on the back of the remote control.
- Slide the battery cover open.
- Insert two AAA batteries, ensuring the correct polarity (+ and -) as indicated inside the compartment.
- Replace the battery cover securely.
2. Pairing the Remote Control
The remote control must be paired with your adjustable bed base's control box to function. The pairing process may vary slightly depending on your bed base model. Please refer to the instructions below and your bed base's original manual for specific details.
General Pairing Method (Refer to your bed base manual for specifics)
- Step 1: Unplug the power cord from the wall outlet. Wait approximately 5 seconds, then plug it back into the outlet.
- Step 2: Within 10 seconds of plugging in the power cord, locate the PAIR button on the back of the remote control. Press and hold the PAIR button.
- Step 3: The PAIR button on the remote will illuminate blue and begin flashing. Continue holding the button until the LED light on the control box goes out.
- Step 4: Release the PAIR button. The remote is now paired to the adjustable base.
- Step 5: Test all remote functions to confirm successful pairing.

Image: Detailed diagram illustrating the general remote control pairing process, including visuals of the power down box, the remote's pair button, and the control box's LED light.
Pairing for Ease 3.0 Base
- Remove the rear cover of the remote to expose the PAIR button.
- Unplug the base from its power source. Wait 1 minute, then plug the base back in. Perform Step 3 within 10 seconds while the base control box light is still blinking.
- Press and hold the PAIR button on the back of the remote. The PAIR button will illuminate and start to flash.
- When the PAIR button stops flashing, the LED light on the control box will stop flashing. Release the PAIR button.
- Your remote is now paired to your base.
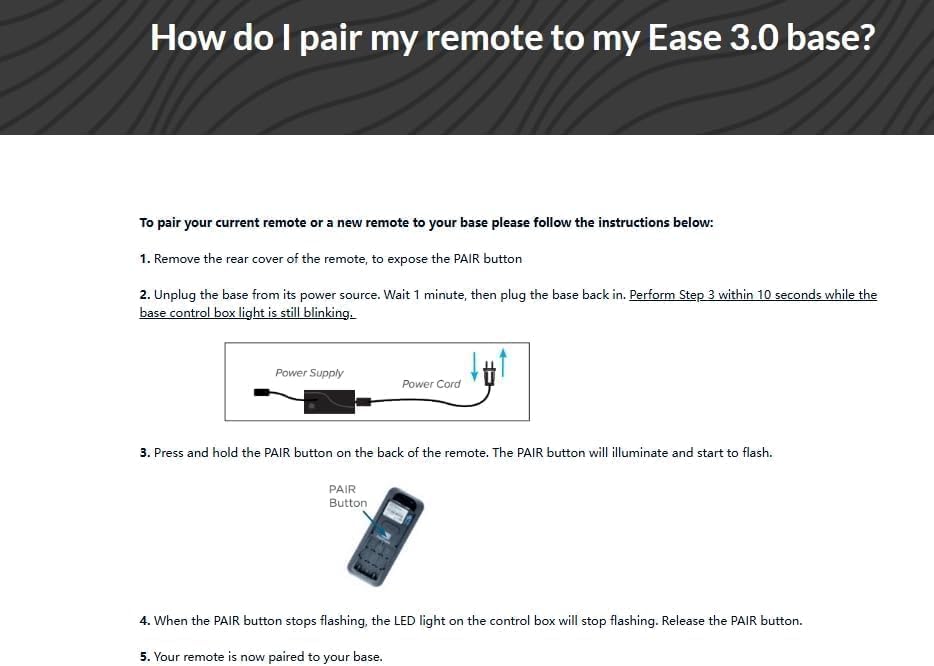
Image: Visual guide for pairing the remote with an Ease 3.0 adjustable bed base, showing power cord and remote's pair button.
Pairing for Ease 1.0 or Ease 2.0 (Prior Models)
- Please ensure your base remote has fresh batteries.
- Locate the Battery Backup Box and press the POWER DOWN button twice. A light on the Battery Backup Box will illuminate.
- On the back of the remote, press and hold down the PAIR button. The PAIR button will illuminate blue and start flashing. When the PAIR button stops flashing, the illuminated light on the Battery Backup Box will go out.
- Release the PAIR button and test all remote functions.

Image: Visual guide for pairing the remote with Ease 1.0 or 2.0 adjustable bed bases, showing the battery backup box and the remote's pair button.
Operating Instructions
Once successfully paired, your remote control allows you to adjust your adjustable bed base. The remote features intuitive buttons for various positions and functions.
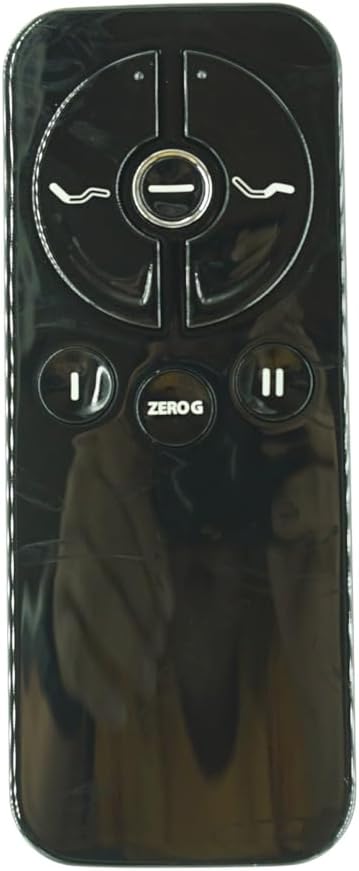
Image: Close-up view of the remote control's buttons, including head up/down, foot up/down, power, pause/play, and Zero G.
- Power Button (Circle with vertical line): Turns the bed base on or off, or returns it to a flat position.
- Head Up/Down Buttons (Curved lines with arrows): Adjusts the head section of the bed base upwards or downwards.
- Foot Up/Down Buttons (Curved lines with arrows): Adjusts the foot section of the bed base upwards or downwards.
- Zero G Button: Activates the "Zero Gravity" preset position, which elevates the head and foot to a position that may relieve pressure on the back.
- Pause/Play Buttons (Vertical lines with triangle): These buttons may control massage functions or other auxiliary features if supported by your bed base. Refer to your bed base manual for specific functionality.
Maintenance
- Cleaning: Wipe the remote control with a soft, dry cloth. Do not use liquid cleaners or abrasive materials.
- Battery Replacement: Replace batteries when the remote's response becomes sluggish or it stops functioning. Always replace both batteries at the same time with new AAA batteries.
- Storage: Store the remote in a dry place, away from extreme temperatures and direct sunlight.
- Handling: Avoid dropping the remote control or exposing it to excessive force, as this may damage internal components.
Troubleshooting
| Problem | Possible Cause | Solution |
|---|---|---|
| Remote does not respond. | Dead or incorrectly installed batteries. | Replace batteries with new AAA batteries, ensuring correct polarity. |
| Remote is not pairing with the bed base. | Incorrect pairing procedure or incompatible control box. | Review the "Pairing the Remote Control" section and ensure you are following the correct steps for your bed base model. Verify your control box model is compatible. |
| Some functions do not work. | Partial pairing or feature not supported by bed base. | Attempt to re-pair the remote. Consult your bed base's original manual to confirm supported features. |
| Remote works intermittently. | Low batteries or interference. | Replace batteries. Ensure no strong electronic devices are causing interference near the bed base. |
Important:
If your remote control is not identical to the one shown in the product images or your control box model is not listed as compatible, this replacement remote may not work. It is crucial to verify compatibility before purchase and use.

Image: Important tips for ensuring remote compatibility, displaying examples of control box labels and the appearance of an old remote for comparison.
Specifications
- Model Number: for JLDP.15.005.102 CU358-2-L
- Brand: Generic
- Color: Black
- Batteries Required: 2 x AAA (not included)
- Max Number of Supported Devices: 1
- Compatible Devices: Adjustable bed base (specific models only)
- Special Feature: Not Universal. Requires specific control box compatibility.
- Manufacturer: Easytry
- Country of Origin: China
Support
For any issues or questions regarding the compatibility or functionality of your replacement remote control, please contact the seller directly. Providing detailed information about your control box and old remote control (including photos and model numbers) will help expedite support.
"Message us if any problems!"


