Introduction
This manual provides detailed instructions for the installation, operation, and maintenance of your RUXAN Underground Dog Electric Fence System. Please read this manual thoroughly before use to ensure proper setup and safe operation for your pets.
Safety Information
- This system is intended for use with dogs weighing 10-110 pounds.
- Always supervise your dog during initial training and while using the system.
- Do not use this system on aggressive dogs or dogs with health issues without consulting a veterinarian or professional trainer.
- Ensure the collar is fitted correctly to prevent skin irritation. The conductive silica gel contact points are designed to protect your dog's skin.
- The transmitter unit should be installed in a dry, protected area, away from direct weather exposure.
- The system includes built-in lightning protection; however, it is advisable to disconnect the transmitter during severe thunderstorms.
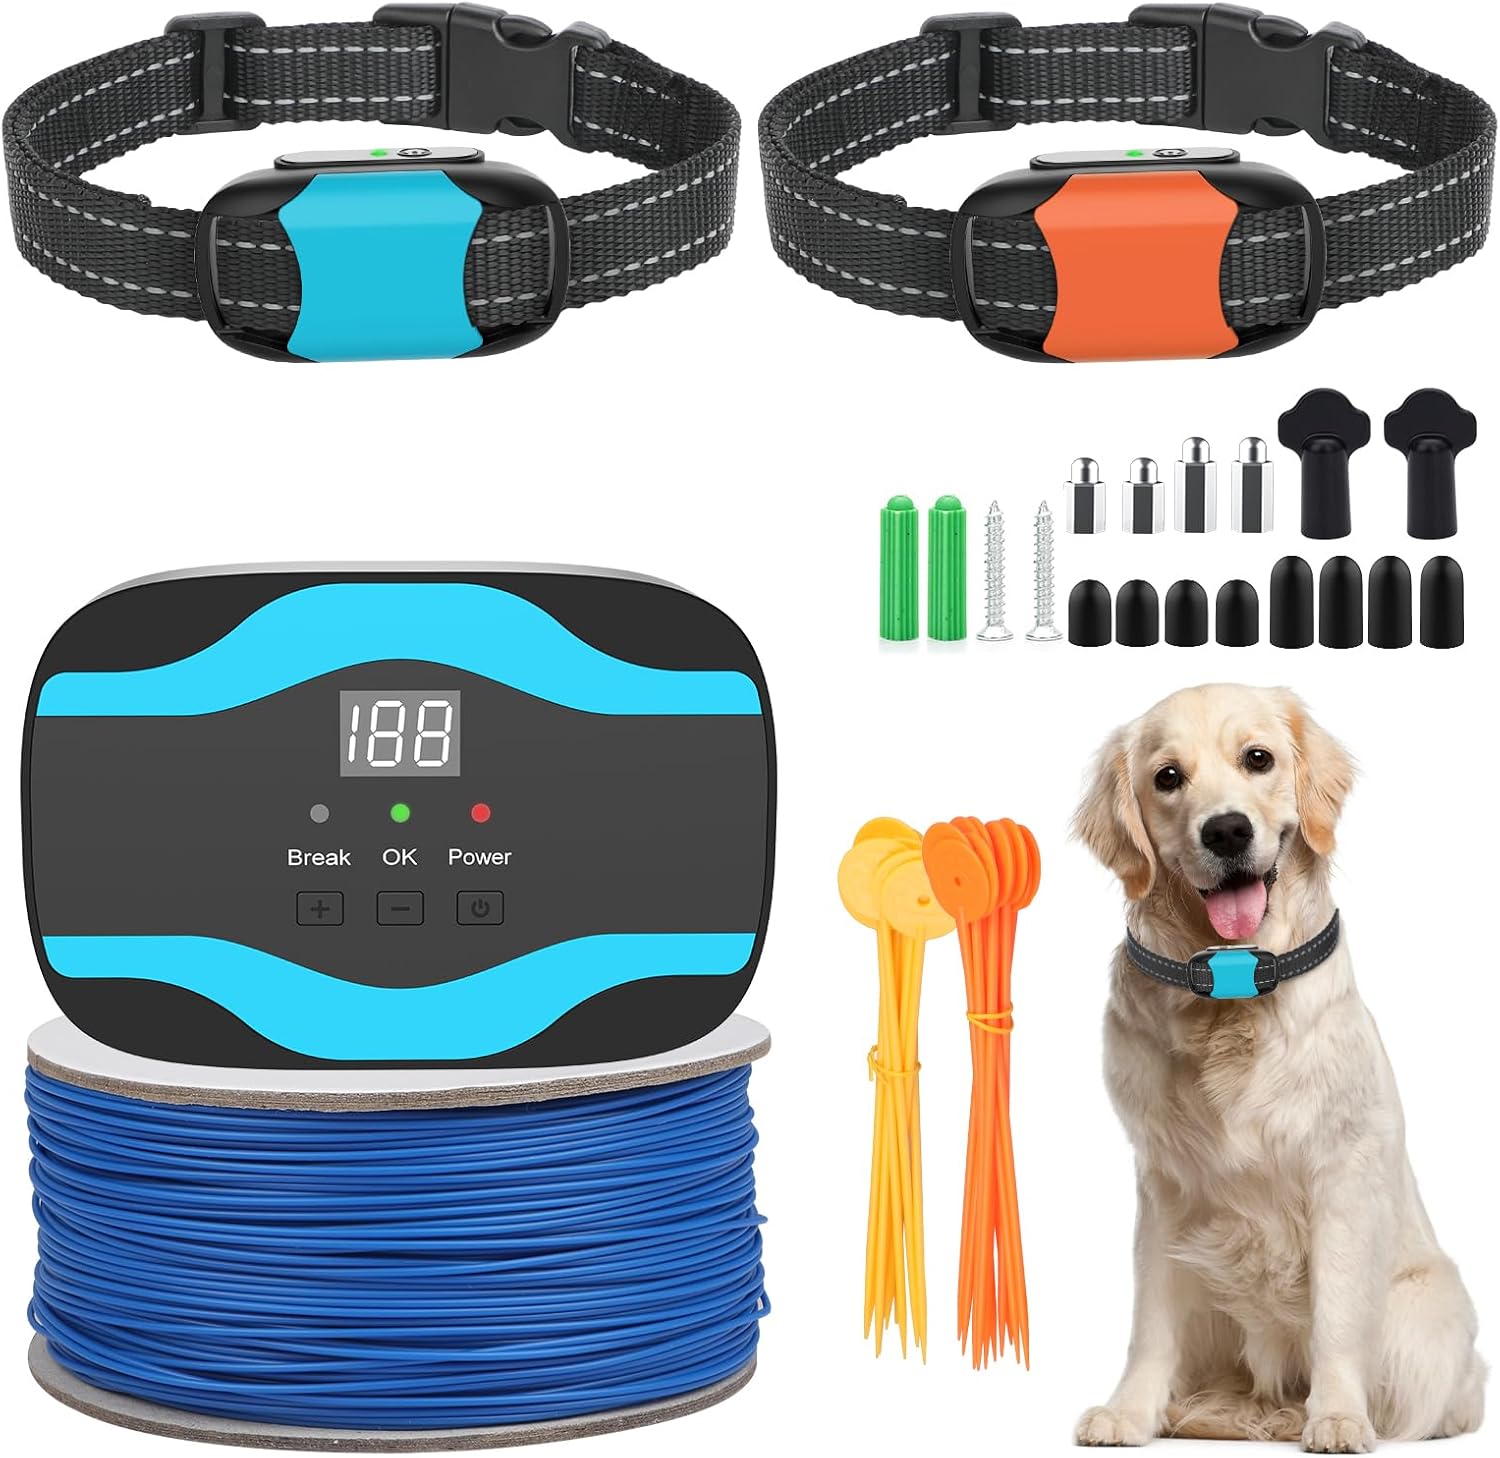
Package Contents
Verify that all items are present in your package:
- 1 x Transmitter Unit
- 2 x Rechargeable Collar Receivers (Blue and Orange)
- 1 x Roll of Boundary Wire (656 feet)
- 4 x Short Contact Points (Silica Gel)
- 4 x Long Contact Points (Silica Gel)
- 1 x Test Light Tool
- 20 x Training Flags
- 1 x Power Adapter for Transmitter
- 2 x USB Charging Cables for Collars
- Mounting Screws and Anchors
Product Overview
Transmitter Unit
- LED Display: Shows signal level (1-100).
- Signal Adjustment Buttons (+/-): Increases or decreases the signal field width.
- Power Button: Turns the transmitter on/off.
- Wire Terminals: Connects the boundary wire.
- Power Port: Connects to the power adapter.
- Indicator Lights: 'OK' (green) for proper wire connection, 'Break' (red) for wire break, 'Power' (red) for power status.
Collar Receiver
- On/Off Button: Powers the collar on/off.
- Indication Light: Shows operational status and low battery.
- Charging Socket: For recharging the collar battery.
- Contact Points: Deliver static correction. Use the provided conductive silica gel points for comfort.
- Adjustable Strap: Fits neck sizes from 9.5 to 26 inches.
- Reflective Strip: Enhances visibility in low light conditions.

Setup
1. Mount the Transmitter
- Choose a dry, protected location near a power outlet, such as a garage or utility room.
- Use the provided screws and anchors to securely mount the transmitter to a wall.
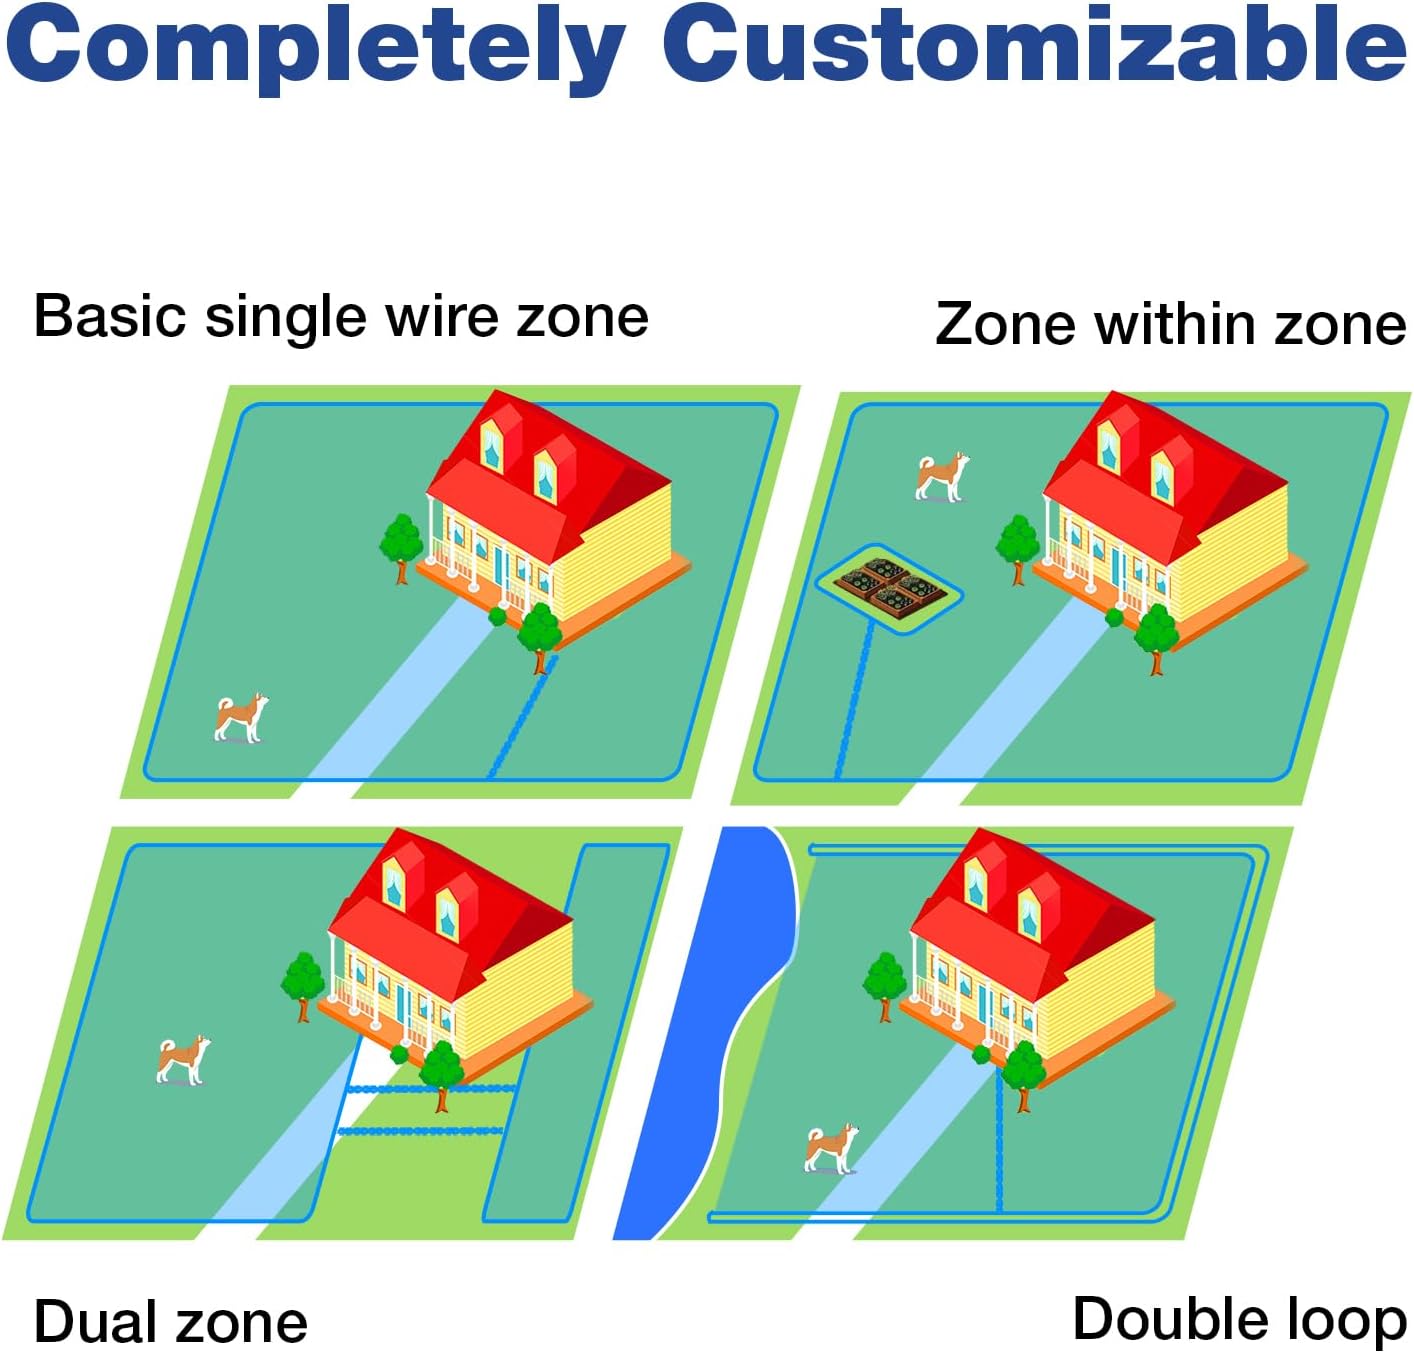
2. Install the Boundary Wire
The system includes 656 feet of boundary wire, covering up to 3/4 acre. Additional wire can be purchased to expand coverage up to 5 acres.
- Planning: Sketch your desired containment area. The wire must form a continuous loop back to the transmitter. Avoid sharp angles.
- Aboveground Installation: Lay the wire directly on the ground, securing it with landscape staples (not included) every few feet. This is suitable for temporary setups or testing.
- Inground Installation: Bury the wire 1-3 inches deep. For best results and protection, bury it no deeper than 12 inches.
- Connecting to Transmitter: Strip about 1/2 inch of insulation from both ends of the boundary wire. Insert one end into each wire terminal on the transmitter. Ensure a secure connection. The 'OK' light on the transmitter should illuminate green. If the 'Break' light is red, check for wire damage or improper connection.
- Training Flags: Place training flags along the boundary wire at intervals of 8-10 feet. These visual markers will aid in your dog's training.

3. Prepare the Collar Receiver
- Charge the Collar: Connect the USB charging cable to the collar's charging socket and a power source. A full charge takes approximately 1.5 hours. The indication light will change when fully charged.
- Attach Contact Points: Select the appropriate length of conductive silica gel contact points based on your dog's fur length. Screw them firmly onto the collar receiver.

4. Fit the Collar
- Place the collar around your dog's neck, ensuring the contact points touch the skin.
- Adjust the strap for a snug fit, allowing two fingers to comfortably slide between the strap and your dog's neck. Trim any excess strap if necessary.
- The collar is adjustable for neck sizes from 9.5 to 26 inches, suitable for various dog breeds.

Operating Instructions
1. Power On the System
- Plug in the transmitter unit. The 'OK' light should be green.
- Press and hold the power button on each collar receiver until the indication light illuminates.
2. Adjust Signal Field Width
- The transmitter allows adjustment of the signal field width from level 1 to 100. This determines how far from the boundary wire the collar will activate.
- Use the '+' and '-' buttons on the transmitter to set the desired signal level. A higher number means a wider signal field (up to 20 feet max. radius).
- Test the signal field with the collar receiver in hand. Walk towards the boundary wire; the collar should emit a beep, followed by a static correction as you get closer to the wire.


3. Training Your Dog
Effective training is crucial for the success of the system. Begin with short, positive training sessions.
- Introduction to Boundary: Walk your dog on a leash around the perimeter marked by the training flags. When the collar beeps, immediately guide your dog away from the boundary with a verbal command like "No!" or "Back!". Praise and reward your dog when they move away from the boundary.
- Gradual Progression: After several days of leash training, allow your dog off-leash within the safe zone, continuing to reinforce the boundary.
- Consistency: Consistent training over 1-2 weeks is typically required for dogs to understand the boundary.
Maintenance
Collar Receiver Care
- Recharge the collar receivers as needed. The indication light will signal a low battery.
- The collar is IPX7 waterproof, meaning it can withstand immersion in water up to 1 meter for 30 minutes. It is suitable for rainy days and swimming.
- Clean the collar and contact points regularly with a damp cloth to prevent dirt buildup.

Boundary Wire Inspection
- Periodically inspect the boundary wire for any visible damage or breaks.
- The transmitter features a disconnect alarm and will indicate a 'Break' (red light) if the wire loop is interrupted.
Troubleshooting
| Problem | Possible Cause | Solution |
|---|---|---|
| Collar not activating at boundary. | Collar not charged, not powered on, signal field too narrow, wire break. | Ensure collar is charged and powered on. Increase signal level on transmitter. Check transmitter 'OK' light; if 'Break' is red, inspect wire for damage. |
| Dog crosses boundary despite correction. | Insufficient training, signal level too low, collar fit too loose. | Reinforce training. Increase signal level on transmitter. Ensure collar is snug with contact points touching skin. |
| Transmitter 'Break' light is red. | Break in boundary wire, loose wire connection at transmitter. | Inspect entire boundary wire for cuts or damage. Re-secure wire connections at the transmitter terminals. |
| Collar continuously activates without approaching boundary. | Interference from other electronic devices, faulty collar. | Move transmitter away from large metal objects or other electronics. Test collar with test light. If issue persists, contact customer support. |
| Collar not holding a charge. | Battery degradation, faulty charging cable/port. | Ensure charging cable and adapter are functional. If battery life is significantly reduced, contact customer support. |
Specifications
- Model Number: N#865RX5-2
- Item Weight: 2.46 pounds
- Batteries: 1 Lithium Polymer battery required (included)
- Collar Adjustment Range: 9.5 - 26 inches
- Recommended Dog Weight: 10 - 110 pounds
- Boundary Wire Length: 656 feet (included)
- Coverage Area: Up to 3/4 acre (with included wire), expandable up to 5 acres with additional wire.
- Signal Field Radius: Up to 20 feet (maximum)
- Correction Levels: 1-100 (static shock and sound)
- Collar Waterproof Rating: IPX7
- Collar Charging Time: Approximately 1.5 hours
- Specific Uses: Outdoor pet containment
Warranty Information
The RUXAN Underground Dog Electric Fence System comes with a 1-year warranty from the date of purchase. This warranty covers manufacturing defects under normal use. Please retain your proof of purchase for warranty claims. The warranty does not cover damage caused by misuse, accident, unauthorized modification, or normal wear and tear.
Customer Support
If you encounter any issues or have questions regarding your RUXAN Underground Dog Electric Fence System that are not addressed in this manual, please contact RUXAN customer support. Refer to the product packaging or the RUXAN official website for contact details.