RATTMMOTOR XIAOJ-50mm
RATTMMOTOR K01-50mm 3-Jaw Lathe Chuck Spindle Assembly with 895 Motor User Manual
Model: XIAOJ-50mm
1. Safety Instructions
Read and understand all instructions before operating this equipment. Failure to follow these instructions may result in serious injury or property damage.
- Always wear appropriate personal protective equipment (PPE), including safety glasses, gloves, and hearing protection.
- Ensure the workpiece is securely clamped in the chuck before starting operation.
- Disconnect power to the motor before performing any adjustments, maintenance, or when changing workpieces.
- Keep hands, hair, and loose clothing away from moving parts.
- Operate the assembly in a well-lit and clear workspace.
- Do not exceed the recommended operating speeds or capacities.
2. Product Overview
The RATTMMOTOR K01-50mm 3-Jaw Lathe Chuck Spindle Assembly with 895 Motor is designed for various woodworking and light machining applications, including use with CNC lathes, grinders, and table saws. This assembly provides a robust and efficient rotary solution.
2.1 Components
The assembly includes the following main components:
- K01-50mm 3-Jaw Self-centering Chuck
- Through-hole Spindle Rod
- Spindle Bearing Housing
- 895 DC Motor
- XL10 Tooth 5mm Synchronous Wheel (for motor)
- XL30 Tooth Synchronous Wheel (for spindle)
- XL110 Belt
- Chuck Spanner
- Hex Keys
- Mounting Screws

Figure 2.1: Exploded view of the K01-50mm 3-Jaw Lathe Chuck Spindle Assembly showing all included components.
2.2 Key Features
- High-Speed 895 DC Motor: Rated voltage 12-24V DC, motor speed up to 12000rpm (12V/6000rpm, 24V/12000rpm). Supports forward and reverse rotation.
- K01-50mm Self-centering Chuck: 3-jaw design with internal jaw clamping range of 2-15mm and external jaw clamping range of 20-50mm. Threaded connection, M14 thread size.
- Synchronous Belt Drive: Utilizes XL10 (motor) and XL30 (spindle) tooth synchronous wheels with an XL110 belt for efficient and smooth power transmission. Reduction ratio of 1:3.
- Durable Construction: Chuck base made of high-quality hardened steel for precision, strength, and durability.
3. Specifications
3.1 895 Motor Parameters
| Parameter | Value |
|---|---|
| Rated Voltage | 12-24V DC |
| No-load Current | 1.5A |
| Motor Speed (12V) | 6000rpm |
| Motor Speed (24V) | 12000rpm |
| Turning Force | 8KG/cm |
| Torque | 0.78N.m |

Figure 3.1: 895 Motor dimensions and electrical parameters.
3.2 K01-50mm Chuck Specifications
- Jaw Type: 3-Jaw, Self-centering
- Internal Jaw Clamping Range: 2-15mm
- External Jaw Clamping Range: 20-50mm
- Connection Form: Threaded connection
- Thread Size: M14
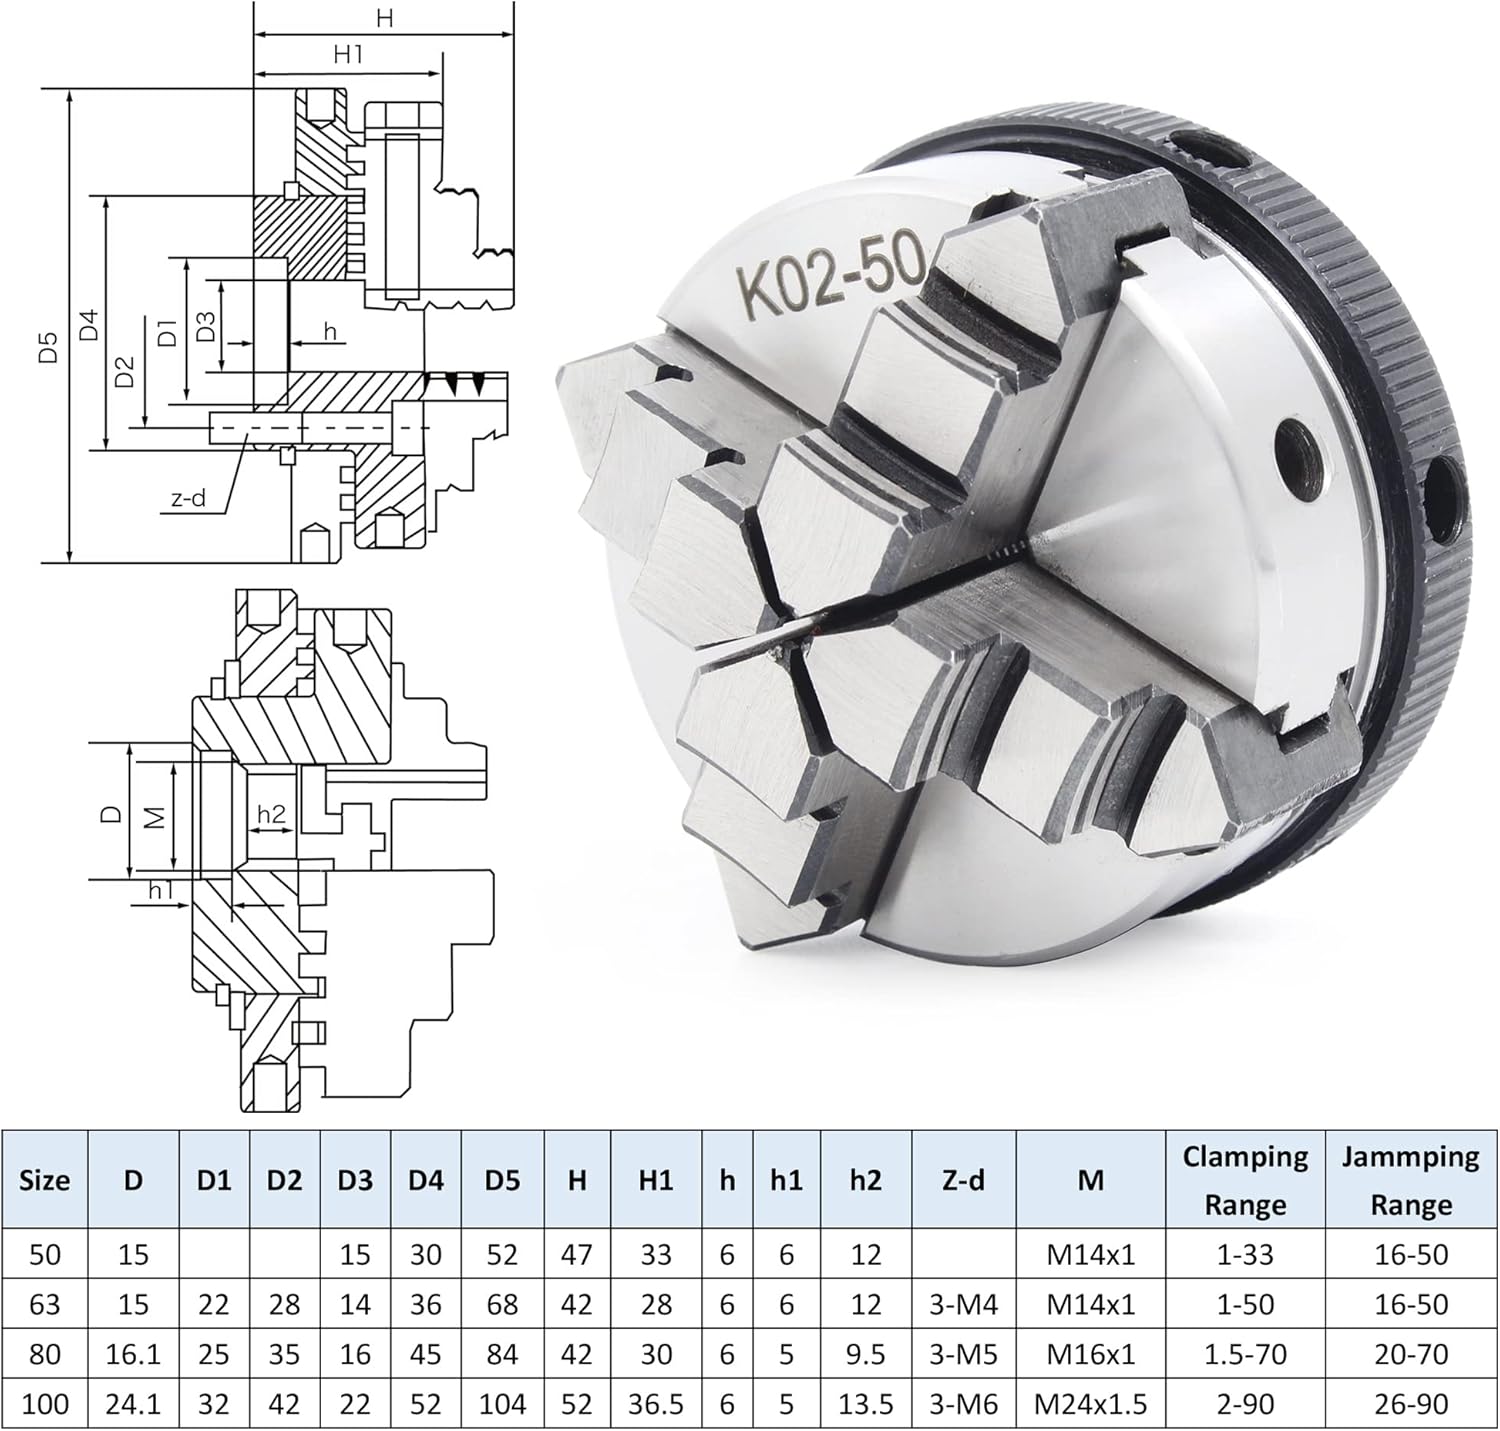
Figure 3.2: K01-50mm 3-Jaw Chuck dimensions and clamping ranges.
3.3 Belt and Synchronous Wheel Specifications
- Belt Model: XL110
- Belt Circumference: 279.44mm
- Belt Teeth: 55
- Motor Synchronous Wheel: XL10 teeth, 5mm bore
- Spindle Synchronous Wheel: XL30 teeth
- Reduction Ratio: 1:3

Figure 3.3: Synchronous wheel dimensions and XL110 belt specifications.
3.4 General Dimensions and Weight
- Item Weight: 3.74 pounds (approx. 1.7 kg)
- Package Dimensions: 7.87 x 5.51 x 4.33 inches (approx. 20 x 14 x 11 cm)

Figure 3.4: Overall dimensions of the assembled spindle unit.
4. Setup and Assembly
This section outlines the general steps for assembling and setting up your RATTMMOTOR K01-50mm 3-Jaw Lathe Chuck Spindle Assembly. Ensure all components are present and undamaged before beginning.
- Unpack Components: Carefully remove all parts from the packaging and verify against the component list in Section 2.1.
- Mount Spindle Bearing Housing: Secure the spindle bearing housing to your workbench or machine frame using appropriate fasteners. Ensure it is stable and level.
- Install Chuck: Attach the K01-50mm 3-jaw chuck to the spindle rod. Ensure the threaded connection (M14) is tight and secure. Use the provided chuck spanner if necessary.
- Mount Motor: Secure the 895 DC motor to its mounting bracket. Then, attach the motor assembly to your setup, ensuring proper alignment with the spindle.
- Install Synchronous Wheels and Belt:
- Place the XL10 tooth synchronous wheel onto the motor shaft and secure it.
- Place the XL30 tooth synchronous wheel onto the spindle shaft and secure it.
- Carefully fit the XL110 belt over both synchronous wheels. Adjust the motor position if needed to achieve proper belt tension. The belt should be taut but not overly tight to avoid excessive strain on bearings.
- Electrical Connection: Connect the 895 DC motor to a suitable 12-24V DC power supply. Ensure correct polarity. If using a variable speed controller (not included), follow its instructions for connection.

Figure 4.1: Fully assembled spindle unit with motor and chuck.
Video 4.1: Demonstration of the K01-50mm Lathe Chuck Spindle Assembly rotating, showcasing its components and smooth operation.
5. Operation
Once the spindle assembly is properly set up and connected to a power source, follow these steps for operation:
- Secure Workpiece: Open the chuck jaws using the chuck spanner. Insert your workpiece and tighten the jaws firmly to ensure it is securely held. Verify the workpiece is centered and balanced to prevent vibration.
- Power On: Apply power to the 895 DC motor. The motor will begin to rotate the spindle.
- Direction Control: If your power supply or controller supports it, you can switch the motor's polarity to change the direction of rotation (forward or reverse).
- Monitoring: During operation, continuously monitor the workpiece and the assembly for any unusual noises, vibrations, or signs of loosening.
- Power Off: After completing your task, turn off the power supply to the motor and allow the spindle to come to a complete stop before handling the workpiece or making any adjustments.
- Remove Workpiece: Loosen the chuck jaws and carefully remove the workpiece.
Note: The motor speed is determined by the input voltage (12V for 6000rpm, 24V for 12000rpm). For variable speed control, an external DC motor speed controller is required (not included).
6. Maintenance
Regular maintenance ensures the longevity and optimal performance of your spindle assembly.
- Cleaning: After each use, clean the chuck and spindle assembly to remove dust, chips, and debris. Use a brush or compressed air. Avoid using harsh chemicals that may damage components.
- Lubrication: Periodically apply a light machine oil to the chuck jaws and screw mechanism to ensure smooth operation. Do not over-lubricate.
- Belt Inspection: Regularly inspect the XL110 belt for signs of wear, cracks, or stretching. Replace the belt if any damage is observed to maintain optimal power transmission.
- Bearing Check: Listen for any unusual noises from the spindle bearings. If grinding or excessive noise is detected, the bearings may require inspection or replacement by a qualified technician.
- Fastener Check: Periodically check all mounting screws and fasteners for tightness. Tighten as necessary to prevent vibration and ensure stability.
7. Troubleshooting
This section addresses common issues you might encounter with the spindle assembly.
| Problem | Possible Cause | Solution |
|---|---|---|
| Motor does not start or runs intermittently. | No power, incorrect wiring, faulty motor. | Check power supply connection and voltage. Verify wiring polarity. If issues persist, motor may be faulty. |
| Chuck will not stay tight or workpiece slips. | Jaws not fully tightened, worn chuck jaws, improper workpiece seating. | Ensure chuck jaws are fully tightened with the spanner. Clean jaws and workpiece. Inspect jaws for wear; replace chuck if necessary. |
| Excessive vibration or noise during operation. | Unbalanced workpiece, loose mounting, worn bearings, loose belt. | Re-balance workpiece. Check all mounting fasteners for tightness. Inspect spindle bearings. Adjust belt tension. |
| Belt slips or comes off. | Insufficient belt tension, worn belt, misaligned pulleys. | Adjust belt tension. Inspect and replace worn belt. Check alignment of synchronous wheels. |
8. Warranty and Support
For warranty information or technical support regarding your RATTMMOTOR K01-50mm 3-Jaw Lathe Chuck Spindle Assembly, please contact the retailer or manufacturer directly. Keep your purchase receipt as proof of purchase.
Manufacturer: RATTMMOTOR
Ask a question about this manual
Ask about setup, troubleshooting, compatibility, parts, safety, or missing instructions. Manuals+ will review the question and use this page’s manual context to help answer it.