Introduction
This manual provides detailed instructions for the installation, operation, and maintenance of your Coiiwsei RTH725 Programmable Thermostat. Please read this manual thoroughly before installation and use to ensure proper function and safety.
Package Contents
Verify that all items listed below are included in your product package:
- 1 x Thermostat
- 1 x Wall Plate
- 1 x Instruction Manual
- 1 x Wiring Labels
- 1 x Screw Sets

Figure 1: Contents of the Coiiwsei RTH725 Thermostat package.
Compatibility
The Coiiwsei RTH725 thermostat is designed for high compatibility with various HVAC systems. Please review the compatibility information below to ensure it works with your system.
Compatible Systems:
- Heat pump multi-stage systems (2 Heat/1 Cool)
- Conventional single-stage systems (1 Heat/1 Cool)
- Forced air systems (gas, oil, or electric)
- Electric furnace
- Hot water steam or gravity radiant heat
- Heat only systems
- Heat pump with or without auxiliary or emergency heat
- Millivolt conventional systems
- Gas fireplaces (24V)
- Floor or wall furnaces
- Cool only systems
Not Compatible With:
- Two transformer systems
- Conventional multi-stage systems
- Dual fuel/hybrid heating systems
- Electric baseboard heat (110-240 volts)
- Line voltage systems
- Convectors
- Radiant-ceiling heat
- Mini split systems
- 12V RV systems

Figure 2: System compatibility overview for the Coiiwsei RTH725 Thermostat.
Installation
Important Safety Information:
- Always turn off power at the main power source by unscrewing the fuse or switching the circuit breaker to the off position before installing, removing, cleaning, or servicing the thermostat.
- Read all information in this manual before installing or programming this thermostat.
- Before removing the old thermostat, label the wires with the supplied wire labels.
Wiring Instructions:
The thermostat features large terminal blocks and a universal sub-base for straightforward installation. Follow these steps for wiring:
- Turn off power to your HVAC system at the circuit breaker.
- Remove your old thermostat from the wall plate.
- Carefully label each wire with the provided wiring labels as you disconnect it from your old thermostat.
- Mount the new Coiiwsei RTH725 wall plate to the wall using the included screws.
- Connect the labeled wires to the corresponding terminals on the new wall plate. Refer to the wiring diagram below.
- Snap the thermostat onto the wall plate.
- Restore power to your HVAC system.
Figure 3: Thermostat wiring base and safety precautions.
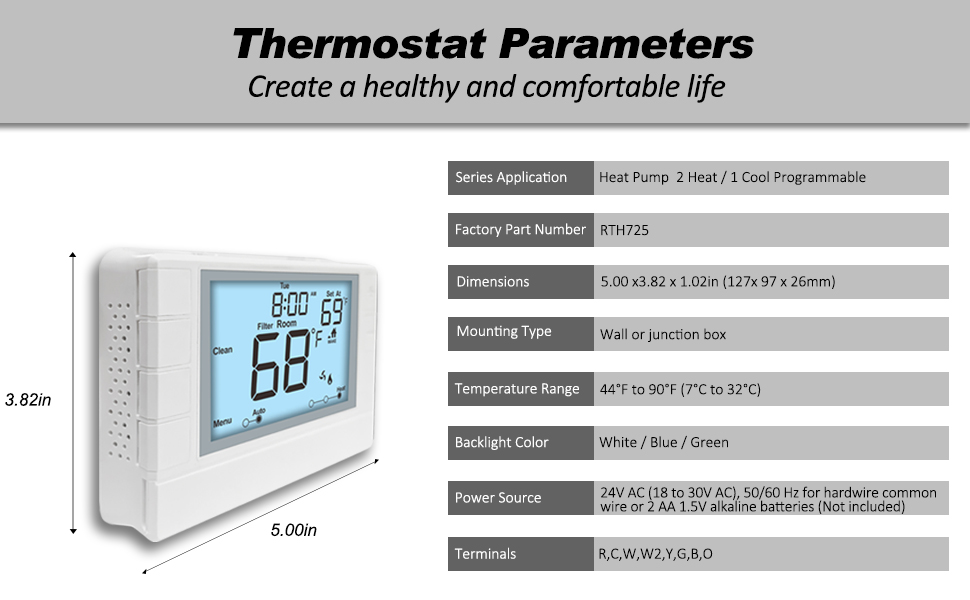
Figure 4: Detailed wiring terminal connections. Note: 4 wires must be connected for use. If only 2 wires are used, batteries must be installed.
Terminal Definitions:
- C: Common 24VAC (system power supply)
- O: REV VALVE COOL (Change-over relay to cool relay)
- B: REV VALVE HEAT (Change-over relay to heat relay)
- W/E: Emergency heat relay stage 1
- W2: Auxiliary heat relay stage 2
- R: 24VAC (system power supply)
- G: FAN (Fan relay)
- Y: Cool relay
Operation
The Coiiwsei RTH725 features a large, clear, backlit LCD display and user-friendly controls for easy operation.
Display and Controls:

Figure 5: Main display and control features of the thermostat.
Figure 6: Thermostat layout with descriptions of FAN switch, SYSTEM switch, and programming buttons.
- FAN Switch: Controls the fan operation (ON, AUTO).
- SYSTEM Switch: Selects the operating mode (COOL, OFF, HEAT, EMH - Emergency Heat).
- Up/Down Buttons: Adjust temperature settings.
- Menu Button: Accesses programming options.
- Room Temperature Display: Range 32°F to 99°F (0°C to 40°C), with an accuracy of +/- 2°F for consistent comfort.
- Temperature Set Range: Manually adjustable from 44°F to 90°F (7°C to 32°C).
Programming:
The thermostat includes factory pre-set energy-efficiency programs with 7-day, 5/1/1 programming menus. This flexible programming allows you to synchronize your comfort settings with your daily schedule.
- Use the programming buttons (unlabeled in some diagrams, refer to the manual for specific button functions) to set your desired schedule.
- The thermostat supports separate heating and cooling swing (cycle rate) adjustments.
- Room temperature calibration adjustment is available.
- Features a 5-minute compressor delay protection, which can be set ON or OFF.
Maintenance
Battery Replacement:
The thermostat requires 2 AA alkaline batteries (not supplied). These batteries provide a back-up power source if a C-wire is not available, maintaining settings in the event of a power outage.
- When the battery icon appears on the display, it indicates that the 2 AA batteries are low and should be replaced.
- Open the easy-change battery door located at the bottom front of the thermostat.
- Remove the old batteries and insert two new AA alkaline batteries, ensuring correct polarity.
- Close the battery door.
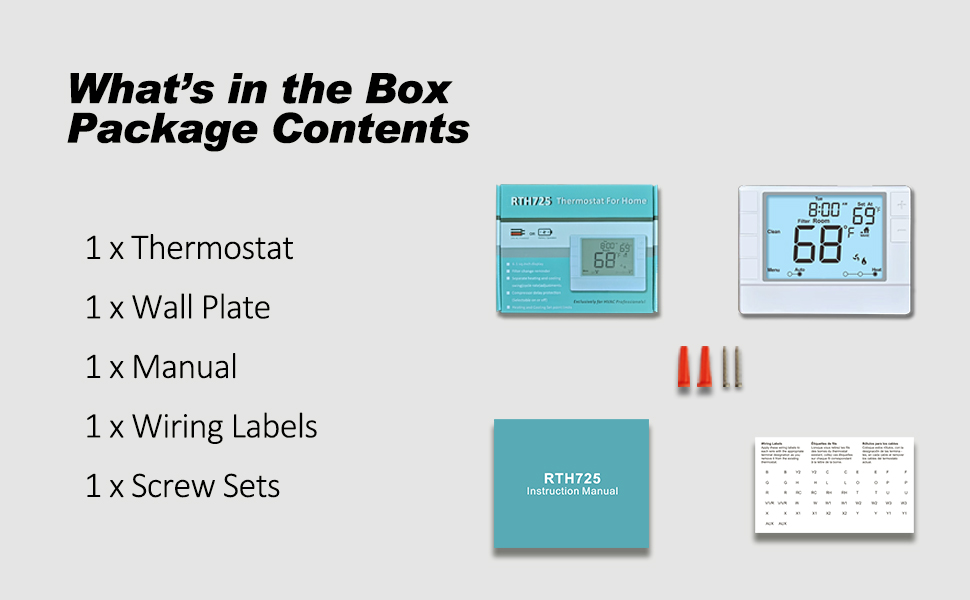
Figure 7: Thermostat dimensions and battery compartment location.
Specifications
Below are the technical specifications for the Coiiwsei RTH725 Programmable Thermostat:
| Parameter | Value |
|---|---|
| Series Application | Heat Pump 2 Heat / 1 Cool Programmable |
| Factory Part Number | RTH725 |
| Dimensions (D x W x H) | 1.02"D x 5"W x 3.82"H (26 x 127 x 97 mm) |
| Mounting Type | Wall or junction box |
| Temperature Range | 44°F to 90°F (7°C to 32°C) |
| Backlight Color | White / Blue / Green |
| Power Source | 24V AC (18 to 30V AC), 50/60 Hz for hardwire common wire or 2 AA 1.5V alkaline batteries (Not Included) |
| Terminals | R, C, W, W2, Y, G, B, O |
| Controller Type | Push Button |
| Connectivity Technology | Wired |
| Material | Plastic |
| Item Weight | 6.4 ounces |
Figure 8: Thermostat dimensions and parameter summary.
Warranty and Support
The Coiiwsei RTH725 thermostat is manufactured with over 20 years of experience, ensuring reliability. For any questions or assistance, customer service is available 24 hours a day, 7 days a week.
Please refer to your purchase documentation for specific warranty terms and contact information.