1. Introduction
This manual provides comprehensive instructions for the setup, operation, maintenance, and troubleshooting of your ZWXYVUT Pandora Saga DX Plus arcade PCB. This system is designed to deliver a classic arcade gaming experience with a vast library of pre-installed games.
2. Package Contents
Please verify that all items listed below are included in your package:
- 1 x Pandora Saga DX Plus Arcade PCB
- 1 x Power Adapter
- 1 x HDMI Cable
- 1 x VGA Cable
- 1 x USB Cable
- 2 x Detachable Joysticks (with replaceable keycaps)
- 1 x User's Guide (this manual)

Figure 2.1: Pandora Saga DX Plus Arcade PCB, top view.
3. Setup Instructions
Follow these steps to set up your Pandora Saga DX Plus arcade PCB:
- Unboxing and Inspection: Carefully remove all components from the packaging. Inspect for any visible damage.
- Connect Joysticks: Attach the detachable joysticks to the designated slots on the control panel. Ensure they are securely fastened.
- Connect Video Output:
- For high-definition display, connect one end of the provided HDMI cable to the HDMI port on the PCB and the other end to your TV or monitor.
- Alternatively, for VGA compatible displays, use the provided VGA cable to connect the PCB to your display.
- Connect Audio Output: If your display does not have integrated speakers or you prefer external audio, connect external speakers to the audio output port on the PCB.
- Connect Power: Connect the power adapter to the 12V DC input port on the PCB, then plug the adapter into a power outlet.
- Power On: Locate the power switch on the PCB and turn it to the "ON" position. The control panel buttons should illuminate.
- Select Input on Display: Switch your TV or monitor to the corresponding HDMI or VGA input channel to view the game menu.
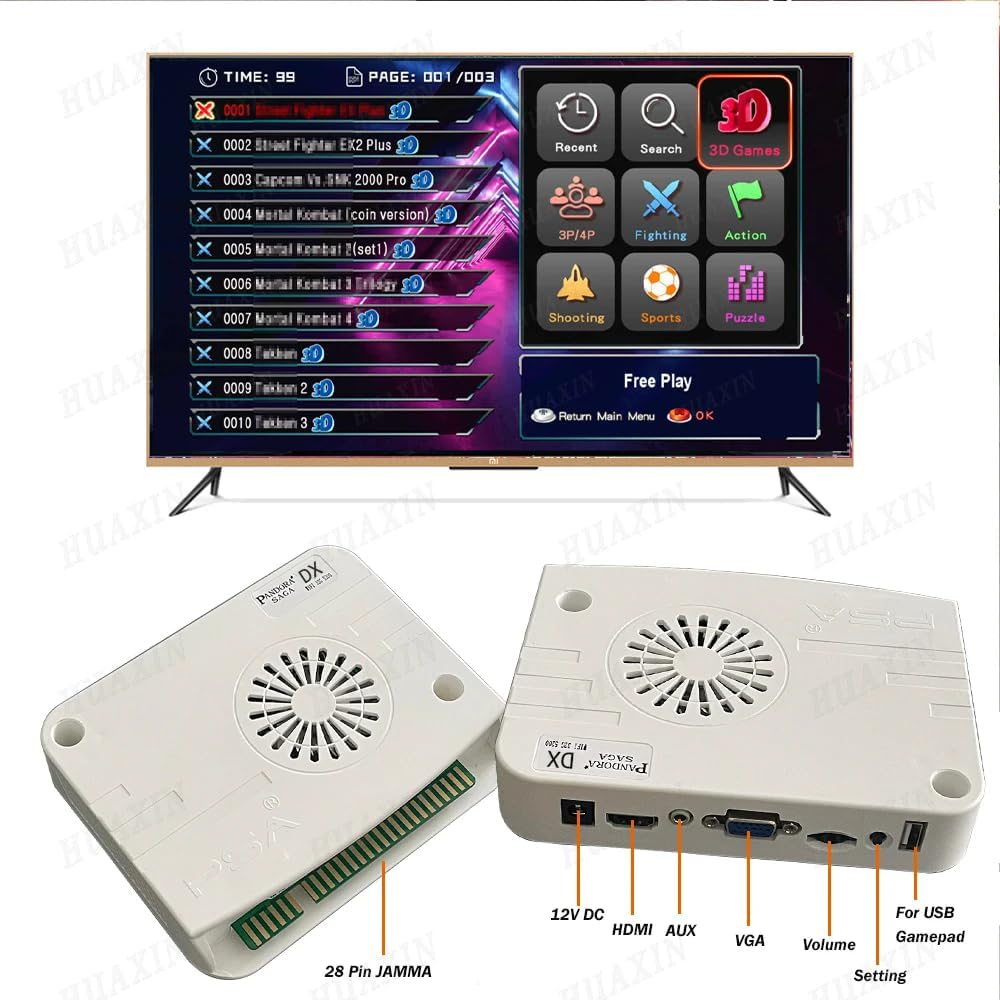
Figure 3.1: Control panel with joysticks and buttons. The joysticks are detachable for customization or replacement.
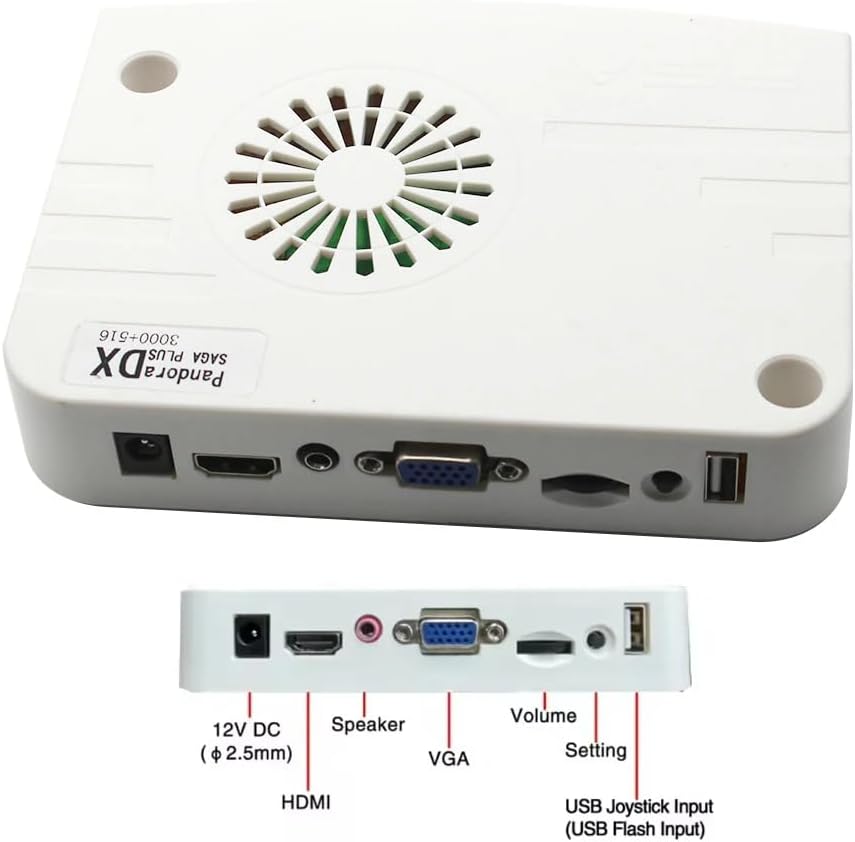
Figure 3.2: Rear view of the PCB showing 12V DC, HDMI, Speaker, VGA, Volume, Setting, USB Joystick Input ports, and Power On/Off switch.
Video 3.1: Demonstrates the unboxing and initial connection steps for an arcade system, including power and video cables.
4. Operating Instructions
Once the system is powered on and connected to your display, you can navigate the game menu and start playing.
4.1. Game Selection
- Use the joysticks to navigate through the game list.
- Press the 'A' button (or equivalent action button) to select a game.
- The system features 3000 horizontal and 516 vertical games.

Figure 4.1: Example of the game selection menu, categorized by game type.
4.2. Switching Display Modes
- To switch between Horizontal and Vertical display modes, press the Player 1-B buttons simultaneously. This is useful for optimizing the display for different game types.
4.3. In-Game Functions
- Pause/Exit: Specific buttons on the control panel allow you to pause a game or exit back to the main menu. Refer to the control panel layout for exact button assignments.
- Favorite Game List: You can add games to a 'Favorite' list for quick access.
- Recent Games: The system tracks recently played games for easy resumption.
- Hide Games: Option to hide specific games from the main list.
4.4. External Controllers and Multiplayer
- The PCB supports external USB controllers, allowing for expanded control options.
- Multiplayer games are supported for up to 4 players, depending on the game.
5. Specifications
| Model | Pandora Saga DX Plus |
|---|---|
| Manufacturer | ZWXYVUT |
| Game Count | 3000 Horizontal + 516 Vertical Games |
| Resolution | HD 1280x720P (via HDMI/VGA) |
| Output Ports | HDMI, VGA, USB, 12V DC, Speaker Out |
| Material | Plastic |
| Product Dimensions | 1 x 1 x 1 inches (PCB dimensions) |
| Recommended Age | 12 years and up |

Figure 5.1: Internal view of the PCB highlighting the CPU cooling mechanism.
6. Maintenance
Proper maintenance ensures the longevity and optimal performance of your arcade PCB.
- Cleaning: Use a soft, dry cloth to wipe down the control panel and PCB surface. Avoid abrasive cleaners or solvents.
- Storage: When not in use for extended periods, store the PCB in a cool, dry place away from direct sunlight and extreme temperatures.
- Dust Prevention: Keep the PCB free from dust accumulation, especially around the fan and ventilation areas, to prevent overheating.
7. Troubleshooting
If you encounter issues, refer to the following common troubleshooting steps:
| Problem | Possible Cause | Solution |
|---|---|---|
| No power | Power cable not connected, power switch off, faulty adapter. | Ensure power cable is securely connected and power switch is ON. Test with a different power outlet. |
| No video output | Incorrect HDMI/VGA connection, wrong input selected on TV. | Verify video cables are securely connected. Select the correct input source on your TV/monitor. |
| No audio | Volume too low, external speakers not connected/powered. | Adjust the volume knob on the PCB. Ensure external speakers are connected and powered on. |
| Joystick/buttons unresponsive | Loose connection, faulty component. | Check joystick connections. If issue persists, contact customer support. |
8. Warranty and Support
For warranty information or technical support, please refer to the contact details provided by ZWXYVUT at the point of purchase. Keep your purchase receipt as proof of purchase for warranty claims.
Additional protection plans may be available for purchase. Please check with your retailer for details.